In this article, we will show you how to install ISPConfig 3 on a CentOS 7 VPS, as well as go through the initial configuration.
ISPConfig is an open-source hosting control panel for Linux which has a user-friendly web interface – with it, users can manage their websites, email addresses, FTP accounts, DNS records, databases, and shell accounts.
 The ISPConfig has four different levels of user access, which are as follows: Administrator, Reseller, Client, and Email-user. Each of these has varying levels of access to ISPConfig’s menus.
Table of Contents
Prerequisites
- A Server running CentOS 7
- Access to the root user, or access to a user with sudo privileges.
Step 1: Connect to your server
Before we begin, you need to connect to your server via SSH as the root user, or as a user with sudo privileges. To do this, use the following command:
ssh root@IP_address -p Port_number
Of course, you will need to replace IP_address and Port_number with your actual server IP address and SSH port number.
Once you are logged in to the server, you can type the following commands to update all of your currently installed packages to their latest available versions. After that, you’ll enable the required packages for the ISPConfig by installing the “Development Tools” bundle:
yum install yum-priorities
yum update
yum groupinstall 'Development Tools'
Enable the EPEL repository if it is not already done so:
yum install epel-release
Install the following packages:
yum install NetworkManager-tui awstats bzip2 getmail quota mailman nano net-tools openssl perl-DateTime-Format-Builder perl-DateTime-Format-HTTP postgrey re2c rkhunter unzip yum-utils webalizer wget
rpm -Uvh ftp://ftp.pbone.net/mirror/rpmfusion.org/nonfree/el/updates/7/x86_64/u/unrar-5.4.5-1.el7.x86_64.rpm
Restart the server for the changes to take effect.
Step 2: Install LAMP Stack
Once the system is up to date, we can continue installing the LAMP stack with Apache, MariaDB, PHP, NTP, and phpMyAdmin:
cd opt/
wget http://rpms.remirepo.net/enterprise/remi-release-7.rpm
rpm -Uvh remi-release-7.rpm
yum-config-manager --enable remi-php72
yum install ntp httpd mod_ssl mariadb-server php php-mysql php-mbstring phpmyadmin
In order to log in to phpMyAdmin from any IP address, edit the phpMyAdmin configuration file (/etc/httpd/conf.d/phpMyAdmin.conf) and remove the following lines:
<RequireAny>
Require ip 127.0.0.1
Require ip ::1
</RequireAny>
Also, edit the /etc/phpMyAdmin/config.inc.php file and change the authentication, i.e replace:
$cfg['Servers'][$i]['auth_type'] = 'cookie';
with:
$cfg['Servers'][$i]['auth_type'] = 'http';
Edit the /etc/httpd/conf.d/awstats.conf Awstats configuration file and replace ‘Require local’ to ‘Require all granted’.
Restart the Apache service for the changes to take effect:
service httpd restart
After the LAMP stack has been successfully installed on your server, you can use the commands below to start and enable the MariaDB service on the server.
systemctl start mariadb.service
systemctl enable mariadb.service
The next command is optional but recommended by us. You can run this command if you want to secure your MariaDB server by disallowing remote root access, removing the test database, and creating a root password.
mysql_secure_installation
When prompted, answer the questions below by following the guide.
Enter current password for root (enter for none): Press the [Enter] key - we do not have a password currently set.
Set root password? [Y/n]: Y
New password: Enter your password
Re-enter new password: Repeat your password
Remove anonymous users? [Y/n]: Y
Disallow root login remotely? [Y/n]: Y
Remove test database and access to it? [Y/n]: Y
Reload privilege tables now? [Y/n]: Y
Restart the MariaDB server so that the changes take effect.
Step 3: Install Dovecot
You can execute the following command to install Dovecot on your server:
yum -y install dovecot dovecot-mysql dovecot-pigeonhole
When the installation is complete, create a dovecot-sql.conf file using the command below, after which you’ll make a symbolic link pointing back to the file you just created:
touch /etc/dovecot/dovecot-sql.conf
ln -s /etc/dovecot/dovecot-sql.conf /etc/dovecot-sql.conf
Now use the following commands to restart and enable the Dovecot service on the server.
systemctl restart dovecot.service
systemctl enable dovecot.service
Step 4: Install Amavisd-new, ClamAV, and SpamAssassin
By using the next command you will install ClamAV, Amavisd, and SpamAssassin, along with all of these additionally required packages, all in one go.
yum -y install amavisd-new spamassassin clamav clamd clamav-data clamav-devel clamav-update perl-DBD-mysql
Step 5: Install PHP and Apache2 Modules
In this step, we will install some required Apache and PHP modules, such as mod_php, mod_fcgid, php-mysql, and so on. To proceed with the installation of the modules, use the command below:
yum -y install php-ldap php-mysql php-odbc php-pear php php-devel php-gd php-imap php-xml php-xmlrpc php-pecl-apc php-mbstring php-mcrypt php-mssql php-snmp php-soap php-tidy curl curl-devel mod_fcgid php-cli httpd-devel php-fpm perl-libwww-perl ImageMagick libxml2 libxml2-devel python-devel
Step 6: Install PureFTPd
The most popular method for transferring files from one server to another or from one place to other is through the FTP protocol. In order to use this protocol, you’ll need to install an FTP server first. We will install PureFTP server because it is simple to install and easy-to-use. To install it on your server you only need to execute the following command:
yum -y install pure-ftpd
Step 7: Install BIND
BIND, or named, is one of the most commonly used Domain Name System software packages available on the Internet. In order for ISPConfig to be able to manage and configure the DNS settings, you need to install the following packages on the server:
yum -y install bind bind-utils
Edit the /etc/named.conf file, remove all the lines and add the following lines:
options {
        listen-on port 53 { any; };
        directory       "/var/named";
        dump-file       "/var/named/data/cache_dump.db";
        statistics-file "/var/named/data/named_stats.txt";
        memstatistics-file "/var/named/data/named_mem_stats.txt";
        allow-query     { any; };
				allow-recursion {"none";};
        recursion no;
};
logging {
        channel default_debug {
                file "data/named.run";
                severity dynamic;
        };
};
zone "." IN {
        type hint;
        file "named.ca";
};
include "/etc/named.conf.local";
Create a new ‘named.conf.local’ file in the /etc directory on your server:
touch /etc/named.conf.local
Restart the named service for the changes to take effect:
service named restart
Step 8: Install Let’s encrypt
We can easily add support for Let’s Encrypt in Apache using:
yum -y install certbot-apache
Add a cronjob so the Let’s Encrypt SSL certificates can be renewed automatically:
* 4 * * * /usr/bin/certbot renew >/dev/null 2>&1
Step 9: Install fail2ban
Stop and disable the firewalld service:
systemctl stop firewalld.service
systemctl disable firewalld.service
Then, install fail2ban:
yum install iptables-services fail2ban fail2ban-systemd
Step 10: Install ISPConfig
After we finish all previous steps, it’s time to download and install ISPConfing 3 on the server. We will use the wget command to make a copy of the official web link on the ISPConfig website. To change the directory to /opt/ and download the ISPConfig packages, run the next two commands:
cd /opt/
wget http://www.ispconfig.org/downloads/ISPConfig-3-stable.tar.gz
Once the package has been downloaded, we’ll need to unpack it in order to use it. Unpack it with the command:
tar -zxvf ISPConfig-3-stable.tar.gz
Then use the following command to change the directory where the install script is placed.
cd ispconfig3_install/install/
To start the installation, you need to run this command:
php -q install.php
Output:
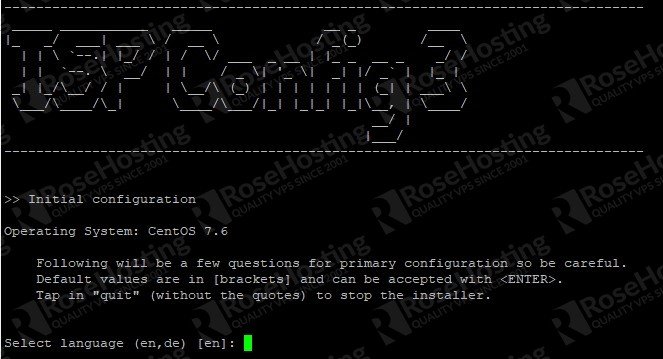
The installation instructions are self-explanatory, with each prompt describing exactly what sort of input ISPConfig expects. Once the setup is complete, you can continue to the next step.
Step 11: ISPConfig Login
Since the installation is completed, you should be able to access the ISPConfig control panel on your web browser. Open your preferred web browser and type your server’s IP address with the default configured port for ISPConfig, as shown below.
https://server_IP_address:8080/
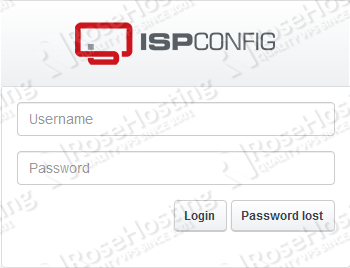
Enter the login credentials so that you can log in.
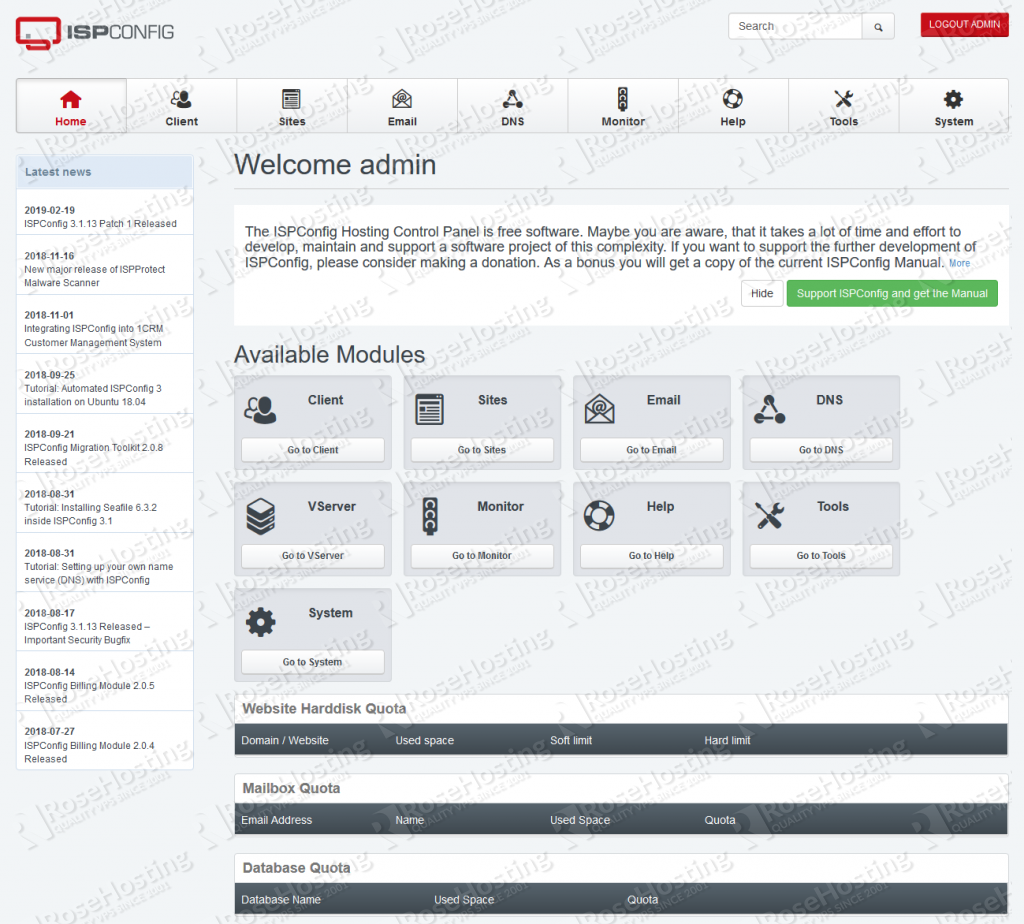
Upon login on the ISPConfig panel, you will see the panel dashboard, as shown in the image below.
In this article, we showed you how to install LAMP, Dovecot, Amavisd-new, ClamAV, SpamAssassin, PureFTPd, BIND, and of course, ISPConfig. Now you can continue exploring this open source control panel and check the possibilities that it offers.
 Of course, if you are one of our Managed CentOS Hosting customers, you don’t have to install ISPConfig 3 on your CentOS 7 VPS – simply ask our admins, sit back, and relax. Our admins will install and configure ISPConfig 3 on CentOS 7 for you immediately. You can also use one of our Managed ISPConfig Hosting plans, where ISPConfig comes pre-installed and set up out-of-the-box, ready to be used.
PS. If you liked this post about how to install ISPConfig 3 on a CentOS 7 VPS, please share it with your friends on the social networks using the share buttons below, or simply leave a comment in the comments section. Thanks.
Do you need to install Postfix for a mail server? Is it pre-installed? Or will ISPConfig work with Sendmail?
The mail server is not pre-installed. You can install any mail server and use it with ISPConfig 3. However, configuring Postfix is easy and most compatible with the ISPConfig 3 panel.
Configuring DBServer
Installing ISPConfig crontab
Installing ISPConfig crontab
no crontab for root
Detect IP addresses
Restarting services …
Job for dovecot.service failed because the control process exited with error cod e. See “systemctl status dovecot.service” and “journalctl -xe” for details.
Job for httpd.service failed because the control process exited with error code. See “systemctl status httpd.service” and “journalctl -xe” for details.
PHP Warning: date(): It is not safe to rely on the system’s timezone settings. You are *required* to use the date.timezone setting or the date_default_timezone _set() function. In case you used any of those methods and you are still getting this warning, you most likely misspelled the timezone identifier. We selected t he timezone ‘UTC’ for now, but please set date.timezone to select your timezone. in /opt/ispconfig3_install/install/install.php on line 628
Installation completed.
You should be able to fix this warning by defining a default timezone in your php.ini file.
As an example, you can do this by adding the following line:
date.timezone = America/New_YorkDon’t forget to restart your Apache web server after this change.
Why did you allow phpMyAdmin access for all IPs?
Doesn’t this endanger database security?
If you want to allow access only from specific IPs, you can simply add them to the configuration. For example if you want to allow access only from IP (1.2.3.4) you can set the following in
/etc/httpd/conf.d/phpMyAdmin.conf:Require ip 1.2.3.4
Require ip 127.0.0.1
Require ip ::1
my installation is complete.
why i can’t access my ispconfig : https://xx.xxxx.xxx.xxx:8080
Please check if port 8080 is actually listening on your server?
I follow all steps when I execute the command php -q install.php, ispconfig configuration didn’t complete :
https://mydomain.com/ispconfig.png======================================
> Initial configuration
Operating System: CentOS 7.9
sh: which: command not found
ISPConfig requires which
Install which using this command: yum install which
i trying several time but not working,
Can any one help me
What exactly are the issues you are encountering in installing ISPConfig 3 on Centos 7?
Installation completed. But still cannot access to http://myip:8080. And yes, the port is open. I also tried with another open port (8000), still don’t work. Help please.