
We’ll show you, How to install Zabbix on Ubuntu. Zabbix is the ultimate enterprise-level software designed for real-time monitoring of millions of metrics collected from tens of thousands of servers, virtual machines and network devices. It uses MySQL, PostgreSQL, SQLite, Oracle or IBM DB2 to store data.
Its backend is written in C and the web frontend is written in PHP. Zabbix offers several monitoring options such as checks that can verify the availability and responsiveness of standard services such as SMTP or HTTP without installing any software on the monitored host. Installing Zabbix on Ubuntu, is fairly easy task and should not take more then 15 minutes.
A Zabbix agent can also be installed on UNIX and Windows hosts to monitor statistics such as CPU load, network utilization, disk space, etc.
Zabbix’s client-server model allows a server to collect rich sets of data that are useful for monitoring the performance of the websites, service, applications etc.. hosted on a server.
This article covers the steps needed for installing Zabbix on an Ubuntu VPS.
Table of Contents
1. Requirements
We will be using our SSD 1 Linux VPS hosting plan for this tutorial.
2. Update the System
Make sure your server is fully up to date using:
# apt-get update && apt-get upgrade
3. Instal Zabbix configuration package Ubuntu
First step for you is to install the Zabbix repository configuration package for Ubuntu 14.04 that contains the apt configuration files. Run the following commands:
# wget http://repo.zabbix.com/zabbix/2.4/ubuntu/pool/main/z/zabbix-release/zabbix-release_2.4-1+trusty_all.deb

# dpkg -i zabbix-release_2.4-1+trusty_all.deb
4. Install Zabbix on Ubuntu
Update and install Zabbix:
# apt-get update

# apt-get install zabbix-server-mysql zabbix-frontend-php php5-mysql
Once the installation starts you will be welcomed by the following window:

The installation will ask you whether you want the database for zabbix-server-mysql to be configured with dbconfig-common. Choose yes to avoid creating a database and modifying the Zabbix config files manually.
Then, you will be asked to enter the database administrative user password as shown in the image below:

You should enter your MySQL root password and press Enter.
The following window will ask you to provide a MySQL password for the database that will be created for the Zabbix installation. Enter a password of your choosing, but make it to be a strong one (combination of letters and numbers and minimum 8 characters long).
Once you enter the password, press Enter. Confirm the password in the next window and press Enter again.
The Zabbix installation will proceed and finish.
5. Modify PHP Settings
However, nothing is finished yet. We need to modify some PHP settings so the web installation of Zabbix can be completed. Edit your server php.ini file:
# vim /etc/php5/apache2/php.ini
Locate the following lines and adjust the values as the ones below:
post_max_size = 16M
max_execution_time = 300
max_input_time = 300
date.timezone = "your timezone"
6. Restart Apache Web Server
Save and close the file. Restart Apache so the changes can take effect:
# /etc/init.d/apache2 restart
7. configure Apache Web Server
Now, you need to copy the example Apache config to the /etc/apache2/conf-available/ directory so Apache and Zabbix can work together:
# cp /etc/zabbix/apache.conf /etc/apache2/conf-available/zabbix.conf
Enable the config:
# a2enconf zabbix.conf
Make sure that the alias mod is enabled:
# a2enmod alias
Restart Apache:
# /etc/init.d/apache2 restart
8. Start Zabbix
Start the Zabbix server:
# service zabbix-server start
Now, open your favorite web browser and navigate to http://your_server_IP/zabbix to complete the Zabbix installation.
You will be welcomed by the installation page
Click on next. In the following window, you should have all the pre-requisites listet as OK as shown in the image below.
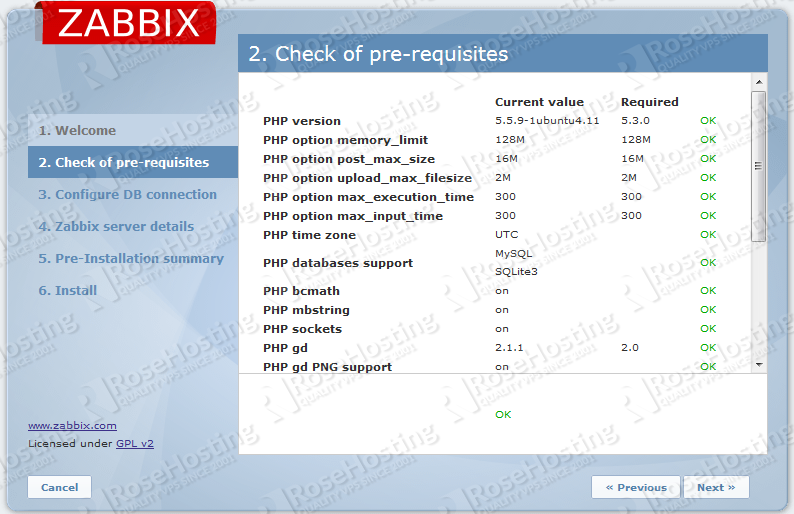
Of course, you need to meet the required settings to proceed with the installation. If everything is OK, click Next.
Configure your database connection and enter the database credentials so you can test the database connection. The username and database name is zabbix, the password is the one you entered previosly during the command line installation of Zabbix. Test the database connection and if everything is OK click on Next. Once you finish the installation you will get the login page.
The default username and password for the Zabbix Dashboard are:
username: admin

password: zabbix
Once you log in, change the password immediately.
That is it. You have successfully installed Zabbix on your server. For more information on Zabbix in general or configuring an Zabbix agent/s on one or multiple machines, please visit their official documentation.
Of course you don’t have to install Zabbix on Ubuntu, if you use one of our Ubuntu VPS Hosting services, in which case you can simply ask our expert Linux admins to install Zabbix on Ubuntu, for you. They are available 24×7 and will take care of your Zabbix installation immediately.
PS. If you liked this post, on how to install Zabbix on Ubuntu, please share it with your friends on the social networks using the buttons on the left or simply leave a reply below. Thanks.