
We’ll show you, how to set up MySQL Cluster on Ubuntu. The MySQL NDB Cluster integrates the standard MySQL server with an in-memory clustered storage engine called NDB (Network DataBase). We will use a total of 4 virtual servers, one for the management, one SQL node and two data nodes:
- 172.16.1.1 – management VPS
- 172.16.1.2 – SQL VPS
- 172.16.1.3 – data1 VPS
- 172.16.1.4 – data2 VPS
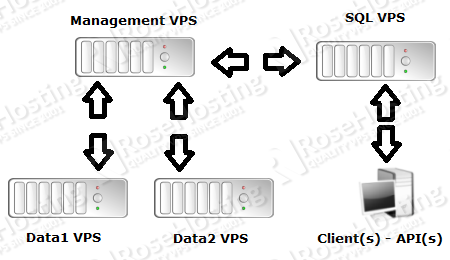
Table of Contents
1. Install and Configure MySQL Cluster on the Management VPS
Download the latest version of MySQL Cluster to a directory of your virtual server and extract it using the following commands:
cd /opt/
wget http://dev.mysql.com/get/Downloads/MySQL-Cluster-7.5/mysql-cluster-gpl-7.5.4-linux-glibc2.5-x86_64.tar.gz -O mysql-cluster.tar.gz
tar -xvzf mysql-cluster.tar.gz -C /opt/
mv mysql-cluster-* mysql
Run the following commands:
cd /opt/mysql/
cp bin/ndb_mgm* /usr/local/bin/
chmod 755 /usr/local/bin/ndb_mgm*
Create a directory named ‘mysql-cluster’
mkdir -p /var/lib/mysql-cluster/
Then, create a new configuration named ‘config.ini’:
vi /var/lib/mysql-cluster/config.ini
add the following lines to it:
[ndbd default]
NoOfReplicas=2
# Memory to allocate for data storage
DataMemory=2G
# Memory to allocate for index storage
IndexMemory=512M

[mysqld default]

[ndb_mgmd default]

[tcp default]

# Management VPS
[ndb_mgmd]
# Enter the hostname or IP address of the Management VPS
hostname=172.16.1.1

# SQL VPS
[mysqld]
# Enter the hostname or IP address of the SQL VPS
hostname=172.16.1.2

# Data1 VPS
[ndbd]
# Enter the hostname or IP address of the Data1 VPS
hostname=172.16.1.3
DataDir= /var/lib/mysql-cluster

# Data2 VPS
[ndbd]
# Enter the hostname or IP address of the Data2 VPS
hostname=172.16.1.4
DataDir=/var/lib/mysql-cluster
Do not forget to change the hostnames/IP addresses according to your actual server hostnames/IP addresses.
2. Install and Configure MySQL Cluster on the SQL VPS
Check if there are MySQL packages already installed:
dpkg -l | grep mysql

rc  libmysqlclient18:amd64               5.5.49-0ubuntu0.14.04.1                  amd64        MySQL database client library
ii  mysql-client                         5.7.16-0ubuntu0.16.04.1                  all          MySQL database client (metapackage depending on the latest version)
ii  mysql-client-5.7                     5.7.16-0ubuntu0.16.04.1                  amd64        MySQL database client binaries
ii  mysql-client-core-5.7                5.7.16-0ubuntu0.16.04.1                  amd64        MySQL database core client binaries
ii  mysql-common                         5.7.16-0ubuntu0.16.04.1                  all          MySQL database common files, e.g. /etc/mysql/my.cnf
ii  mysql-server                         5.7.16-0ubuntu0.16.04.1                  all          MySQL database server (metapackage depending on the latest version)
rc  mysql-server-5.5                     5.5.49-0ubuntu0.14.04.1                  amd64        MySQL database server binaries and system database setup
ii  mysql-server-5.7                     5.7.13-0ubuntu0.16.04.2                  amd64        MySQL database server binaries and system database setup
ii  mysql-server-core-5.7                5.7.13-0ubuntu0.16.04.2                  amd64        MySQL database server binaries
Remove these packages and their configurations using:
apt-get purge mysql-c* mysql-s*
Or, remove packages and configuration files listed by the ‘dpkg -l | grep mysql’ command above using:
apt-get purge mysql-client mysql-client-5.7 mysql-client-core-5.7 mysql-common mysql-server mysql-server-5.5 mysql-server-5.7 mysql-server-core-5.7 libmysqlclient18
Download the latest version of MySQL Cluster available at ‘http://dev.mysql.com/downloads/cluster/’ to the opt directory of your virtual server and extract it using the following commands:
cd /opt/
wget http://dev.mysql.com/get/Downloads/MySQL-Cluster-7.5/mysql-cluster-gpl-7.5.4-linux-glibc2.5-x86_64.tar.gz -O mysql-cluster.tar.gz
tar -xvzf mysql-cluster.tar.gz -C /opt/
Run the following commands:
mv mysql-cluster-* mysql
mv mysql /usr/local/
cd /usr/local/mysql/
mv bin/* /usr/local/bin/
rm -rf bin/
ln -s /usr/local/bin /usr/local/mysql/
cp support-files/mysql.server /etc/init.d/mysql
systemctl enable mysql
mysqld --initialize
chown -R root:mysql /usr/local/mysql/
chown -R mysql /usr/local/mysql/data/
Edit the MySQL configuration file (/etc/my.cnf):
vi /etc/my.cnf
add the following lines:
[mysqld]
datadir=/usr/local/mysql/data
socket=/tmp/mysql.sock
user=mysql

ndbcluster
ndb-connectstring=172.16.1.1

[mysql_cluster]

ndb-connectstring=172.16.1.1

[mysqld_safe]
log-error=/var/log/mysqld.log
pid-file=/var/run/mysqld/mysqld.pid
Log in to the management VPS via SSH and run the following command:
ndb_mgmd -f /var/lib/mysql-cluster/config.ini --configdir=/var/lib/mysql-cluster/
In order to configure ndb_mgmd to start on boot, add the following command to ‘/etc/rc.local’:
vi /etc/rc.local
and add:
ndb_mgmd -f /var/lib/mysql-cluster/config.ini --configdir=/var/lib/mysql-cluster/
before the ‘exit 0’ line and save the file.
Start the MySQL service on the SQL VPS:
service mysql start
In order to improve the security of your MySQL installation, run:
/usr/local/mysql/bin/mysql_secure_installation
3. Install and Configure MySQL Cluster on the Data VPSes
Check if there are MySQL packages already installed using:
dpkg -l | grep mysql
Remove them, including the configuration files:
apt-get purge mysql-client mysql-client-5.7 mysql-client-core-5.7 mysql-common mysql-server mysql-server-5.5 mysql-server-5.7 mysql-server-core-5.7 libmysqlclient18
Download and extract the latest version of MySQL Cluster to the opt directory on the data1 VPS:
cd /opt/
wget http://dev.mysql.com/get/Downloads/MySQL-Cluster-7.5/mysql-cluster-gpl-7.5.4-linux-glibc2.5-x86_64.tar.gz -O mysql-cluster.tar.gz
tar -xvzf mysql-cluster.tar.gz -C /opt/
Run the following commands:
mv mysql-cluster-* mysql
mv mysql /usr/local/
chown -R root:mysql /usr/local/mysql/
cd /usr/local/mysql/
mv bin/* /usr/local/bin/
rm -rf bin/
ln -s /usr/local/bin /usr/local/mysql/
Edit the MySQL configuration file:
vi /etc/my.cnf
add the following lines:
[mysqld]
datadir=/usr/local/mysql/data
socket=/tmp/mysql.sock
user=mysql

ndbcluster
ndb-connectstring=172.16.1.1

[mysql_cluster]

ndb-connectstring=172.16.1.1

[mysqld_safe]
log-error=/var/log/mysqld.log
pid-file=/var/run/mysqld/mysqld.pid
Run the following commands:
mkdir /var/lib/mysql-cluster
chown -R mysql /var/lib/mysql-cluster
cd /var/lib/mysql-cluster
ndbd --initial
echo "ndbd" > /etc/init.d/ndbd
chmod 755 /etc/init.d/ndbd
Repeat the same procedure on the Data2 VPS.
In order to check the MySQL cluster status, run the following command on the management VPS:
ndb_mgm -e show
The output should look like this:
Connected to Management Server at: localhost:1186
Cluster Configuration
---------------------
[ndbd(NDB)]     2 node(s)
id=3    @172.16.1.3  (mysql-5.7.16 ndb-7.5.4, Nodegroup: 0, *)
id=4    @172.16.1.4  (mysql-5.7.16 ndb-7.5.4, Nodegroup: 0)

[ndb_mgmd(MGM)] 1 node(s)
id=1    @172.16.1.1  (mysql-5.7.16 ndb-7.5.4)

[mysqld(API)]   1 node(s)
id=2    @172.16.1.2  (mysql-5.7.16 ndb-7.5.4)
That is it. The setup of the MySQL cluster is now complete.
Of course, you don’t have to set up MySQL Cluster on Ubuntu, if you use one of our MySQL VPS Hosting services, in which case you can simply ask our expert Linux admins to set up MySQL Cluster for you. They are available 24×7 and will take care of your request immediately. For more updates, you can read MariaDB/MySQL Auto-Сlustering with Load Balancing and Replication for High Availability and Performance.
PS. If you liked this post on how to set up MySQL Cluster on Ubuntu, please share it with your friends on the social networks using the buttons on the left or simply leave a reply below. Thanks.
Hi, excellent information.
I have done all the steps however when I was able to connect my BD cluster, in a reboot of my computer
At the time of re-uploading and connecting from mysql to browse my DB, it no longer reads the tables in the cluster.
Reviewing my log I find this
2016-12-14 12:22:13 25824 [Note] NDB Util: Starting…
2016-12-14 12:22:13 25824 [Note] NDB Util: Wait for server start completed
2016-12-14 12:22:13 25824 [Note] NDB Binlog: Wait for cluster to start
2016-12-14 12:22:13 25824 [Note] NDB Binlog: DISCOVER TABLE Event: REPL$mysql/ndb_schema
2016-12-14 12:22:13 25824 [Note] NDB Binlog: logging ./mysql/ndb_schema (UPDATED,USE_WRITE)
2016-12-14 12:22:13 25824 [Note] NDB Binlog: DISCOVER TABLE Event: REPL$mysql/ndb_apply_status
2016-12-14 12:22:13 25824 [Note] NDB Binlog: logging ./mysql/ndb_apply_status (UPDATED,USE_WRITE)
2016-12-14 12:22:13 25824 [Note] NDB: Cleaning stray tables from database ‘MEIFONDOS’
2016-12-14 12:22:13 25824 [Note] NDB: Cleaning stray tables from database ‘ndbinfo’
2016-12-14 12:22:13 25824 [Note] NDB: Cleaning stray tables from database ‘performance_schema’
2016-12-14 12:22:13 25824 [Note] NDB Binlog: DISCOVER TABLE Event: REPL$mysql/ndb_index_stat_head
2016-12-14 12:22:13 25824 [Note] NDB Binlog: logging ./mysql/ndb_index_stat_head (UPDATED,USE_WRITE)
2016-12-14 12:22:13 25824 [Note] NDB Binlog: DISCOVER TABLE Event: REPL$mysql/ndb_index_stat_sample
2016-12-14 12:22:13 25824 [Note] NDB Binlog: logging ./mysql/ndb_index_stat_sample (UPDATED,USE_WRITE)
2016-12-14 12:22:13 25824 [Note] NDB Binlog: Wait for first event
2016-12-14 12:22:13 [NdbApi] INFO — Flushing incomplete GCI:s < 38789/4
2016-12-14 12:22:13 [NdbApi] INFO — Flushing incomplete GCI:s show
Connected to Management Server at: localhost:1186
Cluster Configuration
———————
[ndbd(NDB)] 2 node(s)
id=2 @11.300.0.6 (mysql-5.6.31 ndb-7.4.12, Nodegroup: 0, *)
id=3 @11.300.0.7 (mysql-5.6.31 ndb-7.4.12, Nodegroup: 0)
[ndb_mgmd(MGM)] 1 node(s)
id=1 @11.300.0.4 (mysql-5.6.31 ndb-7.4.12)
[mysqld(API)] 1 node(s)
id=4 @11.300.0.8 (mysql-5.6.31 ndb-7.4.12)
You will have some idea of what you can be friends with.
Greetings.
Can you please be more specific about your problem?