

Gitea is a simple, lightweight, and self-hosted Git platform written in Go. It is a fork of Gogs and very similar to GitLab. Compared to GitLab, Gitea is extra easy, light-weight, and straightforward to configure. It can be installed on all major operating systems including, Windows, macOS, Linux, and ARM. With Gitea, you can track time, issues, repository branching, file locking, merging, and many more.
In this tutorial, we will show you how to install Gitea with Nginx as a reverse proxy on an Ubuntu 20.04 VPS.
Table of Contents
Prerequisites
- An Ubuntu 20.04 VPS (we’ll be using our SSD 2 VPS plan)
- Access to the root user account (or access to an admin account with root privileges)
Step 1: Log in to the Server & Update the Server OS Packages
First, log in to your Ubuntu 20.04 server via SSH as the root user:
ssh root@IP_Address -p Port_number
You will need to replace ‘IP_Address’ and ‘Port_number’ with your server’s respective IP address and SSH port number. Additionally, replace ‘root’ with the username of the admin account if necessary.
Before starting, you have to make sure that all Ubuntu OS packages installed on the server are up to date. You can do this by running the following commands:
apt-get update -y
apt-get upgrade -y
Step 2: Install Required Dependencies
Before going further, you will need to install some necessary packages on your server. You can install all of them with the following command:
apt-get install git unzip gnupg2 -y
After installing these packages, you can proceed and install the MariaDB server package.
Step 3: Install and Configure MariaDB
Gitea uses MariaDB as a database backend so MariaDB must be installed on your server. You can install it with the following command:
apt-get install mariadb-server -y
Once MariaDB is installed, connect to the MariaDB shell with the following command:
mysql
Once connected, enable the Innodb table using the following command:
MariaDB [(none)]>SET GLOBAL innodb_file_per_table = ON;
Next, create a database and use for Gitea with the following command:
MariaDB [(none)]>CREATE DATABASE gitea;
MariaDB [(none)]>CREATE USER 'gitea'@'localhost' IDENTIFIED BY 'securepassword';
Next, grant all the privileges to gitea database and set character set to utf8mb4:
MariaDB [(none)]>GRANT ALL ON gitea.* TO 'gitea'@'localhost' IDENTIFIED BY 'securepassword' WITH GRANT OPTION;
MariaDB [(none)]>ALTER DATABASE gitea CHARACTER SET = utf8mb4 COLLATE utf8mb4_unicode_ci;
Next, flush the privileges an exit from the MariaDB with the following command:
MariaDB [(none)]>FLUSH PRIVILEGES;
MariaDB [(none)]>EXIT;
Next, edit the MariaDB default configuration file and tweak some settings:
nano /etc/mysql/mariadb.conf.d/50-server.cnf
Add the following lines inside [mysqld] section:
innodb_file_format = Barracuda
innodb_large_prefix = 1
innodb_default_row_format = dynamic
Save the file then restart the MariaDB service to apply the changes:
systemctl restart mariadb
Step 4: Install Gitea
Before downloading and installing Gitea, you will need to create a separate user to run Gitea. You can create a new user with the following command:
adduser --system --group --disabled-password --shell /bin/bash --home /home/git --gecos 'Git Version Control' git
After creating a new user, download the latest version of Gitea using the following command:
wget https://dl.gitea.io/gitea/1.13.1/gitea-1.13.1-linux-amd64
Once downloaded, copy the downloaded binary to the system path with the following command:
cp gitea-1.13.1-linux-amd64 /usr/bin/gitea
Next, set the execution permission to the gitea binary:
chmod 755 /usr/bin/gitea
Next, you will need to create a directory structure to store Gitea data and logs. You can create them with the following command:
mkdir -p /etc/gitea /var/lib/gitea/{custom,data,indexers,public,log}
Next, set proper ownership and permission to all the directories:
chown git:git /etc/gitea /var/lib/gitea/{custom,data,indexers,public,log}
chmod 750 /var/lib/gitea/{data,indexers,log}
chmod 770 /etc/gitea
Step 5: Create a System Unit File for Gitea
Next, create a systemd service file to manage the Gitea service using systemd.
nano /etc/systemd/system/gitea.service
Add the following lines:
[Unit]
Description=Gitea
After=syslog.target
After=network.target
After=mysql.service

[Service]
RestartSec=2s
Type=simple
User=git
Group=git
WorkingDirectory=/var/lib/gitea/
ExecStart=/usr/bin/gitea web -c /etc/gitea/app.ini
Restart=always
Environment=USER=git HOME=/home/git GITEA_WORK_DIR=/var/lib/gitea

[Install]
WantedBy=multi-user.target
Save and close the file then reload the systemd daemon with the following command:
systemctl daemon-reload
Next, start the Gitea service and enable it to start at system reboot:
systemctl start gitea
systemctl enable gitea
You can also verify the Gitea status with the following command:
systemctl status gitea
Step 6: Configure Nginx as a Reverse Proxy for Gitea
First, install the Nginx package with the following command:
apt-get install nginx -y
Once installed, you will need to configure Nginx as a reverse proxy to access the Gitea.
First, create a new Nginx virtual host configuration file with the following command:
nano /etc/nginx/conf.d/gitea.conf
Add the following lines:
upstream gitea {
    server 127.0.0.1:3000;
}

server {
    listen 80;
    server_name gitea.example.com;
    root /var/lib/gitea/public;
    access_log off;
    error_log off;

    location / {
      try_files maintain.html $uri $uri/index.html @node;
    }

    location @node {
      client_max_body_size 0;
      proxy_pass http://localhost:3000;
      proxy_set_header X-Forwarded-For $proxy_add_x_forwarded_for;
      proxy_set_header X-Real-IP $remote_addr;
      proxy_set_header Host $http_host;
      proxy_set_header X-Forwarded-Proto $scheme;
      proxy_max_temp_file_size 0;
      proxy_redirect off;
      proxy_read_timeout 120;
    }
}
Save and close the file then restart the Nginx service to apply the changes:
systemctl restart nginx
Step 7: Access Gitea Web UI
Now, open your web browser and access the Gitea using the URL http://gitea.example.com/install. You will be redirected to the Gitea setup page:
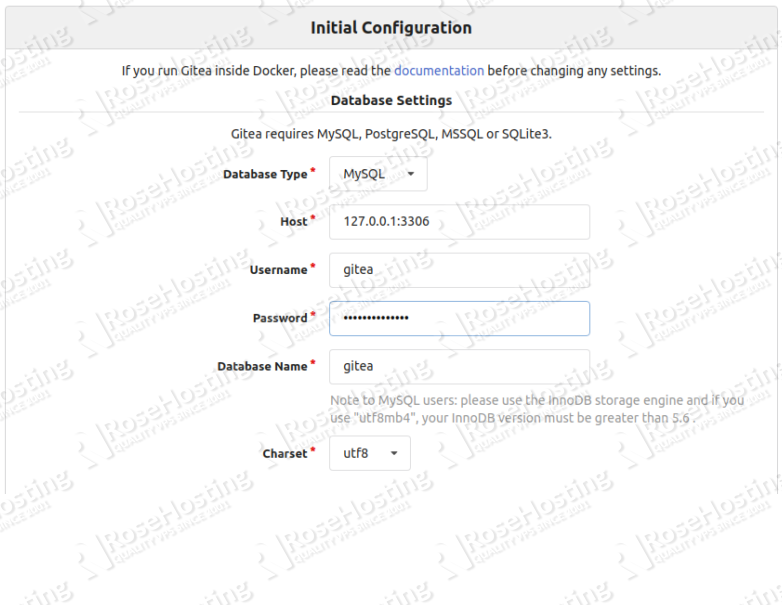
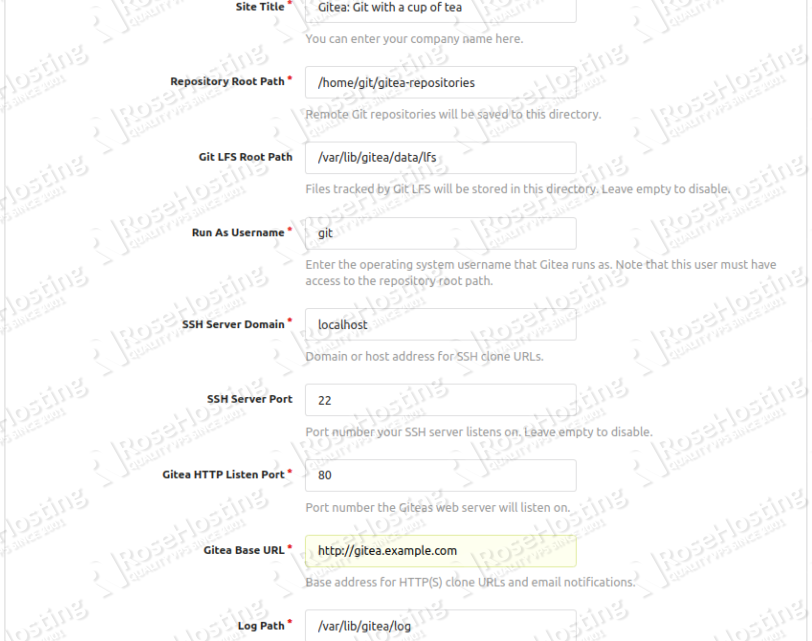
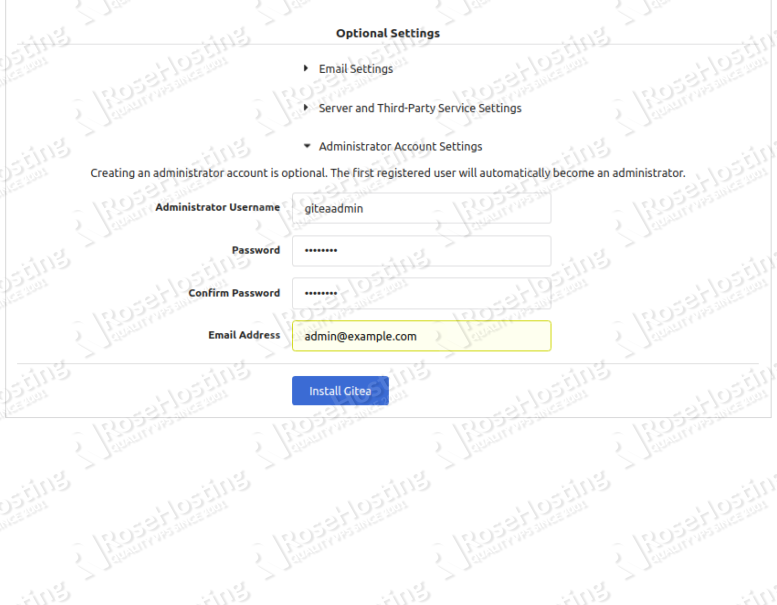
Provide your Gitea database information, port, URL, admin username, password and click on the Install Gitea button. Once the installation has been finished, you will be redirected to the Gitea dashboard:
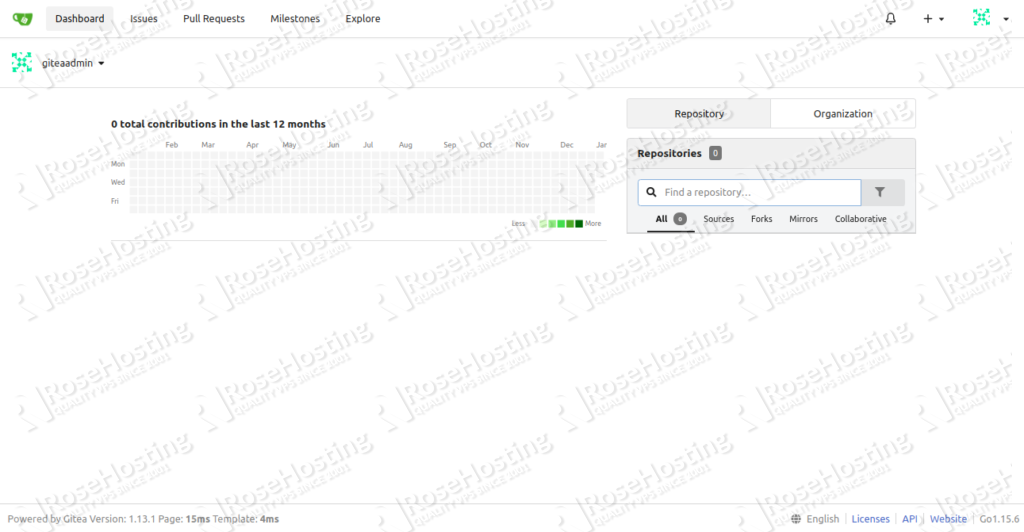
Congratulations! you have successfully installed Gitea on Ubuntu 20.04 VPS.
Follow this tutorial if you are looking to install Gitea on Debian 9
Of course, you don’t have to do any of this if you use one of our Git VPS Hosting services, in which case you can simply ask our expert Linux admins to setup this for you. They are available 24×7 and will take care of your request immediately.
PS. If you liked this post please share it with your friends on the social networks using the buttons on the left or simply leave a reply below. Thanks.