
In this article we will show you how to install Dolibarr on an Ubuntu 18.04 VPS.
Dolibarr is an easy-to-use, open-source ERP and CRM application which is mainly used to easily and effectively manage companies, freelancers, and foundations.  This guide should work on other Debian based servers as well, but it was tested and written for an Ubuntu 18.04 VPS.
Table of Contents
Prerequisites
- For the purposes of this tutorial, we will use a Ubuntu 18.04 virtual server.
- Apache or Nginx web server with PHP support.
- PHP 5.4 or higher (PHP 7.2 is preferred) with the following PHP extensions enabled: mysqli, GD, mbstring, CURL, Zip and XML. Optionally, we can install mcrypt, imagick, openssl, soap and GD2 PHP extensions.
- Full SSH root access (or a user with sudo privileges) is also required.
Step 1: Log in via SSH and Update the System
Log in to your server via SSH, as shown in our example:
ssh root@IP_Address -p Port_number
Make sure to replace “IP_ADDRESS” and “PORT_NUMBER” with your server’s actual IP address and SSH port number.
Once logged in, make sure that the OS server packages are up-to-date. We can do this by running the following commands:
apt-get update && apt-get upgrade
This will update the package index as well as update the software packages currently installed on the server to their latest versions which are available in the Ubuntu repositories (defined in /etc/apt/sources.list).
Step 2: Apache Web Server Installation
To install the Apache web server, run the following command:
apt-get install apache2
After the installation is complete, enable Apache to start automatically upon server boot with:
systemctl enable apache2
We can also check the status of your Apache service with the following command:
systemctl status apache2
Output:
● apache2.service - The Apache HTTP Server
Loaded: loaded (/lib/systemd/system/apache2.service; enabled; vendor preset: enabled)
Drop-In: /lib/systemd/system/apache2.service.d
└─apache2-systemd.conf
Active: active (running) since Fri 2019-06-07 09:23:09 CDT; 14min ago
Process: 702 ExecStart=/usr/sbin/apachectl start (code=exited, status=0/SUCCESS)
Main PID: 816 (apache2)
Tasks: 7 (limit: 2321)
CGroup: /system.slice/apache2.service
├─ 816 /usr/sbin/apache2 -k start
├─ 834 /usr/sbin/apache2 -k start
├─ 835 /usr/sbin/apache2 -k start
├─ 836 /usr/sbin/apache2 -k start
├─ 837 /usr/sbin/apache2 -k start
├─ 839 /usr/sbin/apache2 -k start
└─25045 /usr/sbin/apache2 -k start
If your Apache web server is not started, you can start it with the simple ‘start’ command using systemctl:
systemctl start apache2
Step 3: Install MySQL and Create a MySQL Database
Run the following command to install MySQL 5.7, the latest version available in the official Ubuntu repositories, along with some required MySQL packages:
sudo apt-get install mysql-client-5.7 mysql-client-core-5.7 mysql-common mysql-server-5.7 mysql-server-core-5.7
Once the installation is complete, issue the following command to further improve the security of your MySQL server installation:
mysql_secure_installation
We recommend answering every prompt with ‘Y’.
Once this is done, create a new MySQL database and user for the Dolibarr installation.
Log in to the MySQL console as MySQL user (e.g. root):
sudo mysql -uroot -p
Run the following commands to create a new MySQL database, user, and grant privileges for the user to access the database:
mysql> CREATE DATABASE dolibarr character set UTF8 collate utf8_bin;
mysql> GRANT ALL PRIVILEGES ON dolibarr.* TO 'dolibarr'@'localhost' IDENTIFIED BY 'StrongPassword';
mysql> FLUSH PRIVILEGES;
mysql> quit
Remember to replace StrongPassword with an actual strong password.
Step 4: Install the Required PHP Packages
Install PHP 7.2 and all of the required PHP extensions:
apt-get install php7.2 php7.2-cli php7.2-common php7.2-curl php7.2-gd php7.2-intl php7.2-json php7.2-mbstring php7.2-mysql php7.2-soap php7.2-xml php7.2-xmlrpc php7.2-zip libapache2-mod-php7.2
Step 5: Create a new Apache Configuration File
Create a new Apache configuration file for the domain/subdomain name that we will be using to access the Dolibarr application. For this tutorial, we will use ‘dolibarr.domain.com‘.
vi /etc/apache2/sites-available/dolibarr.conf
Add the following lines:
<VirtualHost *:80>

ServerName dolibarr.domain.com

DocumentRoot /var/www/dolibarr/htdocs

CustomLog ${APACHE_LOG_DIR}/dolibarr.domain.com.access.log combined

ErrorLog ${APACHE_LOG_DIR}/dolibarr.domain.com.error.log

<Directory /var/www/dolibarr>

DirectoryIndex index.php

Options -Indexes

AllowOverride All

Order allow,deny

allow from all

</Directory>

</VirtualHost>
Do not forget to replace dolibarr.domain.com with your actual domain/subdomain name. Save and close the Apache configuration file.
Create a new directory named ‘dolibarr’:
mkdir -p /var/www/dolibarr
To enable the newly created configuration file in Apache, run:
sudo a2ensite dolibarr
Then disable the default Apache configuration file using this next line:
sudo a2dissite 000-default
Also, we need to enable the Apache ‘rewrite’ module (if it is not already enabled):
sudo a2enmod rewrite
Check if there are errors with the newly created Apache configuration:
sudo apachectl -t
Syntax OK
If the syntax is OK and there are no errors, we can restart the Apache web service.
sudo systemctl restart apache2.service
Step 6: Install Dolibarr
At the time of writing this tutorial, the latest stable version is Dolibarr 9.0.3. Download the latest stable version of Dolibarr to the /var/www/ directory:
cd /var/www/
wget https://sourceforge.net/projects/dolibarr/files/Dolibarr%20ERP-CRM/9.0.3/dolibarr-9.0.3.tgz/download -O dolibarr.tgz
Extract the dolibarr.tgz archive and rename the directory:
gunzip -c dolibarr.tgz | tar xvf -

mv dolibarr-* dolibarr
Change the permissions of the files and directories inside the /var/www/dolibarr directory so the web server user (www-data) can access them:
chown www-data: -R /var/www/dolibarr
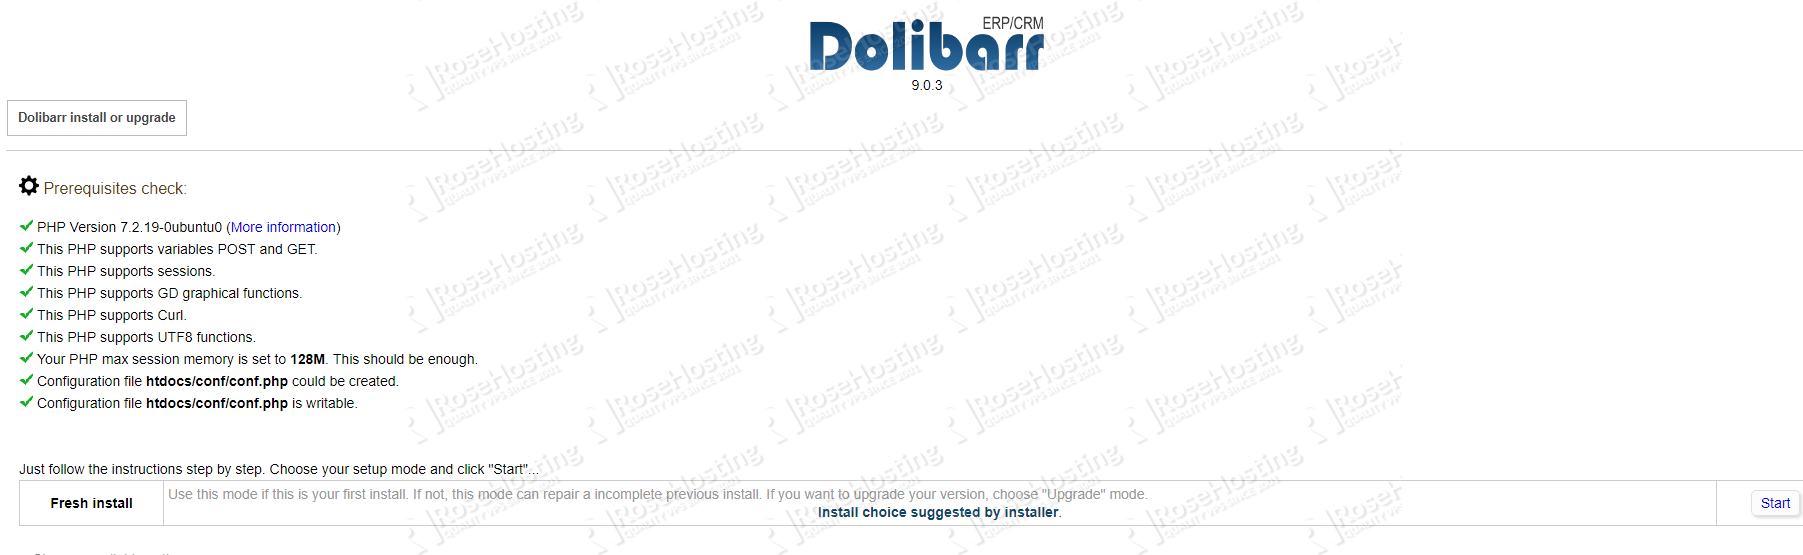
Open http://dolibarr.domain.com in your favorite web browser and follow the easy instructions – select the installation language, and on the next page, check if prerequisites are met. If everything appears to be correct, click ‘Start’:
On the next page, enter:
Database name: dolibarr
Driver type: mysqli
Database server: localhost
Port: 3306
Login: dolibarr
Password: StrongPassword
Click on the ‘Next step’ button and set a new Dolibarr administrator username and password.
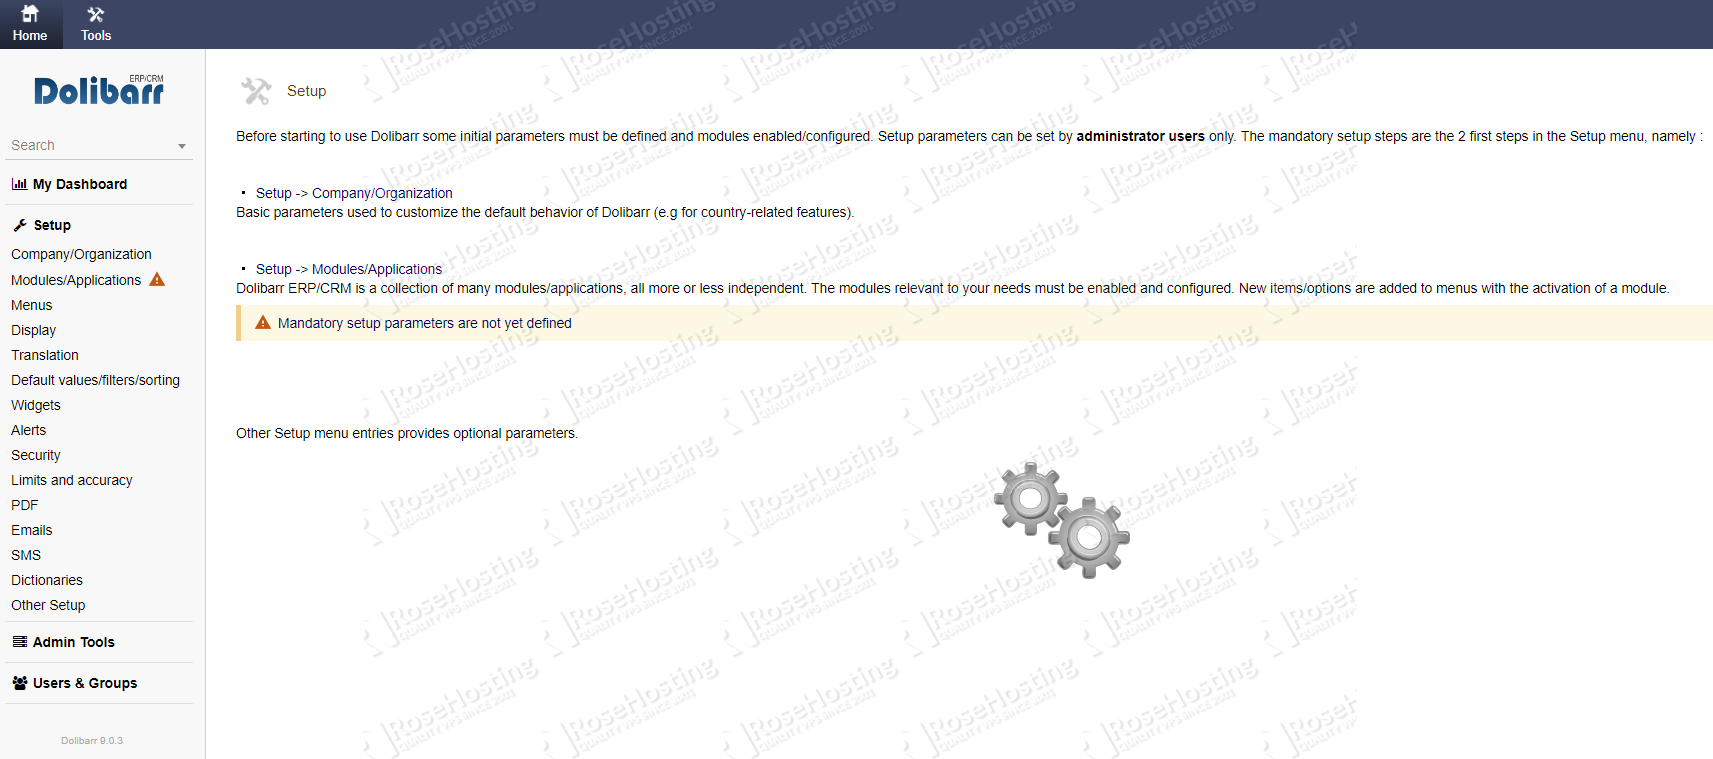
Then, click on the Next step button once again and log in to the Dolibarr Administration backend. It should look something like this:
That’s it! You now have a working Dolibarr instance on your Ubuntu 18.04 VPS.
 Of course, you don’t have to install Dolibarr on Ubuntu 18.04 if you have an Ubuntu VPS with us. You can simply ask our support team to install Dolibarr on Ubuntu 18.04 for you. They are available 24/7 and will be able to help you with the installation.
PS. If you enjoyed reading this blog post on how to install Dolibarr on Ubuntu 18.04, feel free to share it on social networks using the shortcuts below, or simply leave a comment in the comments section. Thanks.