PrestaShop is an open-source e-commerce platform that allows users to create and manage their online stores. The platform provides a user-friendly interface and a range of built-in features to assist retailers in selling products and services online. With PrestaShop, you can easily customize the design and layout of your store, add a product catalog, manage orders, track inventory, and process payments. In this tutorial, we will show you how to install PrestaShop on Debian 13.
Table of Contents
Prerequisites
- A Debian 13 VPS
- SSH root access or a regular system user with sudo privileges
Conventions
# – given commands should be executed with root privileges either directly as a root user or by use of sudo command
$ – given commands should be executed as a regular user
Step 1. Install and Configure Nginx
Prestashop supports Apache and Nginx. In this article, we will use Nginx. Let’s install and configure it.
# apt install nginx
Upon installation, Nginx will automatically start running. Now, let’s create an nginx server block or virtual host.
# nano /etc/nginx/conf.d/prestashop.yourdomain.com.conf
Insert the following into that file.
server {
    # IPv4.
    listen 80;
    #listen 443 ssl http2;

    # IPv6.
    # listen [::]:80;
    # listen [::]:443 ssl http2;

    # [EDIT] Your domain name(s) go here.
    server_name prestashop.yourdomain.com;

    # [EDIT] Path to your domain Nginx logs.
    # more details: https://docs.nginx.com/nginx/admin-guide/monitoring/logging/#setting-up-the-access-log
    access_log /var/log/nginx/prestashop.yourdomain.com-access.log combined;
    # more details: https://nginx.org/en/docs/ngx_core_module.html?#error_log
    error_log /var/log/nginx/prestashop.yourdomain.com-error.log info;

    # [EDIT] Path to your SSL certificates (take a look at Certbot https://certbot.eff.org).
    ssl_certificate /etc/ssl/fullchain.pem;
    ssl_certificate_key /etc/ssl/privkey.pem;

    # [EDIT] Path to your PrestaShop directory.
    root /path/to/prestashop;

    index index.php;

    # This should match the `post_max_size` and/or `upload_max_filesize` settings
    # in your php.ini.
    client_max_body_size 16M;

    # Redirect 404 errors to PrestaShop.
    error_page 404 /index.php?controller=404;

    # HSTS (Force clients to interact with your website using HTTPS only).
    # For enhanced security, register your site here: https://hstspreload.org/.
    # WARNING: Don't use this if your site is not fully on HTTPS!
    # add_header Strict-Transport-Security "max-age=63072000; includeSubDomains" preload; always;

    # XSS Protection
    # add_header X-XSS-Protection "1; mode=block";

    # Clickjacking
    # add_header X-Frame-Options "SAMEORIGIN";

    # X-Content Type Options
    # add_header X-Content-Type-Options nosniff;

    # Secure Cookie
    # add_header Set-Cookie "Path=/; HttpOnly; Secure";


    # [EDIT] If you are using multiple languages.
    # rewrite ^/fr$ /fr/ redirect;
    # rewrite ^/fr/(.*) /$1;
    # Watch out: if you encounter issues with a quick view or shopping cart, you might want to use a different rule:
    # rewrite '^/((?!js|qq)[a-z]{2})/(.*)' /index.php?isolang=$1&$args last;
    # see: https://github.com/PrestaShop/PrestaShop/issues/14921#issuecomment-948932833

    # Images.
    rewrite ^/(\d)(-[\w-]+)?/.+\.jpg$ /img/p/$1/$1$2.jpg last;
    rewrite ^/(\d)(\d)(-[\w-]+)?/.+\.jpg$ /img/p/$1/$2/$1$2$3.jpg last;
    rewrite ^/(\d)(\d)(\d)(-[\w-]+)?/.+\.jpg$ /img/p/$1/$2/$3/$1$2$3$4.jpg last;
    rewrite ^/(\d)(\d)(\d)(\d)(-[\w-]+)?/.+\.jpg$ /img/p/$1/$2/$3/$4/$1$2$3$4$5.jpg last;
    rewrite ^/(\d)(\d)(\d)(\d)(\d)(-[\w-]+)?/.+\.jpg$ /img/p/$1/$2/$3/$4/$5/$1$2$3$4$5$6.jpg last;
    rewrite ^/(\d)(\d)(\d)(\d)(\d)(\d)(-[\w-]+)?/.+\.jpg$ /img/p/$1/$2/$3/$4/$5/$6/$1$2$3$4$5$6$7.jpg last;
    rewrite ^/(\d)(\d)(\d)(\d)(\d)(\d)(\d)(-[\w-]+)?/.+\.jpg$ /img/p/$1/$2/$3/$4/$5/$6/$7/$1$2$3$4$5$6$7$8.jpg last;
    rewrite ^/(\d)(\d)(\d)(\d)(\d)(\d)(\d)(\d)(-[\w-]+)?/.+\.jpg$ /img/p/$1/$2/$3/$4/$5/$6/$7/$8/$1$2$3$4$5$6$7$8$9.jpg last;
    rewrite ^/c/([\w.-]+)/.+\.jpg$ /img/c/$1.jpg last;

    # AlphaImageLoader for IE and FancyBox.
    rewrite ^images_ie/?([^/]+)\.(gif|jpe?g|png)$ js/jquery/plugins/fancybox/images/$1.$2 last;

    # Web service API.
    rewrite ^/api/?(.*)$ /webservice/dispatcher.php?url=$1 last;

    # Installation sandbox.
    rewrite ^(/install(?:-dev)?/sandbox)/.* /$1/test.php last;

    location / {
        try_files $uri $uri/ /index.php$is_args$args;
    }

    # [EDIT] Replace 'admin-dev' in this block with the name of your admin directory.
    location /admin-dev/ {
        try_files $uri $uri/ /admin-dev/index.php$is_args$args;
    }


    # .htaccess, .DS_Store, .htpasswd, etc.
    location ~ /\.(?!well-known) {
        deny all;
    }

    # Source code directories.
    location ~ ^/(app|bin|cache|classes|config|controllers|docs|localization|override|src|tests|tools|translations|var|vendor)/ {
        deny all;
    }

    # vendor in modules directory.
    location ~ ^/modules/.*/vendor/ {
        deny all;
    }

    # Prevent exposing other sensitive files.
    location ~ \.(log|tpl|twig|sass|yml)$ {
        deny all;
    }

    # Prevent injection of PHP files.
    location /img {
        location ~ \.php$ { deny all; }
    }

    location /upload {
        location ~ \.php$ { deny all; }
    }

    location ~ [^/]\.php(/|$) {
        # Split $uri to $fastcgi_script_name and $fastcgi_path_info.
        fastcgi_split_path_info ^(.+?\.php)(/.*)$;

        # Ensure that the requested PHP script exists before passing it
        # to the PHP-FPM.
        try_files $fastcgi_script_name =404;

        # Environment variables for PHP.
        include fastcgi_params;
        fastcgi_param SCRIPT_FILENAME $request_filename;

        fastcgi_index index.php;

        fastcgi_keep_conn on;
        fastcgi_read_timeout 30s;
        fastcgi_send_timeout 30s;

        # Uncomment these in case of long loading or 502/504 errors.
        # fastcgi_buffer_size 256k;
        # fastcgi_buffers 256 16k;
        # fastcgi_busy_buffers_size 256k;

        # [EDIT] Connection to PHP-FPM unix domain socket.
        fastcgi_pass unix:/run/php/php8.1-fpm.sock;
    }
}
Save the file, then exit from the editor. Do not restart nginx at this point.
Step 2. Install MariaDB and Create a Database
In this step, we will install the MariaDB server from the default Debian repository. To install the MariaDB server, invoke this command:
# apt install mariadb-server
Upon installation, the MariaDB server will automatically run. Now, we can proceed with creating a new database and database user for our Prestashop website.
# mysql
Once logged in to the MySQL shell, we can run the following commands.
mysql> CREATE DATABASE prestashop;

mysql> GRANT ALL on prestashop.* to prestashop@localhost identified by 'm0d1fyth15';

mysql> CREATE DATABASE prestashop;

mysql> GRANT ALL on prestashop.* to prestashop@localhost identified by 'm0d1fyth15';
Ensure you create a stronger database password; replace m0d1fyth15 in the command above with a stronger password.
Step 3. Install PHP
Debian 13 ships with PHP 8.4. Since Prestashop 8 requires PHP 7.2 up to version 8.1, we need to use Ondřej Surý’s PPA to install PHP 8.1. Run the command below to install PHP 8.1 and its required extensions.
# apt install -y apt-transport-https lsb-release ca-certificates wget
# wget -O /etc/apt/trusted.gpg.d/php.gpg https://packages.sury.org/php/apt.gpg
# echo "deb https://packages.sury.org/php/ $(lsb_release -sc) main" | sudo tee /etc/apt/sources.list.d/php.list
# apt update
# apt install php8.1-{xml,intl,common,bcmath,curl,fpm,mbstring,mysql,gd,imagick,zip,opcache} imagemagick
Once completed, the PHP-FPM service will be running automatically. We are not going to edit the PHP-FPM configuration; we will use the default PHP-FPM www.conf file. To ensure PHP-FPM is running, you can verify it with this command:
# systemctl status php8.1-fpm
Step 4. Install SSL Certificate
This step is optional, but highly recommended to complete. This step will walk you through SSL installation from Let’s Encrypt using certbot. Ensure that your domain or subdomain is already pointing to your server. If the domain or subdomain is not pointing to your server, the SSL certificate will fail to generate.
# apt install python3-certbot-nginx
Now, we are ready to install the SSL certificate. Run this command:
# certbot
You would need to provide your email address, accept the Let’s Encrypt TOS, and indicate whether you want to share your email address with the Electronic Frontier Foundation or not. Then, you need to choose the domain or subdomain name you would like to activate HTTPS for. Choose your OpenProject website by typing the number and hitting ENTER. Let’s Encrypt will install the certificate, and it will ask you whether to configure HTTP to HTTPS redirect or not. You can choose ‘redirect’, and then Certbot will create the redirection and reload Apache if everything is okay.
When running the ‘certbot’ command, you will get an output like this:
Saving debug log to /var/log/letsencrypt/letsencrypt.log
Enter email address (used for urgent renewal and security notices)
 (Enter 'c' to cancel): you@yourdomain.com

- - - - - - - - - - - - - - - - - - - - - - - - - - - - - - - - - - - - - - - -
Please read the Terms of Service at
https://letsencrypt.org/documents/LE-SA-v1.5-February-24-2025.pdf. You must
agree in order to register with the ACME server. Do you agree?
- - - - - - - - - - - - - - - - - - - - - - - - - - - - - - - - - - - - - - - -
(Y)es/(N)o: y

- - - - - - - - - - - - - - - - - - - - - - - - - - - - - - - - - - - - - - - -
Would you be willing, once your first certificate is successfully issued, to
share your email address with the Electronic Frontier Foundation, a founding
partner of the Let's Encrypt project and the non-profit organization that
develops Certbot? We'd like to send you email about our work encrypting the web,
EFF news, campaigns, and ways to support digital freedom.
- - - - - - - - - - - - - - - - - - - - - - - - - - - - - - - - - - - - - - - -
(Y)es/(N)o: n
Account registered.

Which names would you like to activate HTTPS for?
We recommend selecting either all domains, or all domains in a VirtualHost/server block.
- - - - - - - - - - - - - - - - - - - - - - - - - - - - - - - - - - - - - - - -
1: prestashop.yourdomain.com
- - - - - - - - - - - - - - - - - - - - - - - - - - - - - - - - - - - - - - - -
Select the appropriate numbers separated by commas and/or spaces, or leave input
blank to select all options shown (Enter 'c' to cancel): 1
Requesting a certificate for prestashop.yourdomain.com

Successfully received certificate.
Certificate is saved at: /etc/letsencrypt/live/prestashop.yourdomain.com/fullchain.pem
Key is saved at:         /etc/letsencrypt/live/prestashop.yourdomain.com/privkey.pem
This certificate expires on 2025-08-17.
These files will be updated when the certificate renews.
Certbot has set up a scheduled task to automatically renew this certificate in the background.

Deploying certificate
Successfully deployed certificate for prestashop.yourdomain.com to /etc/nginx/conf.d/prestashop.yourdomain.com.conf
Congratulations! You have successfully enabled HTTPS on https://prestashop.yourdomain.com

- - - - - - - - - - - - - - - - - - - - - - - - - - - - - - - - - - - - - - - -
If you like Certbot, please consider supporting our work by:
 * Donating to ISRG / Let's Encrypt:   https://letsencrypt.org/donate
 * Donating to EFF:                    https://eff.org/donate-le
- - - - - - - - - - - - - - - - - - - - - - - - - - - - - - - - - - - - - - - -
Once the SSL certificate installation is finished, your Prestashop nginx server block should be automatically modified by Certbot.
Step 5. Install Prestashop
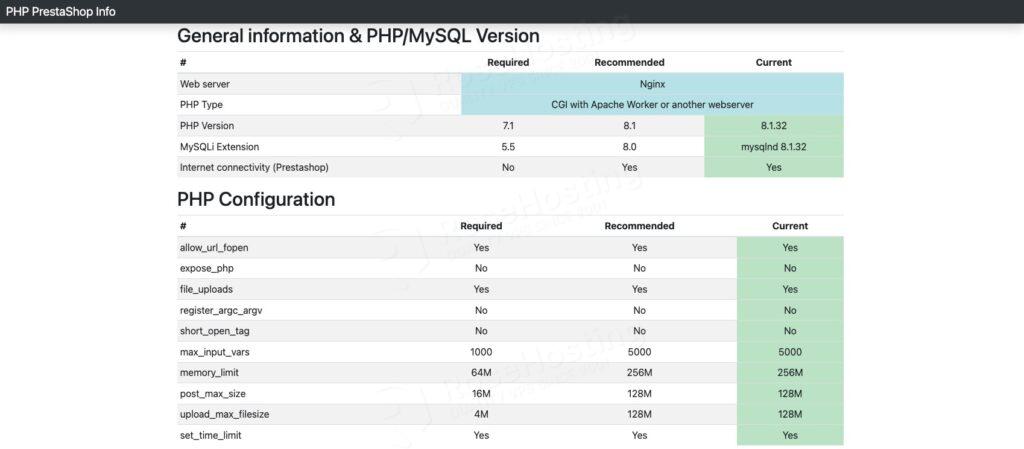
Before downloading the installation file, we need to download the PrestaShop system requirement tool to check if our server is ready for the PrestaShop installation. Let’s download the tool now.
# wget https://github.com/PrestaShop/php-ps-info/archive/refs/tags/v1.2.zip -O phppsinfo.zip
# unzip phppsinfo.zip -d /opt/prestashop/
Now, you can go to https://prestashop.yourdomain.com/php-ps-info-1.2/phppsinfo.php
When accessing the page, you will be prompted for a username and a password. Use “prestashop” for both username and password to log in. If everything is ready, you will see this.
That’s it. It’s time to download Prestashop files now. Visit the PrestaShop downloads page and follow the instructions provided to download the latest version.
# cd /tmp
# wget https://assets.prestashop3.com/dst/edition/corporate/8.2.1/prestashop_edition_basic_version_8.2.1.zip
# unzip prestashop_edition_basic_version_8.2.1.zip
# unzip prestashop.zip -d /opt/prestashop
# chown -R www-data: /opt/prestashop
Now, open your web browser and navigate to https://prestashop.yourdomain.com to initiate the installation through the GUI.
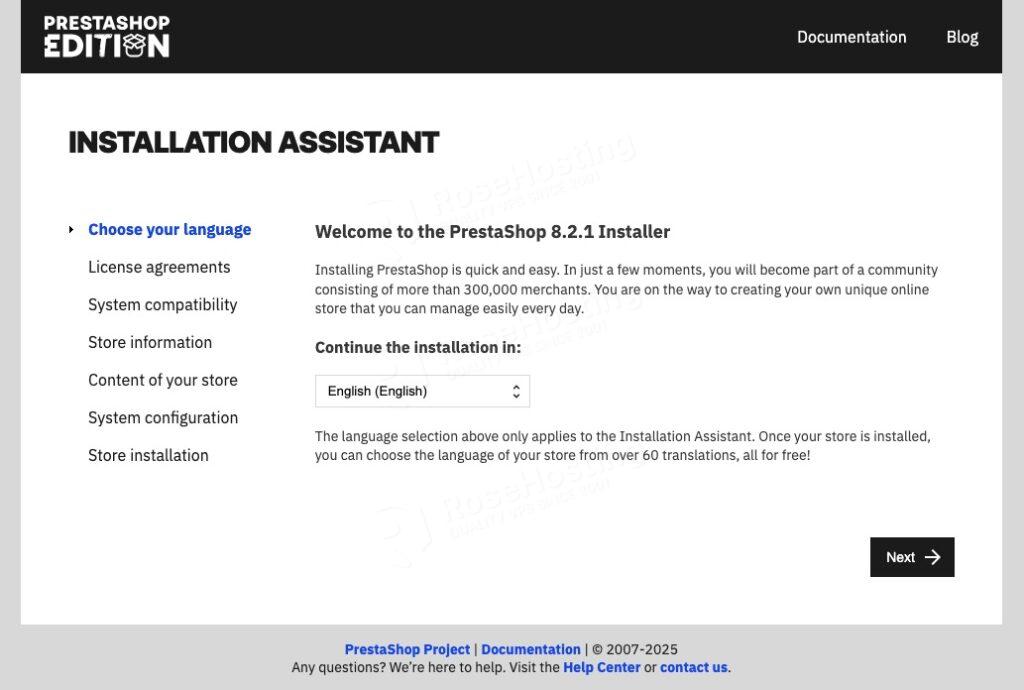
Choose your language, then hit the Next button.
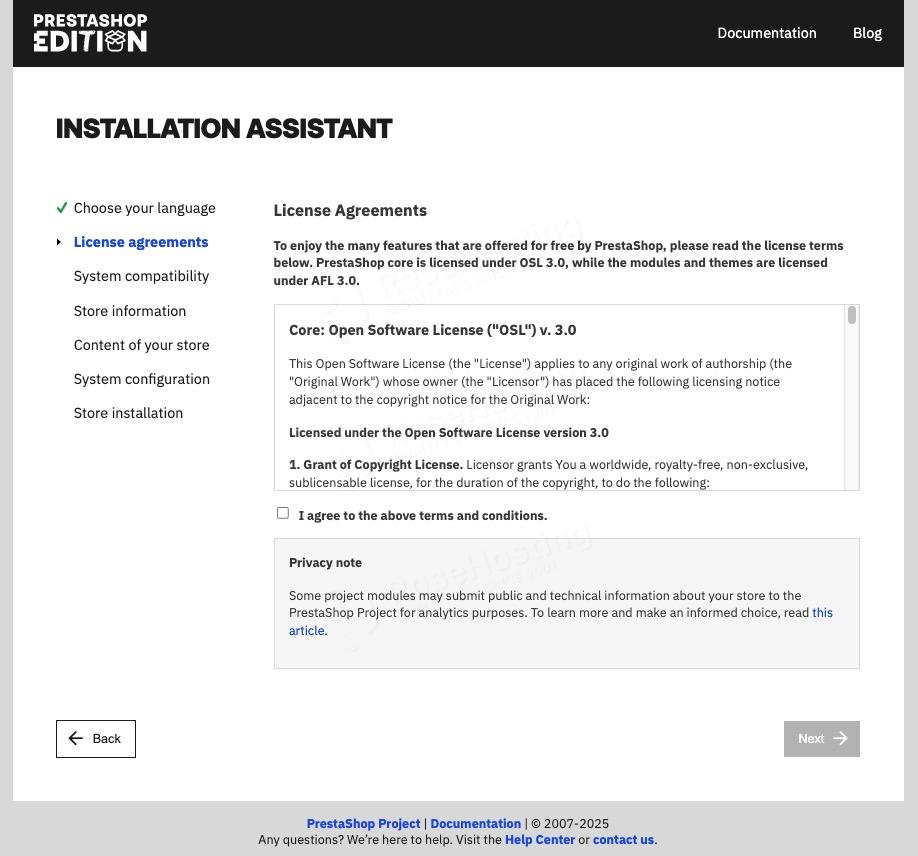
You need to agree to the terms and conditions. Click Next to continue.
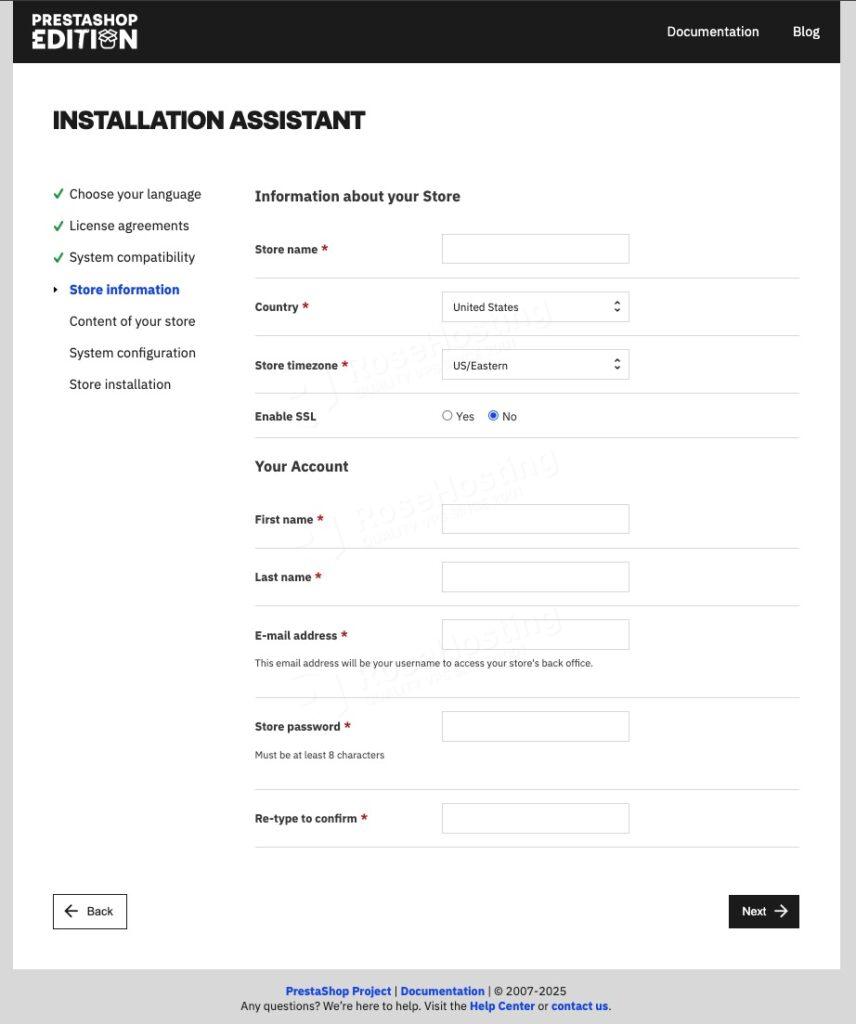
Fill in all required information, then click on the Next button.
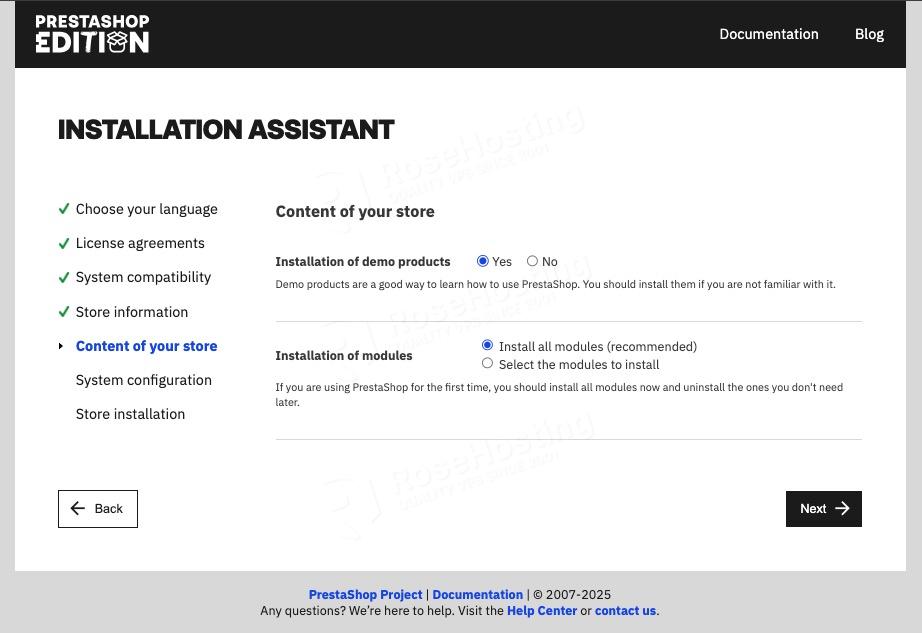
Choose if you want to install the demo product or not.
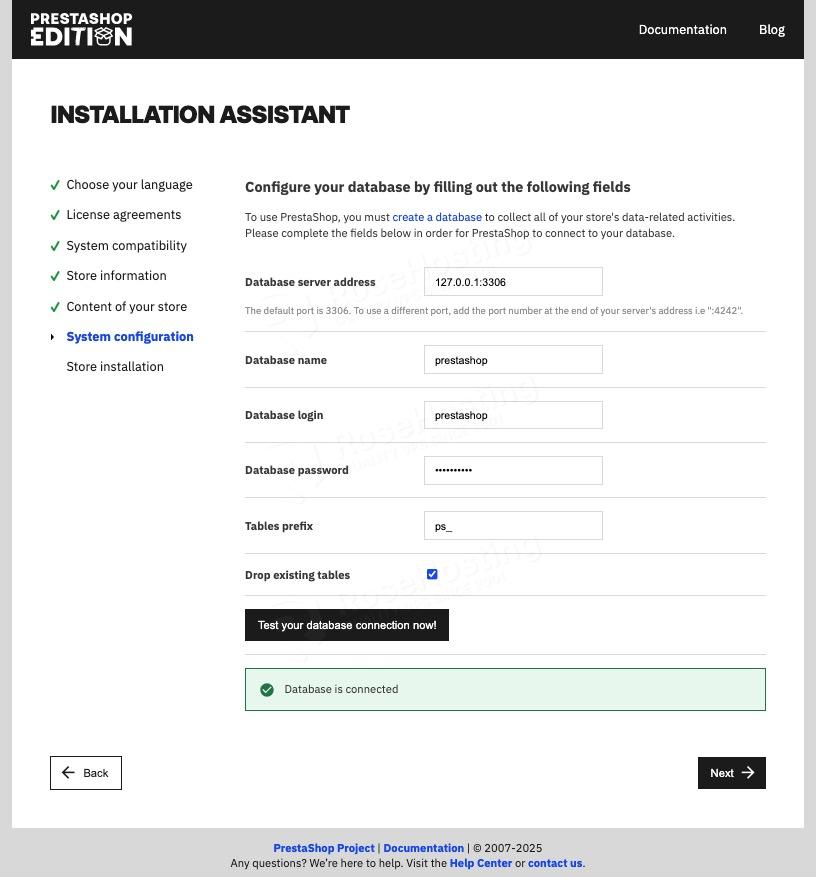
Fill in the database information. Check the database installation step if you forgot. Click the Next button if the database information is correct.

Wait until it finishes.
Once finished, you need to delete the directory /opt/prestashop/install, then navigate to https://prestashop.yourdomain.com/admin to access the backend. You will be redirected to
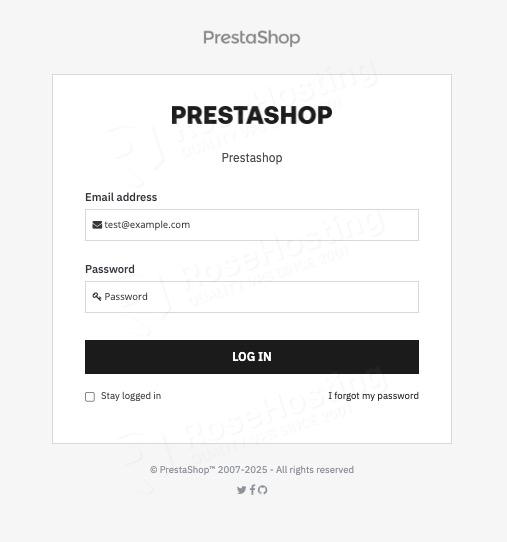
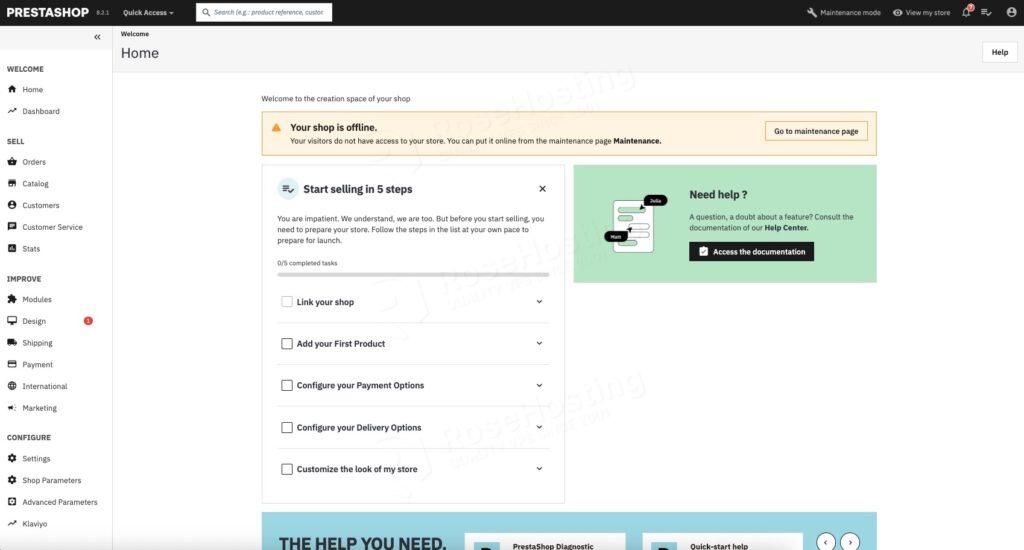
Now, you can log in using the email address and password you created during the installation.
You’ve Learned How to Install PrestaShop on Debian 12
That’s it! You are logged in to the backend, and you can start working and customizing your website.
Of course, if you are one of our PrestaShop Hosting customers, you don’t have to install PrestaShop on Debian 13 yourself – ask our admins, sit back, and relax. Our admins will install Prestashop on Debian 13 immediately without any additional fee, along with many useful optimizations we can do for you. Managing a Prestashop based website is not just about the installation, we can help you with optimizing your Prestashop installation if you have an active service with us.
If you liked this post about how to install Prestashop on Debian 12, please share it with your friends on the social networks using the share buttons below, or simply leave a comment in the comments section. Thanks.