
MySQL is one of the most popular open-source relational database management systems (RDBMS). It is widely used for web applications, data warehousing, and logging applications. With the release of Debian 13 (Trixie), many users are eager to set up a MySQL environment for development or production. This guide walks you through the installation and initial configuration of MySQL on Debian 13.
Table of Contents
Prerequisites
• A system running Debian 13 (Trixie) where MySQL can be installed
• A user account with sudo privileges
Step 1: Update the Package Index
Before installing any packages, make sure your system is up-to-date, especially when you’re preparing to run MySQL on Debian 13:
sudo apt update && sudo apt upgrade -yThis updates the package lists and upgrades existing packages.
Step 2: Install MySQL Server repository
First, let’s install the dependencies needed for installing the MySQL server apt repository.
# apt install wget gnupgYou will then need to install the MySQL apt repository; the apt repository is not installed by default. Installing this is crucial for setting up MySQL on Debian 13 effectively. You can download the deb package and install it with the following commands:
# wget https://dev.mysql.com/get/mysql-apt-config_0.8.36-1_all.debNow you can install the MySQL repository information package with:
# dpkg -i mysql-apt-config_0.8.36-1_all.debYou will be presented with a package configuration screen to select the MySQL product you wish to configure. You can select the first option and click Enter.
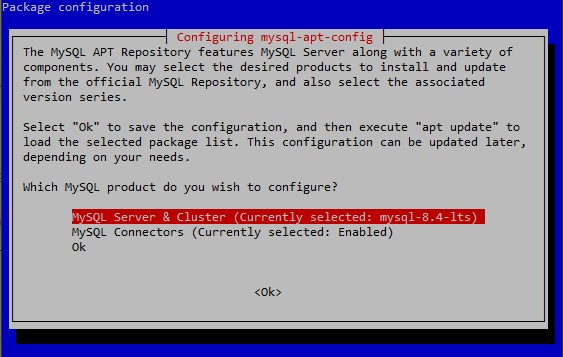
Then, for the next screen, you can select the second option.
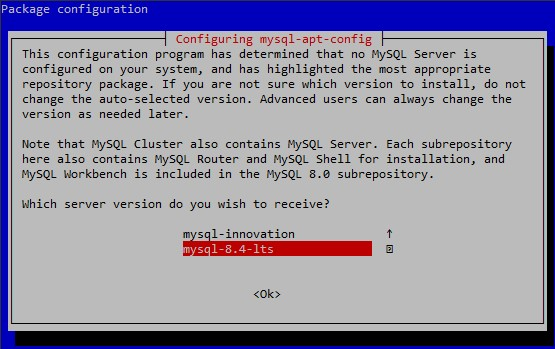
Continue by selecting this option and then clicking on OK, and run the command:
# apt updateWith this, the MySQL repository will be installed.
Step 3: Install MySQL server
Now you can run the MySQL server install with the command, ensuring MySQL works seamlessly on your Debian 13 system.
# apt install mysql-serverAt the start of the installation process, you will be asked to set up a MySQL root password to protect your MySQL server.
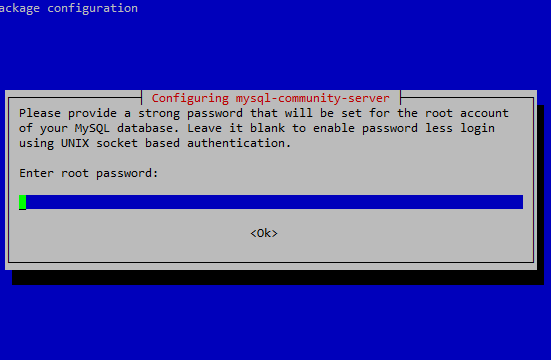
Then, you will be asked to enter the root password again. Once you click OK, the installation will begin.
When the installation is completed, you can check the MySQL server version installed with:
# mysql --version
mysql  Ver 8.4.7 for Linux on x86_64 (MySQL Community Server - GPL)
Step 4: Check the MySQL Service
Once the installation is completed, you can check if MySQL is up and running with, confirming successful deployment of MySQL on Debian 13.
# systemctl status mysqlIf the MySQL service is running, you will receive a similar output:
● mysql.service - MySQL Community Server
     Loaded: loaded (/usr/lib/systemd/system/mysql.service; enabled; preset: enabled)
     Active: active (running) since Thu 2025-11-13 06:45:35 EST; 17min ago
 Invocation: f4cd33e6b87244988508d6904696fed0
       Docs: man:mysqld(8)
             http://dev.mysql.com/doc/refman/en/using-systemd.html
   Main PID: 3407 (mysqld)
     Status: "Server is operational"
      Tasks: 35 (limit: 2297)
     Memory: 429.3M (peak: 434.9M)
        CPU: 6.115s
     CGroup: /system.slice/mysql.service
             └─3407 /usr/sbin/mysqld

Nov 13 06:45:34 debian systemd[1]: Starting mysql.service - MySQL Community Server...
Nov 13 06:45:35 debian systemd[1]: Started mysql.service - MySQL Community Server.
To manually start, stop, or restart MySQL:
#  systemctl start mysql
#  systemctl stop mysql
#  systemctl restart mysql
Step 5: Configuring mysql-community-server
You should also run the mysql_secure_installation command, which runs a script that will take you through a series of steps to further secure your MySQL server. It will ask you if you want to remove the anonymous users, remove the test databases, and if you would like to restrict root login.
# mysql_secure_installationSecuring the MySQL server deployment.
Enter password for user root:
VALIDATE PASSWORD COMPONENT can be used to test passwords
and improve security. It checks the strength of password
and allows the users to set only those passwords which are
secure enough. Would you like to setup VALIDATE PASSWORD component?
Press y|Y for Yes, any other key for No: y
There are three levels of password validation policy:
LOW Length >= 8
MEDIUM Length >= 8, numeric, mixed case, and special characters
STRONG Length >= 8, numeric, mixed case, special characters and dictionary file
Please enter 0 = LOW, 1 = MEDIUM and 2 = STRONG: mysql_secure_installation
You should choose 2 or “Strong” password validation policy or at least MEDIUM to protect your database server.
Please provide a strong password that will be set for the root account of your MySQL database. Leave it blank to enable password less login using UNIX socket based authentication.
You will need to enter the MySQL root password here.

Enter root password:
Once you type the password and press enter, you will receive the password strength score, and you will be asked if you want to continue.
Estimated strength of the password: 100
Do you wish to continue with the password provided?(Press y|Y for Yes, any other key for No) :
You can enter Y and continue.
If you wish to continue, enter Y, and for the next question, you can also select “Yes”.
Remove anonymous users? (Press y|Y for Yes, any other key for No) : Y
Normally, root should only be allowed to connect from
'localhost'. This ensures that someone cannot guess at
the root password from the network.

Disallow root login remotely? (Press y|Y for Yes, any other key for No) : Y
Success.

By default, MySQL comes with a database named 'test' that
anyone can access. This is also intended only for testing,
and should be removed before moving into a production
environment.


Remove test database and access to it? (Press y|Y for Yes, any other key for No) :
Y
By default, MySQL comes with a database named 'test' that
anyone can access. This is also intended only for testing,
and should be removed before moving into a production
environment.


Remove test database and access to it? (Press y|Y for Yes, any other key for No) : Y
 - Dropping test database...
Success.

 - Removing privileges on test database...
Success.

Reloading the privilege tables will ensure that all changes
made so far will take effect immediately.

Reload privilege tables now? (Press y|Y for Yes, any other key for No) : Y
Success.

All done!
With this, you have completed the mysql_secure_installation script, solidifying your MySQL setup on Debian 13.
Optional: Create a MySQL User
You can log in to the MySQL terminal with:
# mysql -u root -pTo create a new user that uses a password to connect:
CREATE USER 'username'@'localhost' IDENTIFIED BY 'strongpassword';You can now create a database and all privileges on this database.
CREATE DATABASE newdb;
GRANT ALL PRIVILEGES ON newdb.* TO 'newuser'@'localhost' WITH GRANT OPTION;
And you can now flush the privileges.
FLUSH PRIVILEGES;Conclusion
You now have a fully functional MySQL server running on Debian 13. You can start creating databases, managing users, and integrating with your applications. Always remember to secure your databases, especially if they are exposed to external networks. You have added the MySQL repository by selecting the version of MySQL you want to install on Debian 13, and successfully finished the installation. Of course, you don’t have to do any of this if you use one of our Debian Hosting services. In that case, you can ask our expert Linux admins to set this up for you. They are available 24×7 and will take care of your request immediately.
If you liked this post on how to install MySQL on Debian 13, please share it with your friends. MySQL’s presence on Debian 13 enhances its database capabilities. Leave a comment below. Thanks.