n8n enables you to automate actions for your business through integrations with applications and APIs. Using n8n’s website is possible; however, self-hosting n8n lets you own your data and run your own integrations through your server. This can actually save you money since you can use that server for other parts of your business, like your website, your email, internal messaging, and more. n8n serves as a central place to manage your social media, content scheduling, outreach, engagement tracking, and more. Let’s see how to install n8n on Ubuntu 24.04.
Table of Contents
Prerequisites
- An Ubuntu 24.04 VPS for n8n self-hosting
- SSH root access or a user with sudo privileges is required
Conventions
# – given commands should be executed with root privileges either directly as a root user or by use of sudo command
$ – given commands should be executed as a regular user
Step 1. Add a System User
n8n will be running under a system user; we will create one. Let’s execute this command to add a new system user.
# adduser masterYou will be prompted to create a password for this user. Ensure you use a strong password. Once the new user is added, we can grant the new user sudo privileges.
# usermod -aG sudo masterNow, let’s switch to the ‘master’ user and complete the rest of the installation.
# su - master
You will be asked for the user’s password. Type the password, then hit ENTER.
Step 2. Install NodeJS and NPM
We can install NodeJS from Ubuntu 24.04 default repository, but we will get an older version of NodeJS if we use this method. Alternatively, we will install Node.js and npm through the Node.js repository to obtain the most recent version.
$ curl -sL https://deb.nodesource.com/setup_lts.x | sudo -E bash -Once completed, let’s refresh the list of available packages and their versions from the configured software repositories.
$ sudo apt updateNext, run the following command to complete the installation of Node.js and NPM.
$ sudo apt install nodejsThat’s it, nodeJS and NPM are installed, you can check the installed version by executing this one-liner:
$ node -v; npm -vThe command above will print an output like this:
v22.17.0
10.9.2
This installation method is suitable for you if you want to get the LTS version or a specific version you want. For example, if you wish to use version 18, then you can execute this command instead.
$ curl -fsSL https://deb.nodesource.com/setup_18.x | sudo -E bash -And, replace 18 with any version you prefer if you want a different version.
Step 3. Install n8n
For the installation of n8n self-hosting, we can use Docker or NPM. In this article, we will guide you through the process of installing n8n on Ubuntu 24.04 using NPM. With npm installed, we can now install n8n globally:
$ sudo npm install -g n8nThe installation will take some time to complete. You can run this command after it’s finished.
$ n8nThe application will run on port 5678. The command above will print an output like this:
Editor is now accessible via:
http://localhost:5678
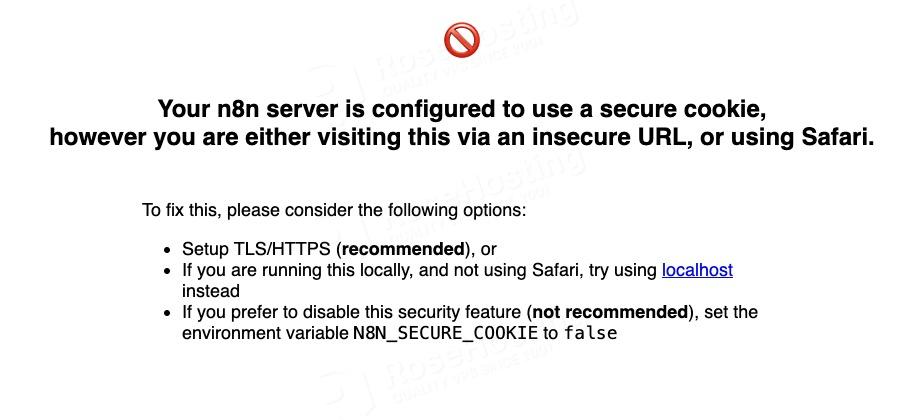
Press "o" to open in Browser.If you open http://YOUR_SERVER_IP_ADDRESS:5678 using your favorite web browser, you will see this:
We can now stop the application by hitting CTRL+C and start configuring it.
$ nano ~/.n8n/.envInsert the following lines.
WEBHOOK_URL=https://n8n.yourdomain.com
WEBHOOK_TUNNEL_URL=https://n8n.yourdomain.com
N8N_HOST=0.0.0.0
N8N_PORT=5678
Make sure to replace n8n.yourdomain.com with the domain subdomain you want to use to access your n8n website.
Step 4. Install PostgreSQL
By default, n8n uses SQLite as its database backend. However, for production, we can use PostgreSQL as the database server. Let’s install PostgreSQL now.
$ sudo apt install postgresql postgresql-contribOnce installed, we can create a new database for our n8n project.
$ sudo su postgresNow, let’s go to the PostgreSQL shell
$ psqlRun these commands inside the PSQL shell.
CREATE DATABASE n8ndb;
CREATE USER n8nuser WITH SUPERUSER PASSWORD 'm0d1fyth15';
GRANT ALL PRIVILEGES ON DATABASE n8ndb TO n8nuser;
\q
Ensure that you replace ‘m0d1fyth15’ with a stronger password.
Let’s exit from user postgres now.
$ exitNow, you can modify your .env file and use the credentials above to connect your n8n project with the PostgreSQL database.
$ nano ~/.n8n/.envAppend the following lines to the file.
DB_TYPE=postgresdb
DB_POSTGRESDB_HOST=localhost
DB_POSTGRESDB_PORT=5432
DB_POSTGRESDB_DATABASE=n8ndb
DB_POSTGRESDB_USER=n8nuser
DB_POSTGRESDB_PASSWORD=m0d1fyth15
DB_POSTGRESDB_SCHEMA=n8ndb
Save the file, then exit.
Step 5. Create a Systemd File
As an alternative to PM2 to manage your n8n project, we can also use a systemd file. Let’s create a systemd file now.
$ sudo nano /etc/systemd/system/n8n.serviceInsert the following into the file.
[Unit]
Description=n8n
After=network.target

[Service]
User=master
WorkingDirectory=/home/master/.n8n
EnvironmentFile=/home/master/.n8n/.env
ExecStart=/usr/bin/n8n
Restart=on-failure
RestartSec=5s

[Install]
WantedBy=multi-user.target
Save the file, then exit. And, do not forget to reload the systemd service and then run n8n.
$ sudo systemctl daemon-reload
$ sudo systemctl enable --now n8n
That’s it; your n8n application is now running, and it’s enabled to start upon server reboot.
Step 6. Install and Configure Nginx
To access your n8n website at http://yourdomain.com instead of http://YOUR_SERVER_IP_ADDRESS:5678, we need to install a web server and configure it as a reverse proxy. In this step, we will install nginx and configure it as a reverse proxy for n8n.
To use nginx, we can install it by running the command below:
$ sudo apt install nginxOn Ubuntu 24.04 server, nginx should be up and running upon installation. Let’s create a new nginx server block now.
$ sudo nano /etc/nginx/conf.d/n8n.confInsert the following into that file.
upstream n8n {
   server 127.0.0.1:5678;
   }

server {
   listen 80;
   server_name n8n.yourdomain.com;

   access_log /var/log/nginx/n8n.access.log;
   error_log /var/log/nginx/n8n.error.log;

   location / {
        proxy_pass http://n8n;
        proxy_set_header Host $host;
        proxy_set_header X-Real-IP $remote_addr;
        proxy_set_header X-Forwarded-For $proxy_add_x_forwarded_for;
        proxy_set_header X-Forwarded-Proto $scheme;

        proxy_http_version 1.1;
        proxy_set_header Upgrade $http_upgrade;
        proxy_set_header Connection "upgrade";
    }
}
Replace n8n.yourdomain.com with your actual domain name or subdomain name pointing to your server IP address. Then, save the file and exit from the editor.
To apply the changes, we can restart nginx
$ sudo systemctl restart nginxStep 7. Install SSL Certificate
In this step, we will install Certbot. Certbot is an ACME tool to generate SSL certificates provided by Let’s Encrypt.
$ sudo apt install python3-certbot-nginxOnce installed, we can execute this command to generate an SSL certificate. However, ensure that your subdomain or domain name is already pointing to your server; otherwise, Certbot will fail to generate the SSL certificate.
$ sudo certbot --nginx -d n8n.yourdomain.comReplace n8n.yourdomain.com with the actual domain or subdomain you use, ensuring it matches the one you use in Nginx.
Certbot will automatically update your nginx configuration to use HTTPS. You should be able to access https://n8n.yourdomain.com
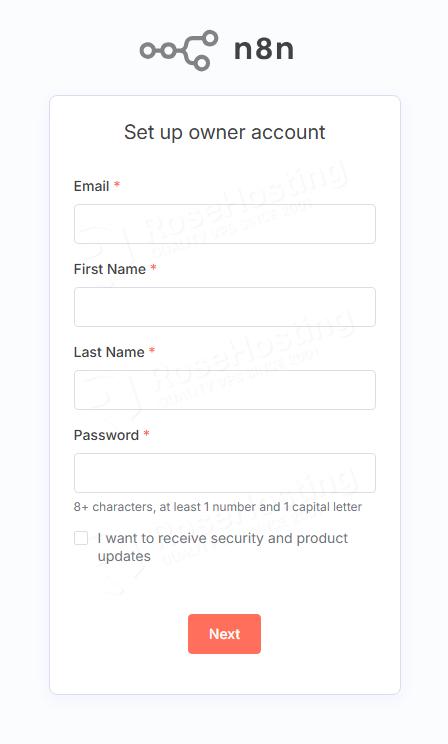
At this point, you can add a new owner account.

Fill them all in, then click on the’ Get started’ button.
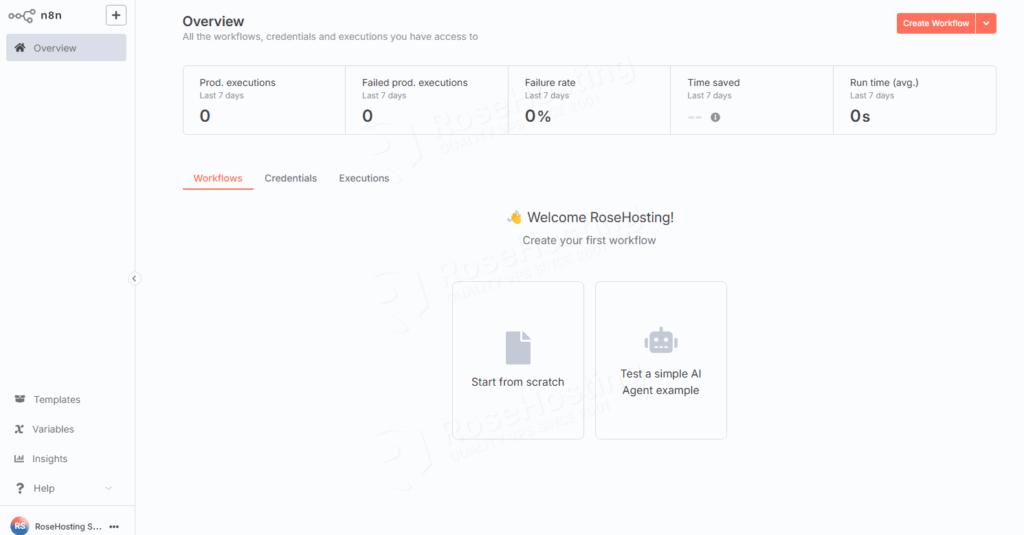
Now you can start working on your n8n backend.
n8n Self-Hosting Complete
That’s it all! You have successfully installed n8n on Ubuntu 24.04.
If you are one of our web hosting customers and use our managed Ubuntu Hosting, you don’t need to follow this tutorial to install n8n on Ubuntu 24.04 yourself. Our Linux administrators will set up and configure n8n hosting on one of our servers for you. They are available 24/7 and will attend to your request promptly. All you need to do is submit a ticket. Bear in mind that n8n self-hosting is not just about the installation; we can help you optimize your n8n installation if you have an active service with us. We will also help you if you require us to use Docker to install n8n.
If you liked this post, please share it with your friends or leave a reply below.