
This blog post is about installing PrestaShop on Ubuntu 26.04 OS. PrestaShop is an open-source e-commerce platform written in PHP for building and managing online stores. It allows businesses to create customizable websites to sell products, manage inventory, orders, and payments, without advanced programming knowledge. Because it is modular, users can extend it with plugins and themes to fit different needs. Small and medium-sized businesses often choose it for its flexibility and low cost. It is widely used for international sales today, thanks to its multilingual and multicurrency support.
In this post, we will install PrestaShop on the LAMP stack, and the entire installation should take around 20 minutes. Let’s get things done!
Table of Contents
Prerequisites to Install PrestaShop on Ubuntu
- A server running Ubuntu 26.04 OS
- User privileges: root or non-root user with sudo privileges
- A valid domain with a pointed A record to the server
Step 1. Update the System
Before installing the LAMP stack, make sure your system packages are up to date. Run the following command to upgrade everything to the newest versions:

apt update -y && apt upgrade -y
Step 2. Install LAMP stack
Before we can install PrestaShop on Ubuntu 26.04, we need to set up our LAMP stack. LAMP stands for Linux, Apache, MySQL, and PHP, and it is a common software stack used for web development. We will begin by installing the Apache web server. To do this, run the command below:
apt install apache2 -y
After installation, start the service and configure it to launch automatically at boot:
systemctl start apache2 && systemctl enable apache2
Verify that Apache is running correctly by checking its status with the following command:
systemctl status apache2
The output should look like this:
root@host:~# systemctl status apache2
● apache2.service - The Apache HTTP Server
     Loaded: loaded (/usr/lib/systemd/system/apache2.service; enabled; preset: enabled)
     Active: active (running) since Fri 2026-05-08 07:25:40 CDT; 11s ago
 Invocation: 8df00055b51245f9990c435073b0064f
       Docs: https://httpd.apache.org/docs/2.4/
   Main PID: 12146 (apache2)
     Status: "Total requests: 0; Idle/Busy workers 100/0;Requests/sec: 0; Bytes served/sec:   0 B/sec"
      Tasks: 55 (limit: 3770)
     Memory: 5.7M (peak: 5.7M)
        CPU: 179ms
     CGroup: /system.slice/apache2.service
Next in the LAMP stack is the MariaDB database service, which stores and manages data for web applications. Install it by running the following command:
apt install mariadb-server -y
After the installation is complete, start the service and configure it to launch automatically when the system boots:
systemctl start mariadb && systemctl enable mariadb
Then verify that MariaDB is running properly by checking its status:
systemctl status mariadb
The expected output should be similar to the following:
root@host:~# systemctl status mariadb
● mariadb.service - MariaDB 11.8.6 database server
     Loaded: loaded (/usr/lib/systemd/system/mariadb.service; enabled; preset: enabled)
     Active: active (running) since Fri 2026-05-08 07:32:09 CDT; 1h 59min ago
 Invocation: 91b3f1904a8d44c3b0ca292eaafc1991
       Docs: man:mariadbd(8)
             https://mariadb.com/kb/en/library/systemd/
    Process: 13230 ExecStartPre=/bin/sh -c [ ! -e /usr/bin/galera_recovery ] && VAR= ||   VAR=`/usr/bin/galera_recovery`; [ $? -eq 0 ]   && echo _WSREP_START_POSITION=$VAR > /run/mysql
d/wsrep-start-position || exit 1 (code=exited, status=0/SUCCESS)
    Process: 13296 ExecStartPost=/bin/rm -f /run/mysqld/wsrep-start-position /run/mysqld/wsrep-new-cluster (code=exited, status=0/SUCCESS)
    Process: 13298 ExecStartPost=/etc/mysql/debian-start (code=exited, status=0/SUCCESS)
   Main PID: 13282 (mariadbd)
     Status: "Taking your SQL requests now..."
      Tasks: 9 (limit: 24887)
     Memory: 93.3M (peak: 98.2M)
        CPU: 5.730s
     CGroup: /system.slice/mariadb.service
             └─13282 /usr/sbin/mariadbd
And the last of the LAMP stack will be PHP, along with its extensions. To install PHP with the extensions, execute the following command:
apt install php libapache2-mod-php php-cli php-fpm php-curl php-mysqlnd php-gd php-readline php-mbstring php-apcu php-xml php-dom php-zip php-intl php-common php-bcmath php-json -y
Once installed, verify the installation with the following command:
php -v
You should get the following output:
root@host:~# php -v
PHP 8.5.4 (cli) (built: Apr  1 2026 09:36:11) (NTS)
Copyright (c) The PHP Group
Built by Ubuntu
Zend Engine v4.5.4, Copyright (c) Zend Technologies
    with Zend OPcache v8.5.4, Copyright (c), by Zend Technologies
Step 3. Create PrestaShop Database and User
To create a PrestaShop database and user, you should execute the following commands one by one in the MariaDB terminal:
CREATE DATABASE prestadb;
CREATE USER 'prestauser'@'localhost' IDENTIFIED BY 'YourStrongPasswordHere';
GRANT ALL ON prestadb.* TO 'prestauser'@'localhost' WITH GRANT OPTION;
FLUSH PRIVILEGES;
EXIT;
Step 4. Download and Install PrestaShop
Since the LAMP stack is installed and the database is created, we can download and install PrestaShop. To do that, execute the following command:
cd /var/www/html

wget https://github.com/PrestaShop/PrestaShop/archive/refs/tags/9.1.1.zip

unzip 9.1.1.zip

mv PrestaShop-9.1.1/ prestashop/

rm 9.1.1.zip
Install Composer:
curl -sS https://getcomposer.org/installer | php -- --install-dir=/usr/local/bin --filename=composer
Install PrestaShop dependencies:
cd /var/www/html/prestashop

composer install
Set the correct permissions to files and folders:
chown -R www-data:www-data /var/www/html/prestashop/

find . -type d -exec chmod 755 {} \;

find . -type f -exec chmod 644 {} \;
Step 5. Create an Apache configuration file
To make your PrestaShop store accessible via a domain name, you must configure Apache with a dedicated virtual host configuration file. Begin by creating a new configuration file for the website.
Run the command below to create the Apache virtual host configuration file:
touch /etc/apache2/sites-available/prestashop.conf
Next, open the file and add the following configuration:
<VirtualHost *:80>
ServerName yourdomain.com
DocumentRoot /var/www/html/prestashop

<Directory /var/www/html/prestashop>
AllowOverride All
</Directory>

ErrorLog ${APACHE_LOG_DIR}/error.log
CustomLog ${APACHE_LOG_DIR}/access.log combined

</VirtualHost>
After adding the configuration, save the file and exit the editor.
Now enable the PrestaShop virtual host configuration and activate the Apache rewrite module.
a2enmod rewrite

a2ensite prestashop.conf
Before applying the changes, it is recommended to verify the Apache configuration syntax.
apachectl -t
If everything is configured properly, you should see output similar to this:
root@host:/var/www/html/prestashop# apachectl -t
Syntax OK
Once the syntax check passes successfully, restart the Apache service to apply the new configuration.
systemctl restart apache2
Your PrestaShop installation should now be reachable through your domain name at http://yourdomainhere.com
We are now finally ready to install PrestaShop on Ubuntu 26.04.
Step 6. Install PrestaShop on Ubuntu 26.04
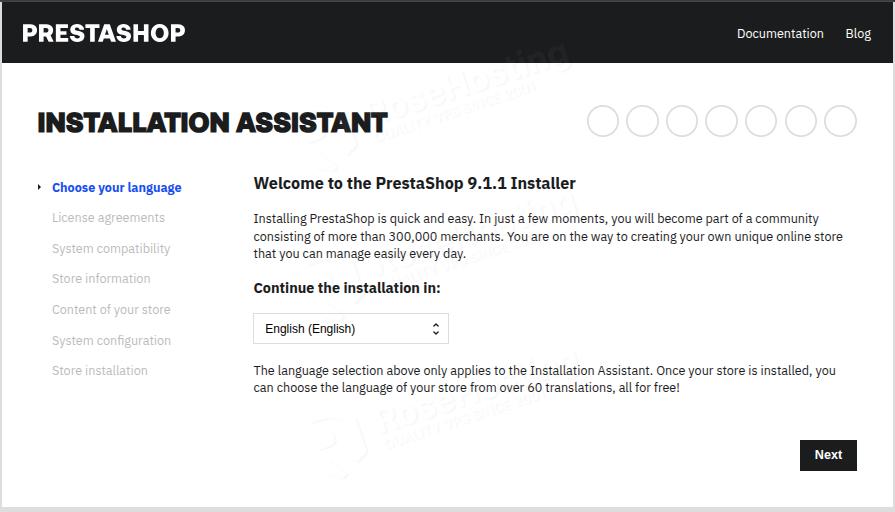
To finish the PrestaShop installation, access your domain at http://yourdomain.com. On the first screen, you should choose the language:
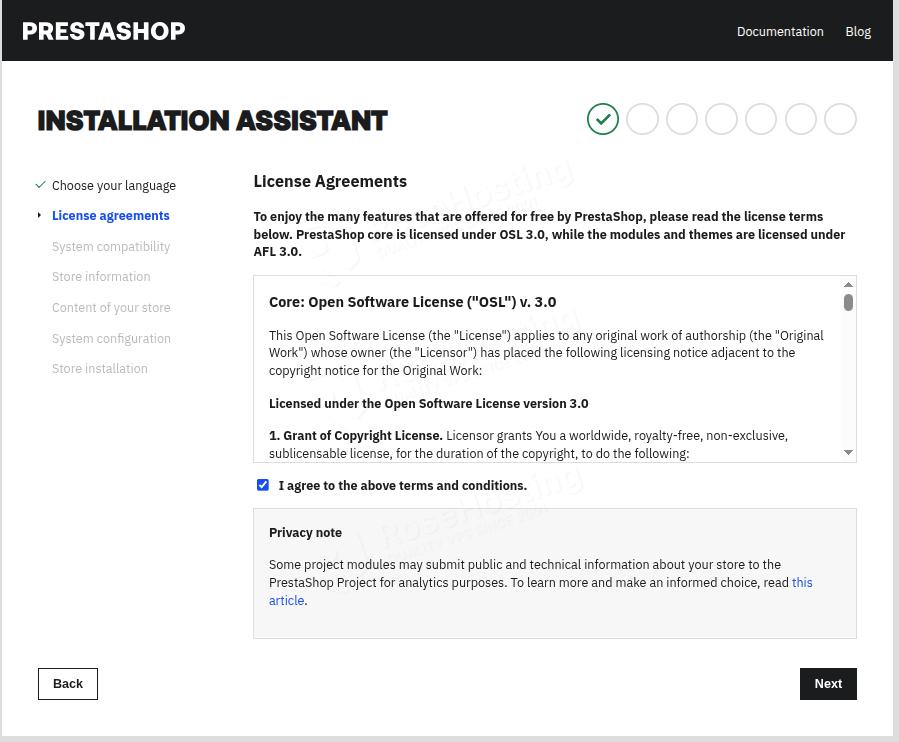
The next screen is for the license agreement. Check the “I agree to the above terms and conditions.”
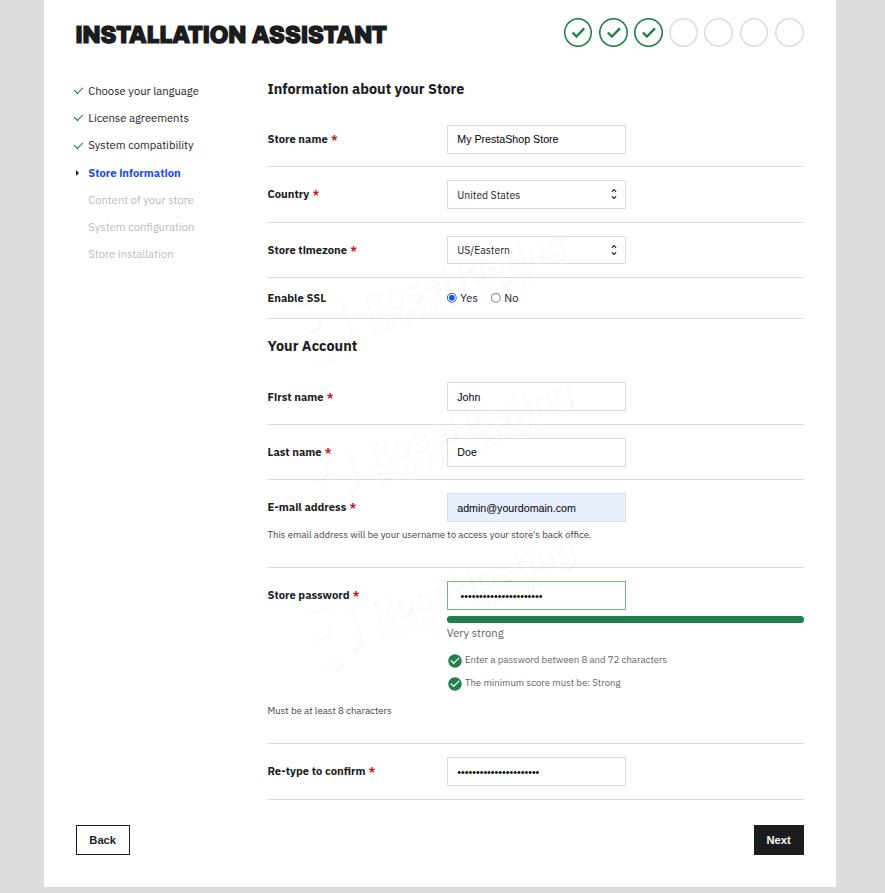
If everything is Ok with the system compatibility, it should redirect to the Store Information screen where you need to enter your store :
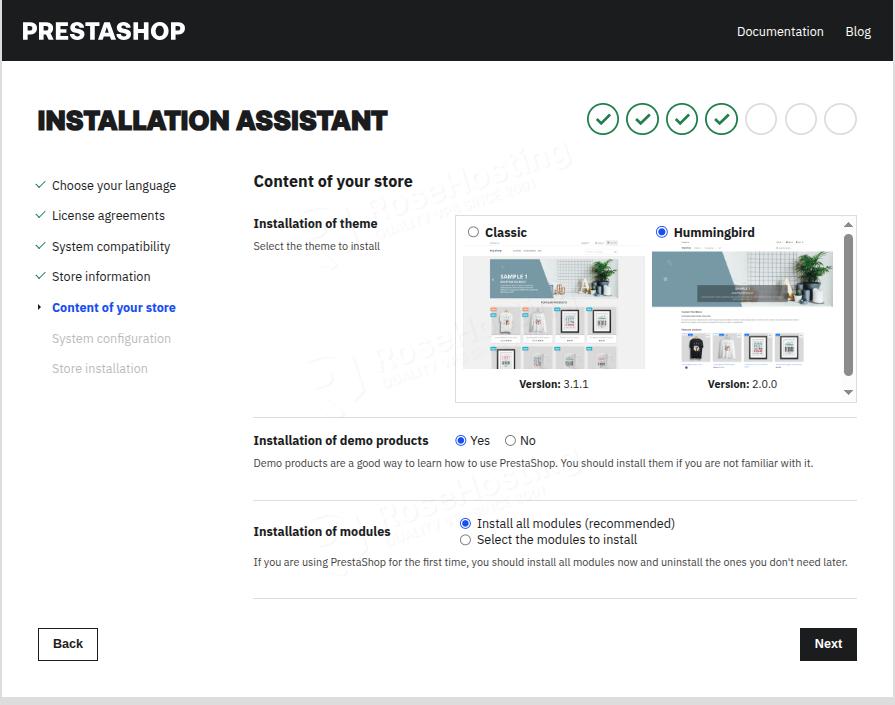
On the next screen, we can install the content we choose. We will select the installation of demo products and all modules.
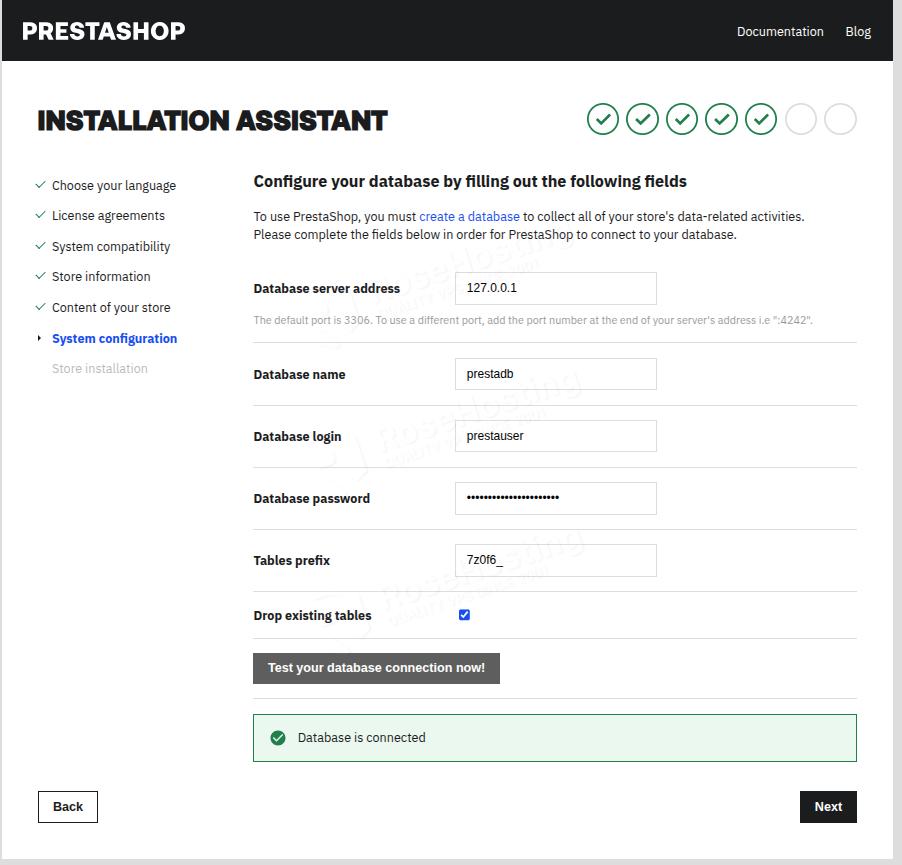
Next, fill in the database information we created in Step 3 above:
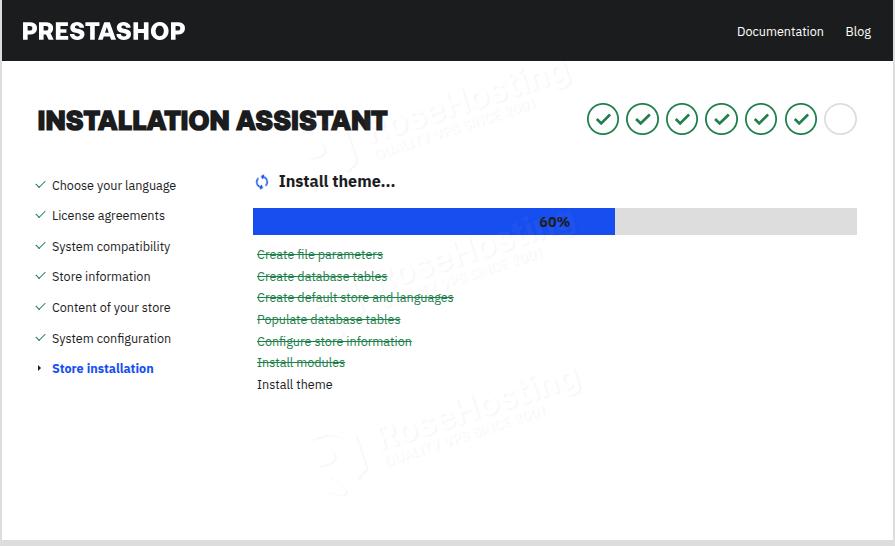
The installation will start:
Once the installation is complete, it will redirect you to the PrestaShop Admin dashboard.
You Managed to Install PrestaShop on Ubuntu 26.04
That’s it. You successfully installed PrestaShop on Ubuntu 26.04 OS.
Of course, you do not have to install it yourself if you have difficulty and are not familiar with Linux. All you have to do is sign up for one of our PrestaShop hosting plans and submit a support ticket. Our admins are available 24/7 and will help you with any aspect of installing PrestaShop.
If you liked this post on installing PrestaShop on Ubuntu 26.04, please share it with your friends or leave a comment below.