In this blog post, we will show you how to install Bitwarden on the latest Ubuntu 24.04 OS. Bitwarden is a free and open-source password manager that helps users store, manage, and share their sensitive data, such as passwords and passkeys. Bitwarden is designed to be compatible with different platforms, mobile devices, web browsers, and desktop applications. In the following paragraphs, we will cover the entire installation process, including Docker installation, creating a Bitwarden local user and directory, and installation via the script.
Installing Bitwarden on Ubuntu 24.04 is a straightforward process that may take up to 20 minutes. Let’s get started with installing Bitwarden on this version of Ubuntu!
Table of Contents
Prerequisites
- A server running Ubuntu 24 OS
- User privileges: root or non-root user with sudo privileges
- Valid domain name with a pointed A record to the server
Step 1. Update the system
Before we start with the installation of Docker and Bitwarden, we need to update the packages to their latest available versions. To do that, execute the following command:
sudo apt update -y && sudo apt upgrade -y
Step 2. Install Docker
Bitwarden can be easily deployed and managed using an array of Docker containers. It can be run with any Docker edition or plan. Now, let’s proceed and install Docker for your Ubuntu 24.04 setup of Bitwarden.
First, we need to set up the Docker repository by adding the GPG keys. Execute the following commands one by one:
sudo apt-get install ca-certificates curl

sudo install -m 0755 -d /etc/apt/keyrings

sudo curl -fsSL https://download.docker.com/linux/ubuntu/gpg -o /etc/apt/keyrings/docker.asc

sudo chmod a+r /etc/apt/keyrings/docker.asc
Once the keys are added next step is to add the Docker repository because it does not exist in the default Ubuntu 24.04 repo.
echo \
  "deb [arch=$(dpkg --print-architecture) signed-by=/etc/apt/keyrings/docker.asc] https://download.docker.com/linux/ubuntu \
  $(. /etc/os-release && echo "${UBUNTU_CODENAME:-$VERSION_CODENAME}") stable" | \
  sudo tee /etc/apt/sources.list.d/docker.list > /dev/null
Once the repo is added, update the system and install Docker with the commands below:
sudo apt-get update

sudo apt-get install docker-ce docker-ce-cli containerd.io docker-buildx-plugin docker-compose-plugin
If the installation is successful, the Docker service will be automatically started. To check the status of the Docker service, execute the following command:
sudo systemctl status docker
You should get the following output:
root@host:~# sudo systemctl status docker
● docker.service - Docker Application Container Engine
     Loaded: loaded (/usr/lib/systemd/system/docker.service; enabled; preset: enabled)
     Active: active (running) since Sat 2025-08-09 03:26:10 CDT; 1min 5s ago
TriggeredBy: ● docker.socket
       Docs: https://docs.docker.com
   Main PID: 2458 (dockerd)
      Tasks: 9
     Memory: 21.9M (peak: 22.5M)
        CPU: 1.128s
     CGroup: /system.slice/docker.service
             └─2458 /usr/bin/dockerd -H fd:// --containerd=/run/containerd/containerd.sock
The Docker service is installed and ready for deploying containers. Let’s proceed with local user and directory creation for the Bitwarden installation on Ubuntu 24.04.
Step 3. Create a Bitwarden local user & directory
Creating a local Bitwarden user and directory will isolate the Bitwarden installation from the other applications on the server and will make it more secure if using strong passwords. To create a Bitwarden user, execute the command below:
sudo adduser bitwarden
Once this is executed, you will be asked for the password and some other info as explained below:
root@host:~# sudo adduser bitwarden
info: Adding user `bitwarden' ...
info: Selecting UID/GID from range 1000 to 59999 ...
info: Adding new group `bitwarden' (1000) ...
info: Adding new user `bitwarden' (1000) with group `bitwarden (1000)' ...
info: Creating home directory `/home/bitwarden' ...
info: Copying files from `/etc/skel' ...
New password:YourStrongPasswordHere
Retype new password:YourStrongPasswordHere
passwd: password updated successfully
Changing the user information for bitwarden
Enter the new value, or press ENTER for the default
        Full Name []: Bitwarden
        Room Number []:
        Work Phone []:
        Home Phone []:
        Other []:
Is the information correct? [Y/n] y
info: Adding new user `bitwarden' to supplemental / extra groups `users' ...
info: Adding user `bitwarden' to group `users' ...
The home directory of the Bitwarden user is /home/bitwarden, and we need to set the following permissions:
sudo chmod -R 700 /home/bitwarden
The next step is to create the Docker group (if it does not exist) and add the Bitwarden user to that group.
sudo groupadd docker

sudo usermod -aG docker bitwarden
Step 4. Install Bitwarden
The next step is to install Bitwarden, but first, we need to obtain a Bitwarden installation key and ID at https://bitwarden.com/host/. We need to add our email address and select the region. In our case, we will choose the US region. After submitting the button, we will receive our installation key and ID as explained above:
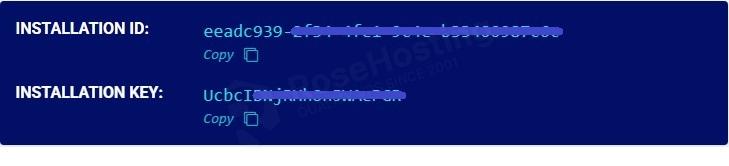
Save the key and ID because you will need them for the installation.
We have all the prerequisites for the Bitwarden installation. We only need to download and run the Bitwarden installation script for Ubuntu 24.04. To do that, follow the steps below:
# Login as bitwarden User

su - bitwarden

# Download the script

curl -Lso bitwarden.sh "https://func.bitwarden.com/api/dl/?app=self-host&platform=linux" && chmod 700 bitwarden.sh

# Make the script executable

chmod +x bitwarden.sh

# Run the Installer

./bitwarden.sh install
Once we run the installer, there will be a couple of steps you will need to complete:
bitwarden@host:~$ ./bitwarden.sh install
 _     _ _                         _
| |__ (_) |___      ____ _ _ __ __| | ___ _ __
| '_ \| | __\ \ /\ / / _` | '__/ _` |/ _ \ '_ \
| |_) | | |_ \ V  V / (_| | | | (_| |  __/ | | |
|_.__/|_|\__| \_/\_/ \__,_|_|  \__,_|\___|_| |_|

Open source password management solutions
Copyright 2015-2025, Bitwarden, Inc.
https://bitwarden.com, https://github.com/bitwarden

===================================================

bitwarden.sh version 2025.7.3
Docker version 28.3.3, build 980b856
Docker Compose version v2.39.1

(!) Enter the domain name for your Bitwarden instance (ex. bitwarden.example.com): yourdomain.com

(!) Do you want to use Let's Encrypt to generate a free SSL certificate? (y/n): y

(!) Enter your email address (Let's Encrypt will send you certificate expiration reminders): admin@yourdomain.com

Using default tag: latest
latest: Pulling from certbot/certbot
Digest: sha256:9626d72120577cf72da4fc7948806e9993598981720a4cbe04340a502468d67b
Status: Image is up to date for certbot/certbot:latest
docker.io/certbot/certbot:latest
Saving debug log to /etc/letsencrypt/logs/letsencrypt.log
Account registered.
Requesting a certificate for yourdomain.com

Successfully received certificate.
Certificate is saved at: /etc/letsencrypt/live/yourdomain.com/fullchain.pem
Key is saved at:         /etc/letsencrypt/live/yourdomain.com/privkey.pem
This certificate expires on 2025-11-07.
These files will be updated when the certificate renews.

 - - - - - - - - - - - - - - - - - - - - - - - - - - - - - - - - - - - - - - - -
(!) Enter the database name for your Bitwarden instance (ex. vault): bitwarden

2025.7.3: Pulling from bitwarden/setup
59e22667830b: Pull complete
136759efcfb5: Pull complete
267fb3c0707c: Pull complete
7a8adda00518: Pull complete
462e6c1e58f3: Pull complete
54076c9489fe: Pull complete
deaa3c9816a8: Pull complete
e54927255d11: Pull complete
dd22cc4e7deb: Pull complete
d85a419b08a6: Pull complete
5c2a127b015c: Pull complete
Digest: sha256:deada6acb2292c47bbe1c240f061a5c5fce12f94257a3fe379474e9497afe491
Status: Downloaded newer image for ghcr.io/bitwarden/setup:2025.7.3
ghcr.io/bitwarden/setup:2025.7.3

(!) Enter your installation id (get at https://bitwarden.com/host): Installation ID Here

(!) Enter your installation key: Installation Key Here

(!) Enter your region (US/EU) [US]: US

Generating DH parameters, 2048 bit long safe prime
..........................................
The installation will start, and we should allow some time for its completion. Once done, you will receive output similar to this:
Building nginx config.
Building docker environment files.
Building docker environment override files.
Building FIDO U2F app id.
Building docker-compose.yml.

Installation complete

If you need to make additional configuration changes, you can modify
the settings in `./bwdata/config.yml` and then run:
`./bitwarden.sh rebuild` or `./bitwarden.sh update`

Next steps, run:
`./bitwarden.sh start`
To start the Bitwarden container, execute the following command:
./bitwarden.sh start
Once all data is pulled and everything is deployed, you will receive the following:
Status: Image is up to date for ghcr.io/bitwarden/setup:2025.7.3
ghcr.io/bitwarden/setup:2025.7.3


Bitwarden is up and running!
===================================================

visit https://yourdomain.com
to update, run `./bitwarden.sh updateself` and then `./bitwarden.sh update`
Let’s proceed to the last step of this post, and that is finishing the Bitwarden installation.
Step 5. Finish the Bitwarden Installation
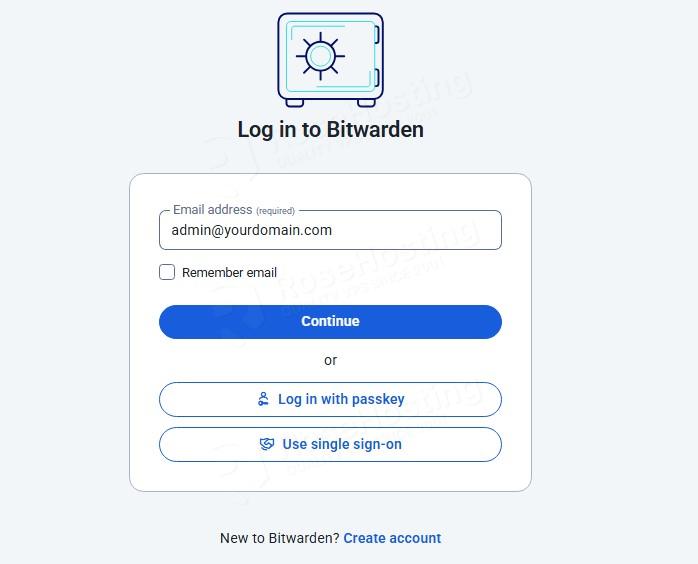
To finish the installation that you started with Bitwarden on Ubuntu 24.04, access the URL you set in the installation: http://yourdomain.com.
Enter your email address and click the Create account button.
Enter your name, for example: MyCompany, and click Continue.
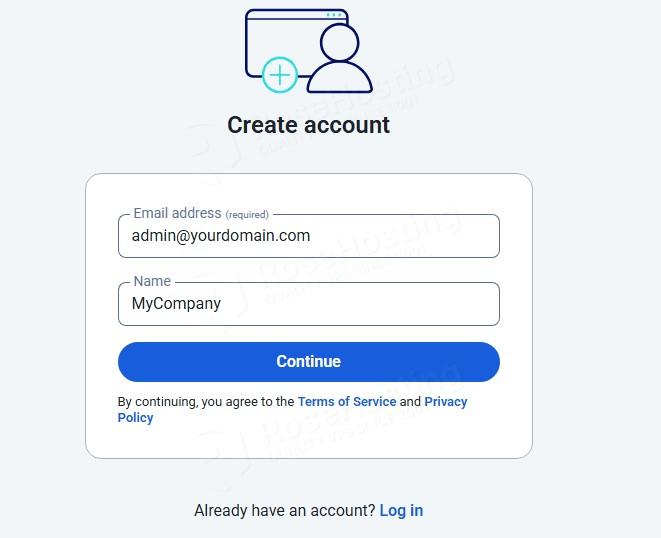
Next, add your master password and its hint.
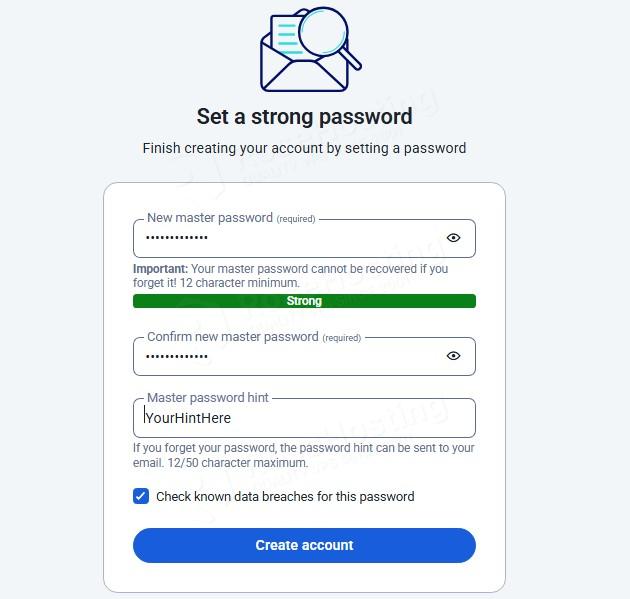
Once you enter them, you need to click on the Create Account button. After that, you will be automatically logged in to the Bitwarden admin dashboard.
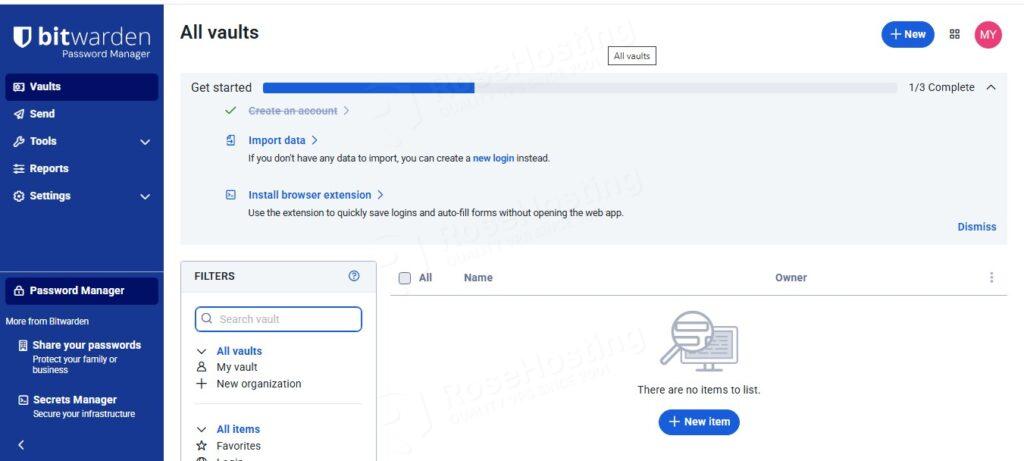
Congratulations! You successfully installed Bitwarden on Ubuntu 24.04 OS
Of course, you do not have to install it on your own if you have difficulties and are not familiar with Linux. Simply sign up for one of our Bitwarden hosting plans and submit a support ticket. Our admins are available 24/7 and will help you with any aspect of installing Bitwarden.
If you liked this post on installing Bitwarden on Ubuntu 24.04, please share it with your friends or leave a comment below. Thanks.