Every programming language has a framework. CodeIgniter is a lightweight, open-source PHP framework, making it one of the most widely used PHP frameworks among website developers. It is a framework that uses the MVC (Model-View-Controller) architecture to develop dynamic websites in PHP. CodeIgniter was first introduced on February 28, 2006. The MVC concept separates the display, data, and logic. This is a familiar concept within the framework. This concept provides comfort when working in a team. Backend developers can focus solely on the logic, while front-end developers focus exclusively on the display. In this article, we will show you how to install CodeIgniter on AlmaLinux 10.
Table of Contents
Prerequisites
- An AlmaLinux 10 VPS
- SSH root access or a regular system user with sudo privileges
Conventions
# – given commands should be executed with root privileges either directly as a root user or by use of sudo command
$ – given commands should be executed as a regular user
Step 1: Update the System
First, you will need to log in to your AlmaLinux 10 VPS via SSH as the root user:
ssh root@IP_Address -p Port_numberYou will need to substitute ‘IP_Address’ and ‘Port_number’ with your server’s corresponding IP address and SSH port number. Furthermore, substitute ‘root’ with the username of the system user with sudo privileges.
You can verify whether you have the correct AlmaLinux version installed on your server with the following command:
# cat /etc/almalinux-release You will see this message:
AlmaLinux release 10.0 (Purple Lion)Step 2. Install PHP
According to their documentation page at https://codeigniter.com/user_guide/intro/requirements.html, the latest version of CodeIgniter does not support PHP lower than version 8.4. At the time of this writing, the default version of PHP on AlmaLinux 10 is PHP 8.3. According to their documentation page at https://codeigniter.com/user_guide/intro/requirements.html, the latest version of CodeIgniter does not support PHP lower than version 8.4. So, we are going to install PHP 8.5 now.
# dnf -y install https://rpms.remirepo.net/enterprise/remi-release-10.1.rpm
# dnf update
Once updated, we can check all available PHP versions to install on our AlmaLinux server after installing the Remi repo.
# dnf module list phpYou will see an output like this:
Last metadata expiration check: 0:11:31 ago on Fri Dec 12 18:45:03 2025.
Remi's Modular repository for Enterprise Linux 10 - x86_64
Name                               Stream                                 Profiles                                                 Summary
php                                remi-7.4                               common [d], devel, minimal                               PHP scripting language
php                                remi-8.0                               common [d], devel, minimal                               PHP scripting language
php                                remi-8.1                               common [d], devel, minimal                               PHP scripting language
php                                remi-8.2                               common [d], devel, minimal                               PHP scripting language
php                                remi-8.3                               common [d], devel, minimal                               PHP scripting language
php                                remi-8.4                               common [d], devel, minimal                               PHP scripting language
php                                remi-8.5                               common [d], devel, minimal                               PHP scripting language

Hint: [d]efault, [e]nabled, [x]disabled, [i]nstalled
As seen above, we should be able to install PHP 8.5 now.
To enable the default source to get these scripting packages to install on our AlmaLinux machine, we need to reset it first, then mention the desired version to enable.
# dnf module reset php
# dnf module enable php:remi-8.5
That’s it, we have switched to PHP 8.5. Now, to install PHP 8.5 with its required extensions, we can execute the command below:
# dnf install php php-{bz2,ctype,curl,fpm,gd,imagick,intl,json,fileinfo,libxml,mbstring,mysqlnd,openssl,posix,session,simplexml,xmlreader,xmlwriter,zip,zlib}Once the installation is completed, the PHP-FPM service is running but is not enabled upon server reboot. You can check and verify the installed PHP version with this command.
# php -vIt will return an output like this:
PHP 8.5.0 (cli) (built: Nov 18 2025 08:02:20) (NTS gcc x86_64)
Copyright (c) The PHP Group
Built by Remi's RPM repository <https://rpms.remirepo.net/> #StandWithUkraine
Zend Engine v4.5.0, Copyright (c) Zend Technologies
    with Zend OPcache v8.5.0, Copyright (c), by Zend Technologies
Step 3. Install Composer
In this step, we are going to install Composer. The installation is fairly easy and straightforward.
# curl -sS https://getcomposer.org/installer -o composer-setup.php
# php composer-setup.php --install-dir=/usr/local/bin --filename=composer
That’s it. To check the version of the installed Composer, you can run this command:
# composer -VStep 4. Install MySQL
CodeIgniter supports multiple database engines, like MySQL/MariaDB, PostgreSQL, SQLite3, Microsoft SQL Server, or Oracle Database. In this step, we are going to install MariaDB from the default Debian 13 repository. To install the MariaDB server, execute the command below:
# dnf install mariadb-server MariaDB should be up and running now.
Step 5. Create a Database
On AlmaLinux 10, MariaDB will start automatically upon installation. Since the database server is up and running now, we can log in to the MySQL shell and create a database for our CodeIgniter website.
# mysql Once logged in to the MySQL shell, we can run the following commands.
mysql> CREATE DATABASE codeigniter;
mysql> GRANT ALL on codeigniter.* to codeigniter@localhost identified by 'm0d1fyth15';
mysql> FLUSH PRIVILEGES;
mysql> \q
Remember to replace m0d1fyth15 with a stronger password.
Step 6. Install CodeIgniter
We can install CodeIgniter by directly downloading the installation file or using Composer. To install CodeIgniter with Composer, let’s execute these commands:
# cd /var/www/html
# /usr/local/bin/composer create-project codeigniter4/appstarter rosehosting -vvv
Wait for the process to complete.
There are several arguments we passed to this command:
create-project is the command to create a new project with Composer;
codeigniter4/appstarter is the CodeIgniter file to be downloaded;
rosehosting is the name of the project we will create;
-vvv allows you to view the installation process in more detail.
Once the process is complete, you will have a new folder called rosehosting in the directory where you execute the command from.
Step 7. Configure CodeIgniter
To start making a configuration file, we can copy the sample env file to .env
# cd /var/www/html/rosehosting
# cp -a env .env
Now, we can edit the .env file.
# nano .env#--------------------------------------------------------------------
# ENVIRONMENT
#--------------------------------------------------------------------
CI_ENVIRONMENT = developmentNow add the database details.
#--------------------------------------------------------------------
# DATABASE
#--------------------------------------------------------------------

database.default.hostname = localhost
database.default.database = codeigniter
database.default.username = codeigniter
database.default.password = m0d1fyth15
database.default.DBDriver = MySQLi
Also, configure the URL to access the CodeIgniter4 web UI.
app.baseURL = 'http://ci.yourdomain.com'Replace ci.yourdomain.com with your actual domain name pointing to your server. Save the file, then exit from the editor
Step 8. Install and Configure Nginx
In this tutorial, we will install and use Nginx, not Apache. Run the following command to install it.
# dnf -y install nginxUpon installation, Nginx will automatically run. It is also configured to start automatically upon reboot.
Now, let’s create an Nginx server block for the domain name you will use for accessing CodeIgniter. For example, we will use ci.yourdomain.com
# nano /etc/nginx/conf.d/codeigniter.conf Insert the following into the file.
upstream codeigniter {
server unix:/run/php-fpm/www.sock;
}
server {
listen 80;
root /var/www/html/rosehosting/public;
index index.php;
server_name _;
location / {
try_files $uri $uri/ /index.php;
}
location ~ \.php$ {
include fastcgi_params;
fastcgi_pass codeigniter;
fastcgi_param SCRIPT_FILENAME $document_root$fastcgi_script_name;
}
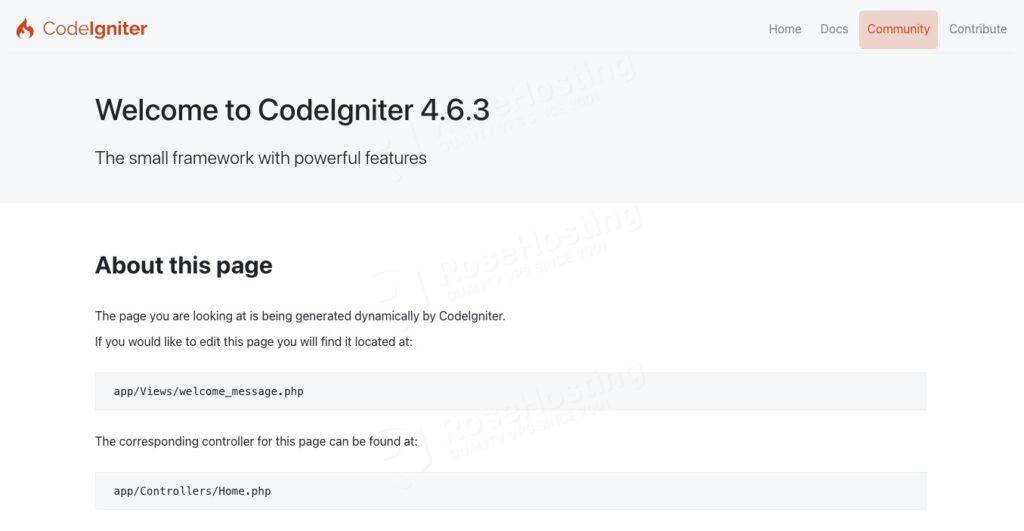
}That’s it! You can now go to http://ci.yourdomain.com and start building your CodeIgniter website.
If you are one of our web hosting customers and use our managed AlmaLinux Hosting, you don’t have to follow this tutorial and install CodeIgniter on AlmaLinux 10 yourself; our Linux admins will set up and configure a CodeIgniter VPS for you. They are available 24×7 and will take care of your request immediately, and all you need to do is submit a ticket. Installing CodeIgniter is not just about the installation; we can help you optimize your CodeIgniter installation if you have an active service with us.
If you liked this post on how to install CodeIgniter on AlmaLinux 10, please share it with your friends or leave a comment below.