
EtherCalc is an open-source and web-based spreadsheet that allows you to collaborate and work remotely and in real-time. It allows multiple users to edit the same spreadsheet at the same time. It is an alternative to Google Sheets and accepts various mathematical formulas and functions.
In this tutorial, we will show you how to install EtherCalc on a CentOS 8 VPS.
Table of Contents
Prerequisites
- A CentOS 8 VPS (we’ll be using our SSD 2 VPS plan)
- Access to the root user account (or access to an admin account with root privileges)
Step 1: Log in to the Server & Update the Server OS Packages
First, log in to your CentOS 8 server via SSH as the root user:

ssh root@IP_Address -p Port_number
You will need to replace ‘IP_Address‘ and ‘Port_number‘ with your server’s respective IP address and SSH port number. Additionally, replace ‘root’ with the username of the admin account if necessary.
Before starting, you have to make sure that all CentOS packages installed on the server are up to date. You can do this by running the following commands:
dnf update -y
Step 2: Install Required Dependencies
Before starting, you will need to install the EPEL repository and some required dependencies in your server.
First, install EPEL repo with the following command:
dnf install epel-release -y
After installing, EPEL repo, install Nginx web server and development tools with the following command:
dnf install nginx curl git unzip -y
dnf groupinstall 'Development Tools'
Once all the packages are installed, start the Nginx service and enable it to start at system reboot:
systemctl start nginx
systemctl enable nginx
Step 3: Install Node.js and Redis
By default, the latest version of Node.js is not available in the CentOS 8 default repository. So you will need to enable the Node.js repo to your system.
You can enable the Node.js repo with the following command:
dnf module enable nodejs:12
Next, install the Node.js with the following command:
dnf install nodejs -y
After installing Node.js, verify the installed version of Node.js with the following command:
node --version
You should get the following output:
v12.18.4
Next, install the Redis server with the following command:
dnf install redis
Once installed, start Redis service and enable it to start at system reboot with the following command:
systemctl start redis
systemctl enable redis
Step 4: Install EtherCalc
You can install the EtherCalc easily using the ‘npm’ command:
npm install -g ethercalc
Once installed, start the EtherCalc with the following command:
ethercalc
You should get the following output:
Please connect to: http://centos8:8000/
Starting backend using webworker-threads
Falling back to vm.CreateContext backend
Express server listening on port 8000 in development mode
Zappa 0.5.0 "You can't do that on stage anymore" orchestrating the show
Connected to Redis Server: localhost:6379
As you can see, EtherCalc is started and listening on port 8000. Now, press CTRL+C to stop the EtherCalc.
Step 5: Create a Systemd Service File for EtherCalc
Next, you will need to create a systemd service file to manage the EtherCalc service. First, create a new user for EtherCalc with the following command:
adduser ethercalc
Next, add the EtherCalc user to the Nginx group with the following command:
usermod -a -G ethercalc nginx
Next, create a systemd service file for EtherCalc:
nano /etc/systemd/system/ethercalc.service
Add the following lines:
[Unit]
Description=Run Ethercalc, the collaborative spreadsheet editor.
After=syslog.target network.target

[Service]
Type=simple
User=ethercalc
ExecStart=/usr/local/bin/ethercalc --port 8000 --cors --expire 31104000
#RuntimeMaxSec=86400
#Restart=always

[Install]
WantedBy=multi-user.target
Save and close the file then reload the systemd daemon with the following command:
systemctl daemon-reload
Next, start the EtherCalc service and enable it to start at system reboot with the following command:
systemctl start ethercalc
systemctl enable ethercalc
You can also verify the status of the EtherCalc with the following command:
systemctl status ethercalc
You should get the following output:
● ethercalc.service - Run Ethercalc, the collaborative spreadsheet editor.
   Loaded: loaded (/etc/systemd/system/ethercalc.service; enabled; vendor preset: disabled)
   Active: active (running) since Sun 2020-11-15 03:08:03 EST; 5s ago
 Main PID: 24370 (node)
    Tasks: 11 (limit: 12523)
   Memory: 65.6M
   CGroup: /system.slice/ethercalc.service
           └─24370 node /usr/local/bin/ethercalc --port 8000 --cors --expire 31104000

Nov 15 03:08:03 centos8 systemd[1]: Started Run Ethercalc, the collaborative spreadsheet editor..
Nov 15 03:08:03 centos8 ethercalc[24370]: Please connect to: http://centos8:8000/
Nov 15 03:08:04 centos8 ethercalc[24370]: Starting backend using webworker-threads
Nov 15 03:08:04 centos8 ethercalc[24370]: Falling back to vm.CreateContext backend
Nov 15 03:08:04 centos8 ethercalc[24370]: Cross-Origin Resource Sharing (CORS) enabled.
Nov 15 03:08:04 centos8 ethercalc[24370]: Express server listening on port 8000 in development mode
Nov 15 03:08:04 centos8 ethercalc[24370]: Zappa 0.5.0 "You can't do that on stage anymore" orchestrating the show
Nov 15 03:08:04 centos8 ethercalc[24370]: Connected to Redis Server: localhost:6379
At this point, EtherCalc is started and listening on port 8000. You can check it with the following command:
ss -antlp | grep 8000
You should see the following output:
LISTEN 0 128 0.0.0.0:8000 0.0.0.0:* users:(("node",pid=24370,fd=18))
Step 6: Configure Nginx as a Reverse Proxy
Next, you will need to configure Nginx as a reverse proxy for EtherCalc. You can create an Nginx virtual host configuration file with the following command:
nano /etc/nginx/conf.d/ethercalc.conf
Add the following lines:
upstream ether_backend {
  server 127.0.0.1:8000;
}

server {
    listen 80;
    server_name ethercalc.example.com;

    location / {
        proxy_pass http://ether_backend/;
        proxy_http_version 1.1;
        proxy_set_header Upgrade $http_upgrade;
        proxy_set_header Connection "upgrade";
        proxy_set_header Host $http_host;

        proxy_set_header X-Real-IP $remote_addr;
        proxy_set_header X-Forward-For $proxy_add_x_forwarded_for;
        proxy_set_header X-Forward-Proto http;
        proxy_set_header X-Nginx-Proxy true;

        proxy_redirect off;
    }
}
Save and close the file then restart the Nginx service to apply the changes:
systemctl restart nginx
Step 7: Access EtherCalc Web UI
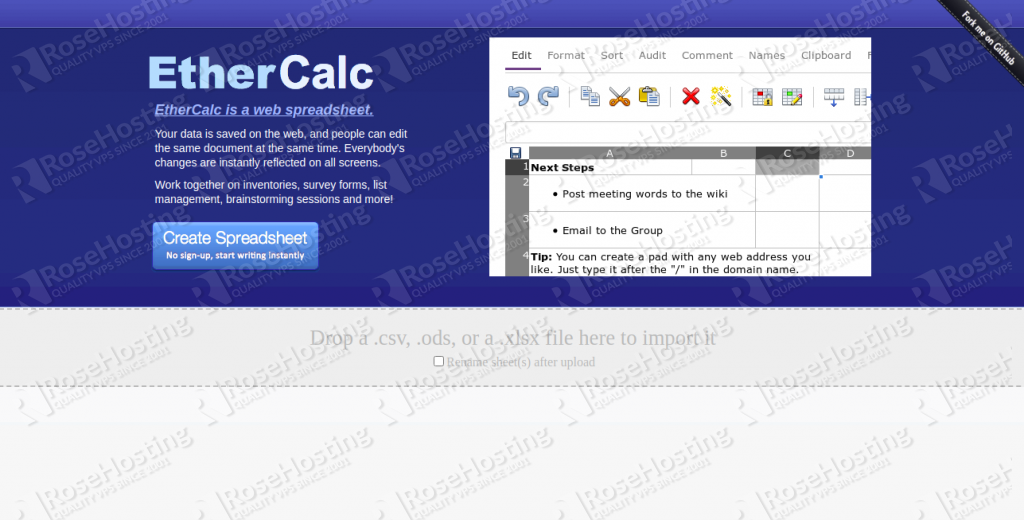
Now, open your web browser and access the EtherCalc web interface using the URL http://ethercalc.example.com. You should see the EtherCalc dashboard in the following screen:
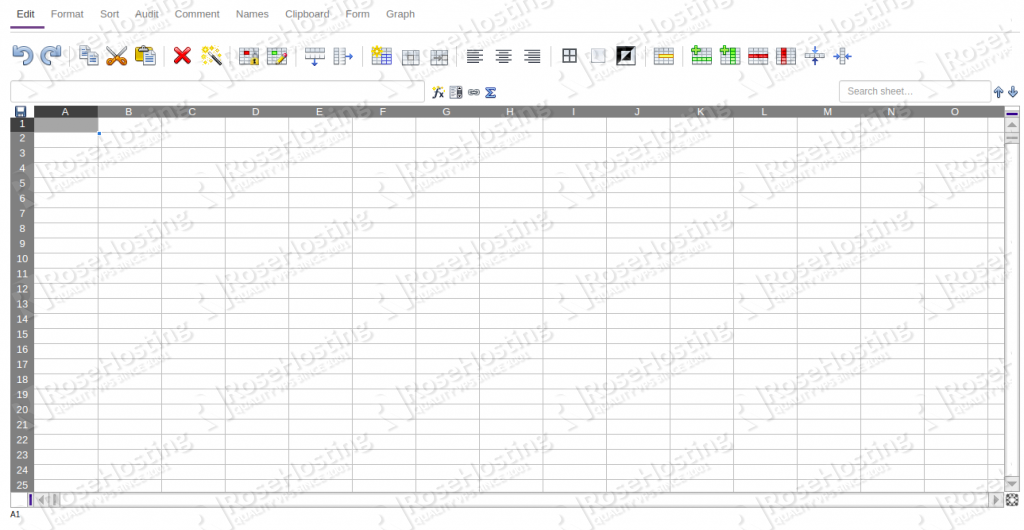
Now, click on the Create Spreadsheet. You should see the following screen:

Of course, you don’t have to do any of this if you use one of our Linux VPS Hosting services, in which case you can simply ask our expert Linux admins to setup this for you. They are available 24×7 and will take care of your request immediately.
PS. If you liked this post please share it with your friends on the social networks using the buttons on the left or simply leave a reply below. Thanks.