
In this tutorial, we will explain how to install Joomla on Ubuntu 26.04 OS. Joomla is a free and open-source CMS (Content Management System) written in PHP used for building, managing, and publishing content on websites and applications. Joomla stores data in a MySQL database, offering a robust model-view-controller (MVC) framework. There are many features offered by Joomla, such as extensibility, versatility, user-friendly desing a has a large community of developers. In this post, we will install Joomla on the LAMP stack so our website functions properly.
Installing Joomla is straighforward process that may take up to 15 minutes. Let’s get things done with our guide on Joomla installation for Ubuntu 26.04.
Table of Contents
Prerequisites
- A server running Ubuntu 26.04 OS
- User privileges: root or non-root user with sudo privileges
- A valid domain with a pointed A record to the server
Step 1. Update the System
Before we start installing the LAMP stack, we will update the system packages to their latest versions, which is essential for preparing to install Joomla on Ubuntu 26.04.
apt update -y && apt upgrade -y
Step 2. Install LAMP stack
The LAMP stack is a shortcut for Linux, Apache, MySQL, and PHP, and is very important for building web applications. First of the LAMP stack will be the Apache web server. To install the Apache web server, execute the following command:
apt install apache2 -y
Once installed, start and enable the Apache service before proceeding to install Joomla on Ubuntu 26.04.
systemctl start apache2 && systemctl enable apache2
Check the status of the service:
systemctl status apache2
You should get the following output:
root@host:/var/www/html# systemctl status apache2
● apache2.service - The Apache HTTP Server
     Loaded: loaded (/usr/lib/systemd/system/apache2.service; enabled; preset: enabled)
     Active: active (running) since Thu 2026-03-05 16:58:53 CST; 16s ago
 Invocation: 46773271c7044c46a985d47e4783d190
       Docs: https://httpd.apache.org/docs/2.4/
   Main PID: 3041 (apache2)
     Status: "Total requests: 0; Idle/Busy workers 100/0;Requests/sec: 0; Bytes served/sec:   0 B/sec"
      Tasks: 55 (limit: 4027)
     Memory: 5.1M (peak: 5.6M)
        CPU: 191ms
     CGroup: /system.slice/apache2.service
Next in the LAMP stack will be the MariaDB database service. To install it, execute the command below:
apt install mariadb-server -y
Once installed, start and enable the MariaDB service to get ready for Joomla installation on Ubuntu 26.04.
systemctl start mariadb && systemctl enable mariadb
Check the status of the service:
systemctl status mariadb
You should get the following output:
root@host:/var/www/html# systemctl status mariadb
● mariadb.service - MariaDB 11.8.6 database server
     Loaded: loaded (/usr/lib/systemd/system/mariadb.service; enabled; preset: enabled)
     Active: active (running) since Thu 2026-03-05 17:00:34 CST; 13s ago
 Invocation: 84a17c4ceaf24db29701607547af7aaf
       Docs: man:mariadbd(8)
             https://mariadb.com/kb/en/library/systemd/
   Main PID: 4234 (mariadbd)
     Status: "Taking your SQL requests now..."
      Tasks: 14 (limit: 26579)
     Memory: 93.6M (peak: 98M)
        CPU: 7.389s
     CGroup: /system.slice/mariadb.service
             └─4234 /usr/sbin/mariadbd
And the last of the LAMP stack will be the PHP, along with its extensions. To install PHP with the extensions, execute the following command:
apt install php8.4 libapache2-mod-php8.4 php8.4-fpm php8.4-mysql php8.4-xml php8.4-mbstring php8.4-curl -y
Once installed, verify the installation with the following command for your Joomla deployment on Ubuntu 26.04.
php -v
You should get the following output:
root@host:/var/www/html# php -v
PHP 8.4.11 (cli) (built: Jan  7 2026 08:44:28) (NTS)
Copyright (c) The PHP Group
Built by Ubuntu
Zend Engine v4.4.11, Copyright (c) Zend Technologies
    with Zend OPcache v8.4.11, Copyright (c), by Zend Technologies
Step 3. Create a Joomla database and a user
To create a Joomla database, Joomla user, and assign the correct permissions, execute the following commands. These steps are critical for a secure Joomla install on Ubuntu 26.04.
CREATE USER 'joomlauser'@'localhost' IDENTIFIED BY 'YourStrongPassword';

CREATE DATABASE joomladb;

GRANT ALL PRIVILEGES ON joomladb.* TO 'joomlauser'@'localhost';

FLUSH PRIVILEGES;

EXIT;
Step 4. Download and install Joomla
First, we need to download and extract the Joomla files. This is a fundamental step for the installation process on Ubuntu 26.04.
mkdir -p /var/www/html/joomla

cd /var/www/html/joomla

wget https://downloads.joomla.org/cms/joomla6/6-0-3/Joomla_6-0-3-Stable-Full_Package.zip?format=zip -O /var/www/html/joomla/joomla.zip

unzip joomla.zip

rm joomla.zip
Set the right permissions for files and folders when you install Joomla on your Ubuntu 26.04 server.
chown -R www-data:www-data /var/www/html/joomla

find . -type d -exec chmod 755 {} \;

find . -type f -exec chmod 644 {} \;
Step 5. Create Apache Virtual Host File
To create the Apache configuration file, execute the following command; this helps ensure your Joomla website runs smoothly on Ubuntu 26.04.
touch /etc/apache2/sites-available/joomla.conf
Open the file
nano /etc/apache2/sites-available/joomla.conf
Paste the following lines of code:
<VirtualHost *:80>
ServerName yourdomain.com
DocumentRoot /var/www/html/joomla

<Directory /var/www/html/joomla>
AllowOverride All
</Directory>

ErrorLog ${APACHE_LOG_DIR}/error.log
CustomLog ${APACHE_LOG_DIR}/access.log combined

</VirtualHost>
Save the file and close it.
Enable the Apache configuration files for Joomla and the rewrite module for your Ubuntu 26.04 installation.
a2enmod rewrite

a2ensite joomla.conf
Check the Apache2 syntax:
apachectl -t
You should receive the following output:
root@host:/var/www/html/joomla# apachectl -t
Syntax OK
If the syntax is OK, restart the Apache service to finish your Joomla install on Ubuntu 26.04.
systemctl restart apache2
Next is to access and finish the Joomla installation at http://yourdomain.com
Step 6. Finish Joomla Installation
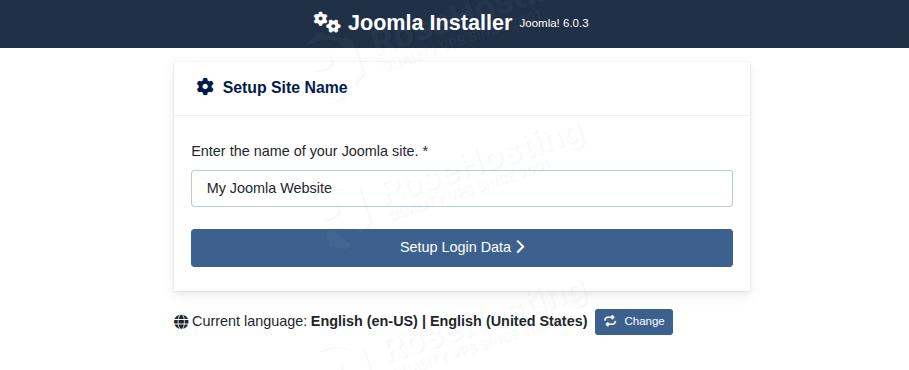
To finish the Joomla installation, access your domain at http://yourdomain.com. On the first screen, you should enter your Joomla website name. This step finalizes the process to install Joomla on Ubuntu 26.04.
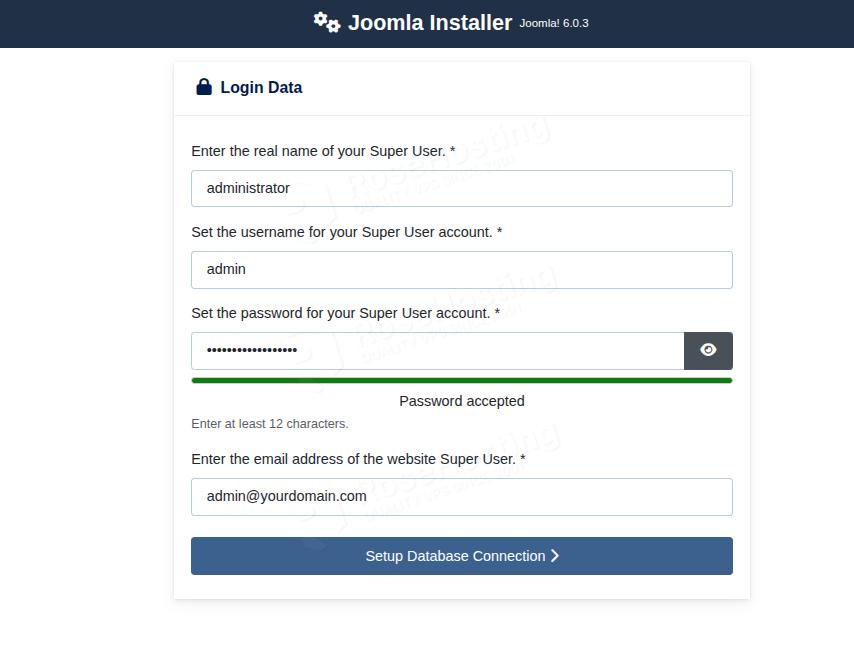
After clicking on Setup Login Data, you need to enter your super user account login info:
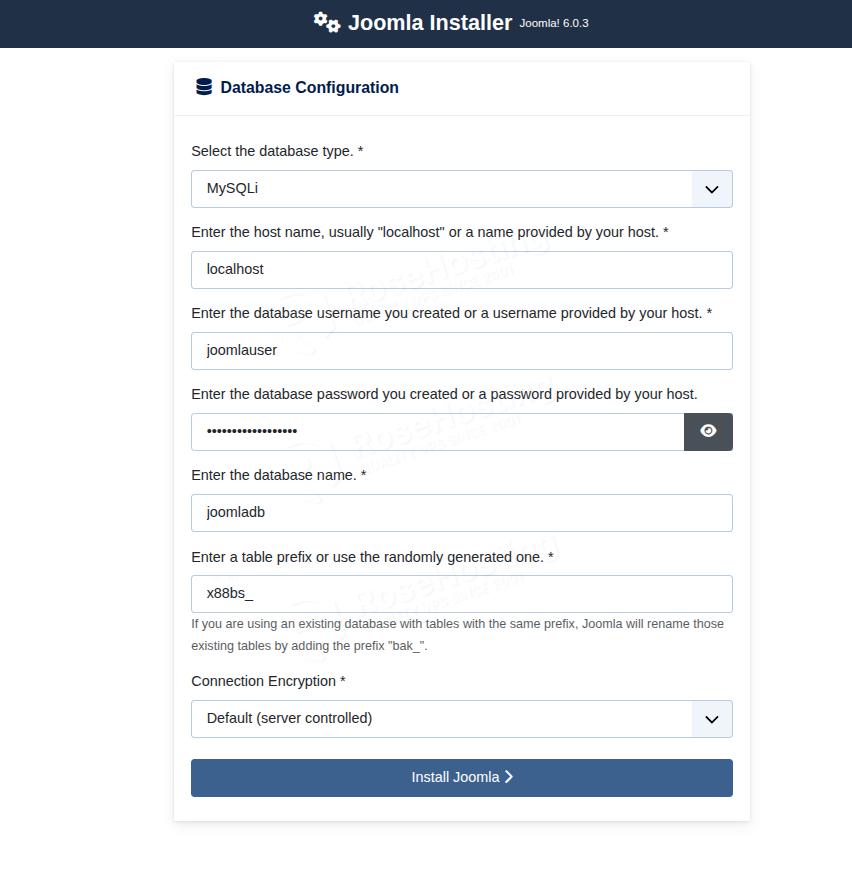
The next screen is for the database connection. Enter the database credentials you created in Step 3 above to complete your Joomla installation on Ubuntu 26.04.
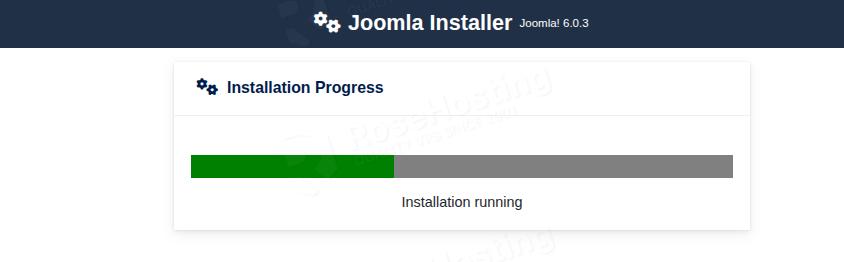
Once the credentials are entered, click on the Install Joomla button, and allow some time for the installation process to complete:
Once done, you will be redirected to the following screen:
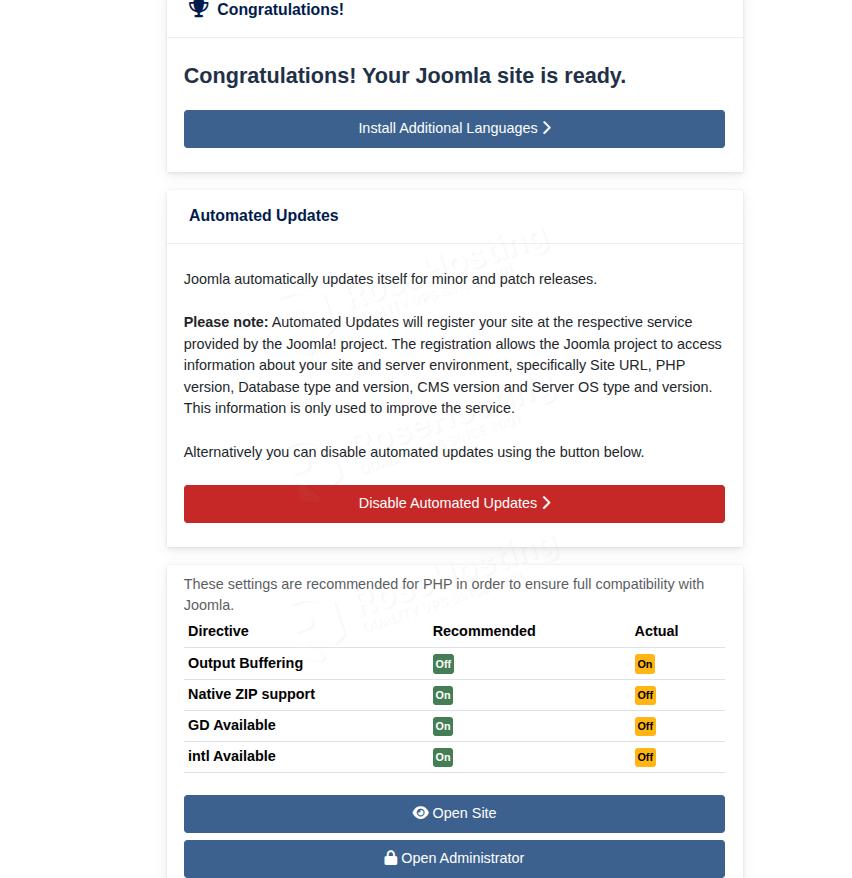
Congratulations! You successfully installed Joomla on Ubuntu 26.04 OS.
Of course, you do not have to install it yourself if you have difficulties or are not familiar with Linux. All you have to do is sign up for one of our NVMe Linux VPS plans and submit a support ticket. Our admins are available 24/7 and will help you with any aspect of installing Joomla.
If you liked this post on how to install Joomla on Ubuntu 26.04, please share it with your friends or simply leave a reply below.