We’ll show you how to install LAMP on CentOS 7. LAMP is actually an acronym for a web services solution stack consisting of Linux, the Apache HTTP Server, the MySQL or MariaDB database engines, and the PHP, Perl or Python programming language. All components are free and open-source software, and the combination is suitable for building dynamic web pages.
Requirements?
We are using our SSD 1 VPS hosting plan for this set-up, which should be more than enough to run LAMP and host multiple dynamic websites using virtual host directives.
1. Update the System
As always, make sure your CentOS 7 VPS is fully up-to-date and you’re in a screen session using the commands below:
## screen -U -S lamp-centos7
## yum update
2. Install MariaDB
MariaDB is the default database server in CentOS 7, so go ahead and install it with yum using the following command:
## yum install mariadb mariadb-server mysql
Once installed, add bind-address = 127.0.0.1 to /etc/my.cnf.d/server.cnf to bind MariaDB to localhost only:
## vim /etc/my.cnf.d/server.cnf

[mysqld]
#log-bin=mysql-bin
#binlog_format=mixed
bind-address = 127.0.0.1
Table of Contents
3. Restart and Configure MariaDB
Restart the MariaDB database server and enable it to start on system start-up using:
## systemctl restart mariadb
## systemctl status mariadb
## systemctl enable mariadb
4. Run MySQL post-installation script
Finally, you can run the mysql_secure_installation post-installation script to finish the MariaDB set-up. For example:
## mysql_secure_installation

Enter current password for root (enter for none): ENTER
Set root password? [Y/n] Y
Remove anonymous users? [Y/n] Y
Disallow root login remotely? [Y/n] Y
Remove test database and access to it? [Y/n] Y
Reload privilege tables now? [Y/n] Y
5. Install Apache
OK so far so good. Next, proceed with the installation of Apache, OpenSSL and mod_ssl using yum as in:
## yum install httpd openssl mod_ssl
6. Restart and Configure Apache
Restart Apache and add it to automatically start on your system start-up using:
## systemctl restart httpd
## systemctl status httpd
## systemctl enable httpd
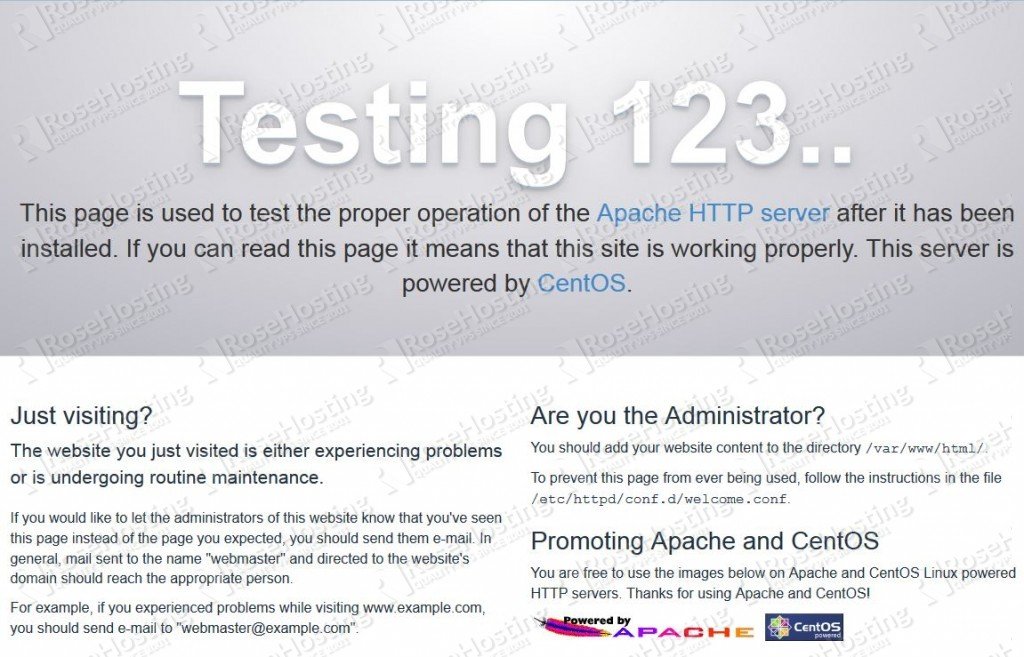
Test the set-up by opening, for example http://YOUR_SERVER_IP/ in your favorite browser. You should see the default Apache page, for example:
Great. Now let’s configure some extra Apache options, for example, hide its version number, its banner etc… by adding the following to /etc/httpd/conf.d/options.conf
## vim /etc/httpd/conf.d/options.conf

TraceEnable off

## Disable Signature
ServerSignature Off

## Disable Banner
ServerTokens Prod
Test Apache configuration file and restart the webserver for the changes to take effect:
## apachectl configtest
## systemctl restart httpd
## systemctl status httpd
7. Install PHP
In order to be able to run PHP based web applications, we have to add PHP support to the Apache webserver, so let’s install some required packages with yum:
## yum install php php-mysql
also, you may want to install some other PHP extensions required by your applications. Here is the list:
php-bcmath          : A module for PHP applications for using the bcmath library
php-cli             : Command-line interface for PHP
php-common          : Common files for PHP
php-dba             : A database abstraction layer module for PHP applications
php-devel           : Files needed for building PHP extensions
php-embedded        : PHP library for embedding in applications
php-enchant         : Enchant spelling extension for PHP applications
php-fpm             : PHP FastCGI Process Manager
php-gd              : A module for PHP applications for using the gd graphics library
php-intl            : Internationalization extension for PHP applications
php-ldap            : A module for PHP applications that use LDAP
php-mbstring        : A module for PHP applications which need multi-byte string handling
php-mysql           : A module for PHP applications that use MySQL databases
php-mysqlnd         : A module for PHP applications that use MySQL databases
php-odbc            : A module for PHP applications that use ODBC databases
php-pdo             : A database access abstraction module for PHP applications
php-pear.noarch     : PHP Extension and Application Repository framework
php-pecl-memcache   : Extension to work with the Memcached caching daemon
php-pgsql           : A PostgreSQL database module for PHP
php-process         : Modules for PHP script using system process interfaces
php-pspell          : A module for PHP applications for using pspell interfaces
php-recode          : A module for PHP applications for using the recode library
php-snmp            : A module for PHP applications that query SNMP-managed devices
php-soap            : A module for PHP applications that use the SOAP protocol
php-xml             : A module for PHP applications which use XML
php-xmlrpc          : A module for PHP applications which use the XML-RPC protocol
8. Configure PHP
OK, let’s continue with PHP configuration. Edit /etc/php.ini and set the following:
## vim /etc/php.ini

date.timezone = America/New_York
memory_limit = 64M
expose_php = Off
restart Apache using systemctl for the changes to take effect:
## systemctl restart httpd
## systemctl status httpd
Test if PHP module is loaded in Apache using:
## httpd -M | grep php

also

## php -v
You can create a test info.php script too using the following command:
## echo -e "<?php\n\tphpinfo();" > /var/www/html/info.php
and access it with the following command:
## curl -I $(curl -s icanhazip.com)/info.php
9. Set Up Apache VHosts
Now, you would have to set-up Apache Virtual Host Directives, to be able to host multiple domains, even SSL powered ones using one IP address. So, create /etc/httpd/conf.d/vhosts.conf and add the following:
## cat /etc/httpd/conf.d/vhosts.conf

# Load my vhosts
IncludeOptional vhosts.d/*.conf
This tells Apache, to load the configuration files ending with .conf which reside in /etc/httpd/vhosts.d. As you can guess, this is the place where we put our Virtual Hosts, so let’s set-up one for domain1.com and another for domain2.net
VHOST for domain1.com
## cat /etc/httpd/vhosts.d/domain1.com.conf

<VirtualHost YOUR_SERVER_IP:80>
    ServerAdmin webmaster@domain1.com
    DocumentRoot "/var/www/html/domain1.com"
    ServerName domain1.com
    ServerAlias www.domain1.com
    ErrorLog "/var/log/httpd/domain1.com-error_log"
    CustomLog "/var/log/httpd/domain1.com-access_log" combined

    <Directory "/var/www/html/domain1.com/">
        DirectoryIndex index.html index.php
        Options FollowSymLinks
        AllowOverride All
        Require all granted
    </Directory>
</VirtualHost>
VHOST for domain2.net
## cat /etc/httpd/vhosts.d/domain2.net.conf

<VirtualHost YOUR_SERVER_IP:80>
    ServerAdmin webmaster@domain2.net
    DocumentRoot "/var/www/html/domain2.net"
    ServerName domain2.net
    ServerAlias www.domain2.net
    ErrorLog "/var/log/httpd/domain2.net-error_log"
    CustomLog "/var/log/httpd/domain2.net-access_log" combined

    <Directory "/var/www/html/domain2.net/">
        DirectoryIndex index.html index.php
        Options FollowSymLinks
        AllowOverride All
        Require all granted
    </Directory>
</VirtualHost>
10. Restart Apache Server
Finally, restart Apache for the changes to take effect:
## apachectl configtest
## systemctl restart httpd
## systemctl status httpd
Of course you don’t have to install LAMP on CentOS 7, if you use one of our CentOS 7 Hosting Plans, in which case you can simply ask our expert Linux administrators to install LAMP on CentOS 7 for you. They are available 24×7 and will take care of your request immediately.
PS. If you liked this post, on how to install LAMP on CentOS 7, please share it with your friends on the social networks using the buttons on the left or simply leave a reply below. Thanks.