We’ll show you, how to install Drupal on Ubuntu 16.04. Today’s article is all about installing Drupal with LEMP (Linux, Nginx, MySQL and PHP-FPM) on Ubuntu 16.04. A LEMP stack is a synonym of LEMP server or LEMP web server. It refers to a set-up which includes Linux, Nginx, MySQL (MariaDB) and PHP. Drupal is a free and open source content-management framework written in PHP and distributed under the GNU General Public License. Drupal provides a back-end framework for at least 2.3% of all web sites worldwide – ranging from personal blogs to corporate, political, and government sites. ystems also use Drupal for knowledge management and for business collaboration. Installing Drupal on Ubuntu 16.04, is really an easy task, just carefully follow the steps below and you should have it installed in less then 10 minutes.
Table of Contents
1. Requirements
We will be using our SSD 1 Linux VPS hosting plan for this tutorial.
2. Log in to Your Server via SSH
# ssh root@server_ip
You can check whether you have the proper Ubuntu version installed on your server with the following command:
# lsb_release -a
You should get this output:
Distributor ID: Ubuntu
Description:    Ubuntu 16.04 LTS
Release:        16.04
Codename:       xenial
3. Update the System
Make sure your server is fully up to date using:
# apt-get update && apt-get upgrade
4. Install LEMP Stack
With the below command you will install the LEMP stack along with some needed PHP extensions.
# apt-get install nginx mysql-server php-fpm php-mysql php-gd php-xml
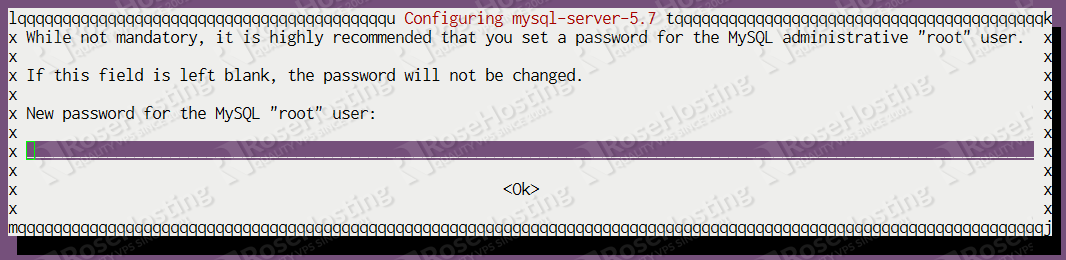
During the installation you will be prompted with an output from MySQL where you need to set the new MySQL root password just like the image below:
5. Configure PHP.INI
Once the installation is finished, edit the server php.ini file and change the cgi.fix_pathinfo parameter value to 0. By default it will be commented out with a semi-colon and the value set to 1 which practically ensures that PHP will attempt to execute the closest file available when a requested PHP file can’t be found. This is a bad security practice, so let’s change it. Execute the below command:
# nano /etc/php/7.0/fpm/php.ini
Now find the cgi.fix_pathinfo line, uncomment it and set the value to 0. Save and close the file.
Restart PHP-FPM so the changes can take effect.
# systemctl restart php7.0-fpm
6. Configure Nginx
You should now configure Nginx to use PHP which can be done by editing the default server block. Issue the below command:
# nano /etc/nginx/sites-available/default
Add index.php in the index directive so the index.php files are served.
Then uncomment a part of the section that handles PHP requests. This part consists of the ‘location ~ \.php$ {‘ block which includes the fastcgi-php.conf snippet and socket connected with php-fpm. After editing, the file should look like this:
server {
        listen 80 default_server;

       root /var/www/html;

        # Add index.php to the list if you are using PHP
        index index.php index.html index.htm index.nginx-debian.html;

        server_name _;

        location / {
                # First attempt to serve request as file, then
                # as directory, then fall back to displaying a 404.
                try_files $uri $uri/ =404;
        }

        # pass the PHP scripts to FastCGI server listening on 127.0.0.1:9000
        #
        location ~ \.php$ {
                include snippets/fastcgi-php.conf;
                fastcgi_pass unix:/run/php/php7.0-fpm.sock;
        }

        # deny access to .htaccess files, if Apache's document root
        # concurs with nginx's one
        #
        location ~ /\.ht {
                deny all;
        }
}
Save and close the file. Then, check the configuration file for syntax errors:
# nginx -t
If no errors are reported, restart Nginx for the changes to take effect:
# systemctl restart nginx
The LEMP installation is now complete. If you want to check whether Nginx handles PHP files correctly, create a test phpinfo.php file in the Nginx document root. Open a file with the nano text editor:
# nano /var/www/html/phpinfo.php
Paste the following:
 <?php

// Show all information, defaults to INFO_ALL
phpinfo();

// Show just the module information.
// phpinfo(8) yields identical results.
phpinfo(INFO_MODULES);

?>
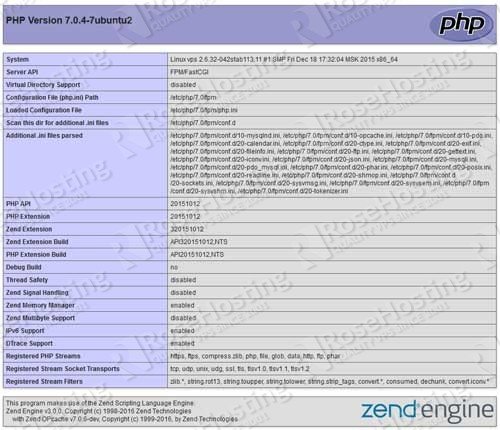
Now open your favorite web browser and navigate to http://your_server_IP/phpinfo.php . You should be presented with a page like the one in the image below:
7. Install Drupal on Ubuntu 16.04
Now that everything is in order with the LEMP installation, install Drupal for your website. We will install Drupal in the Nginx document root (/var/www/html). Enter the directory:
# cd /var/www/html/
Install Drush:
# apt-get install drush php-console-table
Using Drush download the latest stable Drupal version:
# drush dl drupal
You will see something like this. The version of Drupal might be different at the time of your installation.
Project drupal (7.43) downloaded to /var/www/html/drupal-7.43.
Rename the downloaded directory to something more easy to access:
# mv /var/www/html/drupal-7.43/ /var/www/html/drupal
Set the correct files/directories ownership:
# chown www-data: -R drupal
You now need to create a database for the Drupal installation. Enter MySQL as root and execute the below queries:
# mysql -u root -p

mysql> create database drupal;

mysql> grant all privileges on drupal.* to drupaluser@localhost identified by 'your_password';

mysql> flush privileges;

mysql> exit
Bye
Now create a virtual block in Nginx so you can access Drupal with your domain. Enter the underneath command:
# nano /etc/nginx/sites-available/drupal
Paste the following:
server {
    server_name domainname.com;

    access_log /var/log/nginx/domainname.com-access.log;
    error_log /var/log/nginx/domainname.com-error.log;
    root /var/www/html/drupal;

    location / {
        index index.php;
        try_files $uri $uri/ /index.php$is_args$args;
    }

location ~ \.php$ {
                include snippets/fastcgi-php.conf;
                fastcgi_pass unix:/run/php/php7.0-fpm.sock;
        fastcgi_param SCRIPT_FILENAME $document_root$fastcgi_script_name;
    }
}
Of course, don’t forget to replace domainname.com with your actual domain. Save and close the file. Then, enable it by creating a symlink:
# ln -s /etc/nginx/sites-available/drupal /etc/nginx/sites-enabled/
Test the Nginx configuration:
# nginx -t
If everything is successful, restart Nginx so the changes can take effect:
# systemctl restart nginx
Now open your web browser and navigate to http://your_domain.com to finish the Drupal installation.
Congratulations, you have successfully installed Drupal with LEMP on your Ubuntu 16.04 server.
Of course you don’t have to how to install Drupal on Ubuntu 16.04, if you use one of our Drupal Managed Hosting services, in which case you can simply ask our expert Linux admins to install Drupal on Ubuntu 16.04, with the LEMP stack for you. They are available 24×7 and will take care of your request immediately.
PS. If you liked this post, on how to install Drupal on Ubuntu 16.04, please share it with your friends on the social networks using the buttons on the left or simply leave a reply below. Thanks.
This is an amazing tutorial.
Adding a link to the nginx recipe for Drupal for your viewers to get more details on what can be achieved with nginx may be of benefit.
https://www.nginx.com/resources/wiki/start/topics/recipes/drupal/
Now that Drupal has released 7.50 adding a link to https://www.drupal.org/node/2754539 to allow anyone reading this to ensure that they connect to their database with 4 byte UTF enabled may be a further item to mention.