Magento is an open-source CMS specifically used for creating e-commerce websites. Because it’s open source, Magento can be freely used and modified by users. Magento offers flexibility and scalability that can support the growth of your online business over time. To add website features to your Magento website, you can install Magento Extensions. You can find them in the Magento Marketplace, both free and paid extensions. Simply install the extension and configure its settings, and you can add website features as you wish without needing to understand scripts or code. In this article, we will show you how to install Magento on Debian 13.
Table of Contents
Prerequisites
- A Debian 13 VPS with at least 8GB of RAM
- SSH root access or a user with sudo privileges is required
Conventions
# – given commands should be executed with root privileges either directly as a root user or by use of sudo command
$ – given commands should be executed as a regular user
Step 1. Install Dependencies
We need to set up some dependencies before we can install Magento on Debian 13. Let’s install them by running the command below.
# apt install apt-transport-https ca-certificates curl gnupg-agent -yStep 2. Add System User
Magento will run under a new system user named magento. Let’s create a new system user now. Execute the command below.
# useradd -G sudo,www-data -s /bin/bash -m -d /opt/magento magentoThen, let’s give the new user a password.
# passwd magentoYou will be prompted to type the password for user ‘magento’ twice; the password will not be shown on your screen. From now on, we can switch to the user ‘magento’ and continue the installation using this user.
# su - magentoStep 3. Install MySQL Server
We can install MySQL 8.4 using the MySQL repository. To complete this step, navigate to the download page at https://dev.mysql.com/downloads/repo/apt/ to download the repository setup package. After getting the download link, we can run this command:
$ cd /tmp
$ wget https://dev.mysql.com/get/mysql-apt-config_0.8.36-1_all.deb
Once downloaded, we can execute this command:
$ sudo apt install ./mysql-apt-config_0.8.36-1_all.deb
Follow the instructions on the screen, answer the question with (Y)

Press the TAB key until you reach the <Ok> button at the bottom, and then press ENTER.
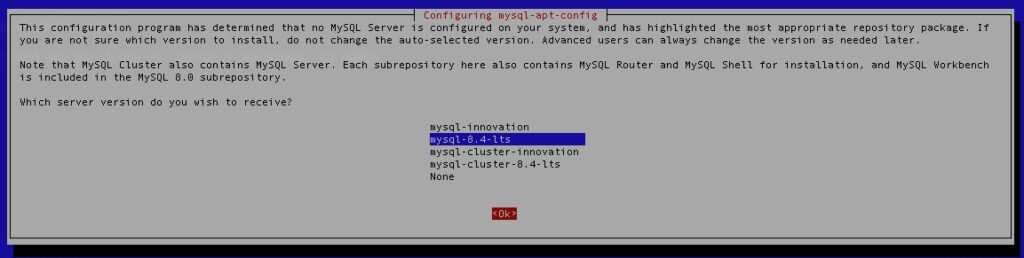
Press another TAB until it is selected, and hit ENTER again.

In this step, hit <Ok>
Then, we can refresh the packages index file by running this command:
$ sudo apt updateThat’s it, now we can install MySQL server
$ sudo apt install mysql-server -yUpon installation, MySQL server will be up and running. Now, we can generate a new database and its user for our Magento project.
$ mysql -u root -pYou will be asked to type your MySQL root password, it was created during the installation.
Once logged to the MySQL shell, we can run these commands.
mysql> CREATE USER 'magento'@'localhost' IDENTIFIED BY 'm0d1fyth15';
mysql> CREATE DATABASE magentodb;
mysql> GRANT ALL PRIVILEGES ON magentodb.* TO 'magento'@'localhost';
mysql> FLUSH PRIVILEGES;
mysql> \q
Make sure to replace ‘m0d1fyth15’ with a stronger password.
Next, we will need to disable bin log.
$ sudo nano /etc/mysql/mysql.conf.d/mysqld.cnfAppend this to the file.
disable_log_binTo apply the changes, we need to restart MySQL
$ sudo systemctl restart mysqlStep 4. Install PHP
Debian 13 ships with PHP 8.4, and at the moment, only Magento 2.4.8-p2 supports it. Before we install Magento on Debian 13, we need to install PHP 8.4 and its extensions.
$ sudo apt install php-{bcmath,common,curl,fpm,gd,intl,mbstring,mysql,soap,xml,zip,cli}Next, we need to modify the following settings in the php.ini file:
Increase memory_limit to 512M
Set short_open_tag to On
Set upload_max_filesize to 128M
Increase max_execution_time to 3600
Let’s make the changes by executing these commands
$ sudo sed -i "s/memory_limit = .*/memory_limit = 512M/" /etc/php/8.4/fpm/php.ini
$ sudo sed -i "s/upload_max_filesize = .*/upload_max_filesize = 128M/" /etc/php/8.4/fpm/php.ini
$ sudo sed -i "s/short_open_tag = .*/short_open_tag = On/" /etc/php/8.4/fpm/php.ini
$ sudo sed -i "s/max_execution_time = .*/max_execution_time = 3600/" /etc/php/8.4/fpm/php.ini
Then, let’s create a PHP-FOM pool.
$ sudo nano /etc/php/8.4/fpm/pool.d/magento.conf We need to insert the following into the file.
[magento]
user = magento
group = magento

listen = /run/php/magento.sock
listen.owner = magento
listen.group = www-data
pm = ondemand
pm.max_children = 50
pm.start_servers = 10
pm.min_spare_servers = 5
pm.max_spare_servers = 10
Save the file and then exit from the file editor, and don’t forget to restart the php-fpm service
$ sudo systemctl restart php8.4-fpmStep 5. Install Nginx
In this article, we will use Nginx as the web server. Let’s install it now.
$ sudo apt install nginx -yThen, we need to create an nginx server block for our Magento website.
$ sudo nano /etc/nginx/sites-enabled/magento.confInsert the following into the configuration file.
upstream fastcgi_backend {
server unix:/run/php/magento.sock;
}

server {
server_name magento.yourdomain.com;
listen 80;
set $MAGE_ROOT /opt/magento/website;
set $MAGE_MODE production;

access_log /var/log/nginx/magento-access.log;
error_log /var/log/nginx/magento-error.log;

include /opt/magento/website/nginx.conf.sample;
}
Save the file, then exit.
Step 6. Install Opensearch
As an alternative to Elasticsearch, Magento now supports OpenSearch. In this step, we will install OpenSearch and then modify its settings. Let’s download and install it.
$ wget https://artifacts.opensearch.org/releases/bundle/opensearch/3.2.0/opensearch-3.2.0-linux-x64.debTo get the download link, you can go to the OpenSearch download page.
Now, let’s proceed with the installation. Please note that during installation, we need to export the initial admin password. Please replace the password in the command below with a minimum 8-character password that must contain at least one uppercase letter, one lowercase letter, one digit, and one special character.
$ sudo env OPENSEARCH_INITIAL_ADMIN_PASSWORD=@@5bV9u2N3Bt dpkg -i opensearch-3.2.0-linux-x64.deb If your password is not strong enough, you will receive a message and need to create a stronger one.
After the installation is finished, we can start the service
$ sudo systemctl daemon-reload
$ sudo systemctl enable --now opensearch
That’s it! OpenSearch has been successfully running.
By default, OpenSearch uses SSL, but Magento doesn’t. So we need to disable the SSL plugin in OpenSearch for a successful Magento installation:
$ sudo nano /etc/opensearch/opensearch.ymlAnd add this to the end of the yml file:
plugins.security.disabled: trueSave the file, then exit, and finally restart the service.
$ sudo systemctl restart opensearchOnce it’s up and running, we can run this command to verify.
$ curl -X GET localhost:9200The command will return an output similar to this:
root@rh:/opt/magento/website# curl -X GET localhost:9200
{
  "name" : "blogpost1",
  "cluster_name" : "opensearch",
  "cluster_uuid" : "5jgcZzL0TyyR0DCa6ofSPA",
  "version" : {
    "distribution" : "opensearch",
    "number" : "3.2.0",
    "build_type" : "deb",
    "build_hash" : "6adc0bf476e1624190564d7fbe4aba00ccf49ad8",
    "build_date" : "2025-08-12T03:54:00.119899934Z",
    "build_snapshot" : false,
    "lucene_version" : "10.2.2",
    "minimum_wire_compatibility_version" : "2.19.0",
    "minimum_index_compatibility_version" : "2.0.0"
  },
  "tagline" : "The OpenSearch Project: https://opensearch.org/"
}
Step 7. Install Composer
In this step, we will install Composer. The installation is straightforward.
$ curl -sS https://getcomposer.org/installer -o composer-setup.php
$ sudo php composer-setup.php --install-dir=/usr/local/bin --filename=composer
That’s it. To check the version of the installed Composer, you can run this command:
$ composer -VThe command will show you an output like this;
Composer version 2.8.12 2025-09-19 13:41:59
PHP version 8.4.11 (/usr/bin/php8.4)
Run the "diagnose" command to get more detailed diagnostics output.
Step 8. Download and Install Magento
Go to the Adobe Marketplace and create an account or log in if you already have an account. After logging in, navigate to your Commerce Marketplace Access Keys and create the key pair. You will need the key pair when executing the command below.
composer create-project –repository-url=https://repo.magento.com/ magento/project-community-edition=2.4.8-p2 /opt/magento/website
When prompted for a username, you need to use the ‘PUBLIC KEY’ for the username and ‘PRIVATE KEY’ for the password.
    Authentication required (repo.magento.com):
      Username: 3b20816aa197fe396821xd995608d1a9
      Password:
Do you want to store credentials for repo.magento.com in /opt/magento/.config/composer/auth.json ? [Yn]
Hit ENTER to continue; it would be self-explanatory from here. Wait until the download finishes.
After all required files are downloaded, we can proceed with the installation by running the command below.
$ cd /opt/magento/website
$ bin/magento setup:install \
--base-url=http://yourdomain.com \
--db-host=127.0.0.1 \
--db-name=magentodb \
--db-user=magento \
--db-password=m0d1fyth15 \
--admin-firstname=Magento \
--admin-lastname=Admin \
--admin-email=admin@yourdomain.com \
--admin-user=rosehosting \
--admin-password=m0d1fyth15 \
--language=en_US \
--currency=USD \
--timezone=America/Chicago \
--use-rewrites=1 \
--search-engine=opensearch
At the end of the installation, you will see an output similar to this:
[SUCCESS]: Magento installation complete.
[SUCCESS]: Magento Admin URI: /admin_4ibionn
Nothing to import.
Now, let’s correct the permissions; otherwise, you will not be able to access Magento.
$ sudo chown 755 /opt/magentoNow, we can open our Magento website and access the backend. You can use your favourite browser and navigate to http://yourdomain.com/admin_4ibionn
Please remember, you should have your own Magento backend URL.
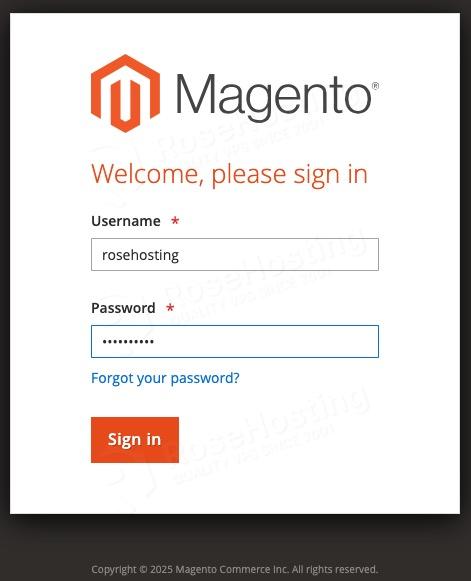
Let’s log in with the username and password we used during installation.
Now, you will see this message about 2FA.
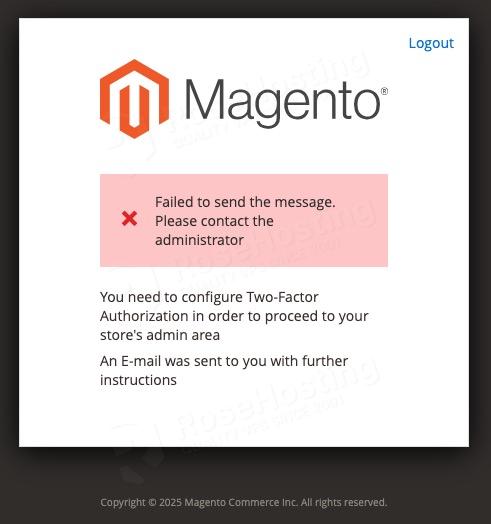
We can disable 2FA now.
$ php bin/magento module:disable Magento_AdminAdobeImsTwoFactorAuth
$ php bin/magento module:disable Magento_TwoFactorAuth
$ php bin/magento setup:di:compile
$ php bin/magento cache:clean
At this point, you can refresh your Magento backend or try to log in again. You should now be able to access the dashboard.

Step 9. Install SSL Certificate
In this step, we will install certbot. Certbot is an ACME tool to generate SSL certificates provided by Let’s Encrypt.
$ sudo apt install python3-certbot-nginxOnce installed, we can execute this command to generate an SSL certificate. But make sure that your subdomain or domain name is already pointing to your server; otherwise, certbot will fail to generate the SSL certificate.
$ sudo certbot --nginx -d magento.yourdomain.comReplace magento.yourdomain.com with the actual domain or subdomain you use, make sure it matches the one you use in nginx.
Certbot will automatically update your nginx configuration to use HTTPS. Now, your website is loaded in HTTPS mode.
Step 10. Set up Cron Jobs
Magento requires its cron jobs to run to automate its important system functions. Let’s execute the command below to create Magento cron jobs under the user magento.
$ php bin/magento cron:installTo confirm if the crons are added, you can run this command:
$ crontab -lThe command above will print you an output similar to this:
#~ MAGENTO START b719a4448879f9e9995857329b0ee3a254953e05e3d6cfc20de366f4e91e28a3
* * * * * /usr/bin/php8.4 /opt/magento/website/bin/magento cron:run >> /opt/magento/website/var/log/magento.cron.log 2>&1
#~ MAGENTO END b719a4448879f9e9995857329b0ee3a254953e05e3d6cfc20de366f4e91e28a3
That’s it all! You have successfully installed Magento on Debian 13.
Of course, you don’t have to follow this guide and install Magento if you have a Magento hosting service with us, in which case you can simply ask our expert Linux hosting admins to set all of this up for you, quickly and easily. Our experienced administrators are available 24×7 and will respond to your request immediately. They will also help you with more complex Magento installations, like using Varnish, Elasticsearch, and other customizations.
PS. If you liked this post, please share it with your friends or leave a comment below.