Netdata is an open-source tool to collect metrics per second as well as in real time. This includes but is not limited to disk read and write activity, CPU usage, bandwidth usage, etc. Netdata is designed to run on physical servers or containers. Netdata also offers real-time performance and health monitoring with easy-to-interpret charts. In this tutorial, we will show you how to install Netdata on Debian 12.
Table of Contents
Prerequisites
- A Debian 12 VPS
- SSH access with sudo privileges or root access.
Step 1. Log in to your VPS
First of all, we need to log in to our Debian 12 server through SSH:
ssh root@IP_Address -p Port_number
Replace “root” with a user that has sudo privileges or root if necessary. Additionally, replace “IP_Address” and “Port_Number” with your server’s respective IP address and SSH port number. Next, let’s make sure that we’re on Debian 12. You can do that like this:
# lsb_release -a
The command should return an output like this:
No LSB modules are available.
Distributor ID: Debian
Description: Debian GNU/Linux 12 (bookworm)
Release: 12
Codename: bookworm
Now that we are signed in and confirmed on Debian 12, let’s start with the installation.
Step 2. Install Dependencies
Netdata installation requires some packages. So, before starting, we will install the dependencies on our Debian 12 system. Let’s execute the command below to proceed.
# apt install dirmngr gnupg gnupg-l10n gnupg-utils gpg gpg-agent gpg-wks-client gpg-wks-server gpgconf gpgsm libassuan0 libksba8 libnpth0 pinentry-curses
Step 3. Install Netdata
There are several ways to install Netdata on a Debian 12 system. We can install it using their native DEB packages through their repository, in a docker container, or use its static binary Linux package. But, in this tutorial, we will show you how to install netdata using the kickstart.sh script. This is the recommended way to install Netdata. To install it this way, simply execute the following command and answer the questions with YES when prompted.
# wget -O /tmp/netdata-kickstart.sh https://my-netdata.io/kickstart.sh && sh /tmp/netdata-kickstart.sh --stable-channel
The option –stable-channel means we are going to install the stable version of netdata. If we do not use this option, the installation script will install the nightly version, which can be unstable or have more bugs.
At the end of the installation, you should see a successful message as follows:
Successfully installed the Netdata Agent.

Official documentation can be found online at https://learn.netdata.cloud/docs/.

Looking to monitor all of your infrastructure with Netdata? Check out Netdata Cloud at https://app.netdata.cloud.

Join our community and connect with us on:
  - GitHub: https://github.com/netdata/netdata/discussions
  - Discord: https://discord.gg/5ygS846fR6
  - Our community forums: https://community.netdata.cloud/
[/root]# rm -rf /tmp/netdata-kickstart-alOGF95w3O
 OK
On the Debian system, Netdata will automatically start upon installation, and it’s configured to run after reboot. Let’s check the service’s status.
# systemctl status netdata
You will see an output similar to this:
● netdata.service - Real time performance monitoring
     Loaded: loaded (/lib/systemd/system/netdata.service; enabled; preset: enabled)
     Active: active (running) since Fri 2023-09-15 05:06:31 CDT; 59s ago
   Main PID: 3802 (netdata)
      Tasks: 88 (limit: 2306)
     Memory: 139.9M
        CPU: 6.033s
     CGroup: /system.slice/netdata.service
             ├─3802 /usr/sbin/netdata -D -P /var/run/netdata/netdata.pid
             ├─3839 /usr/sbin/netdata --special-spawn-server
             ├─4154 bash /usr/libexec/netdata/plugins.d/tc-qos-helper.sh 1
             ├─4156 /usr/libexec/netdata/plugins.d/nfacct.plugin 1
             ├─4166 /usr/libexec/netdata/plugins.d/ebpf.plugin 1
             ├─4169 /usr/bin/python3 /usr/libexec/netdata/plugins.d/python.d.plugin 1
             ├─4173 /usr/libexec/netdata/plugins.d/systemd-journal.plugin 1
             ├─4182 /usr/libexec/netdata/plugins.d/go.d.plugin 1
             ├─4189 /usr/libexec/netdata/plugins.d/debugfs.plugin 1
             └─4199 /usr/libexec/netdata/plugins.d/apps.plugin 1

Sep 15 05:06:32 debian12.rosehosting.com ebpf.plugin[4166]: set name of thread 4230 to EBPF FD
Sep 15 05:06:32 debian12.rosehosting.com ebpf.plugin[4166]: thread created with task id 4231
Sep 15 05:06:32 debian12.rosehosting.com ebpf.plugin[4166]: set name of thread 4231 to EBPF SOFTIRQ
Sep 15 05:06:32 debian12.rosehosting.com ebpf.plugin[4166]: thread created with task id 4232
Sep 15 05:06:32 debian12.rosehosting.com ebpf.plugin[4166]: set name of thread 4232 to EBPF OOMKILL
Sep 15 05:06:32 debian12.rosehosting.com ebpf.plugin[4166]: thread created with task id 4233
Sep 15 05:06:32 debian12.rosehosting.com ebpf.plugin[4166]: set name of thread 4233 to EBPF SHM
Sep 15 05:06:33 debian12.rosehosting.com apps.plugin[4199]: Using now_boottime_usec() for uptime (dt is 0 ms)
Sep 15 05:06:33 debian12.rosehosting.com debugfs.plugin[4189]: Zswap is disabled
Sep 15 05:06:33 debian12.rosehosting.com debugfs.plugin[4189]: Failed to find powercap zones.
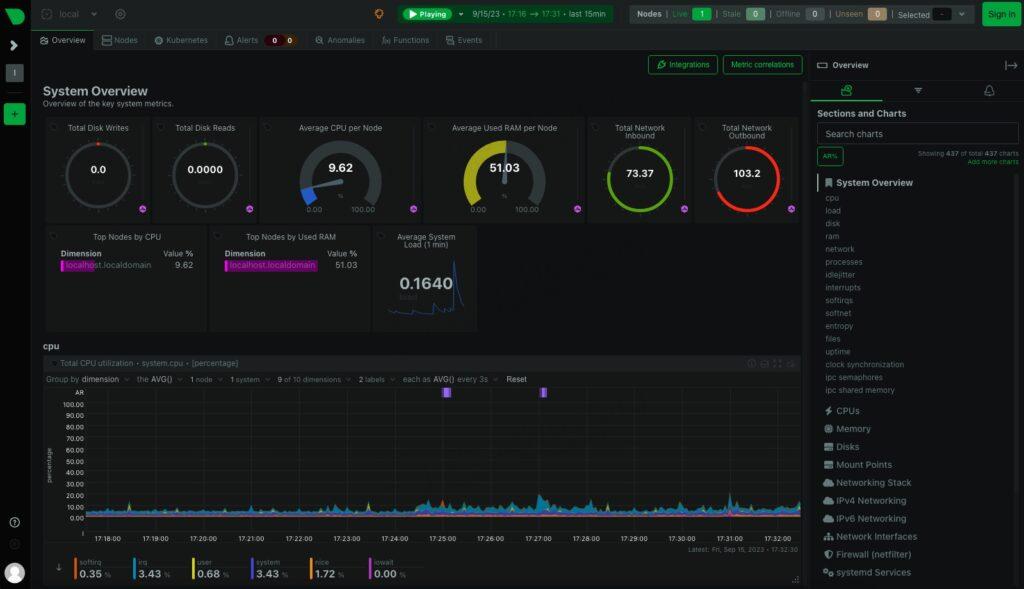
That’s it! Netdata is running and you should be able to access it at http://YOUR_SERVER_IP_ADDRESS:19999
Step 4. Configure Netdata
By default, Netdata is listening on all interfaces on your server. Due to security reasons, it is recommended to configure netdata to listen only on localhost, and you will need to use a reverse proxy to access it. Let’s proceed with this now.
# nano /etc/netdata/netdata.conf
Add this line to the file under the [global] section:
bind to = 127.0.0.1
It should look like this:
[global]
    run as user = netdata

    # default storage size - increase for longer data retention
    page cache size = 32
    dbengine multihost disk space = 256
    bind to = 127.0.0.1
Save the file, then exit from the file editor. Then, let’s restart netdata to apply the changes we made.
# systemctl restart netdata
Now, Netdata is no longer accessible when you access http://YOUR_SERVER_IP_ADDRESS:19999
Step 5. Install Nginx
In the previous step, we configured Netdata to listen only on localhost. So, to access it we need a web server to act as a reverse proxy to Netdata. Now, we are going to install Nginx and configure it as the reverse proxy.
# apt install nginx
At this moment, Nginx is up and running. Let’s create an Nginx server block.
# nano /etc/nginx/conf.d/netdata.conf
Then, insert the following into the file:
upstream netdata {
    server 127.0.0.1:19999;
    keepalive 64;
}

server {
    listen 80;
    server_name netdata.yourdomain.com;

location / {
        proxy_set_header X-Forwarded-For $proxy_add_x_forwarded_for;
        proxy_set_header X-Forwarded-Host $host;
        proxy_set_header X-Forwarded-Server $host;
    	proxy_pass http://netdata;
    	proxy_http_version 1.1;
        proxy_pass_request_headers on;
        proxy_set_header Connection "keep-alive";
        proxy_store off;
    }
}
Make sure to replace netdata.yourdomain.com with your actual domain or subdomain name pointing to your server. Save the file, then exit and restart Nginx.
# systemctl restart nginx
Now, you should be able to access Netdata at http://netdata.yourdomain.com – of course, change netdata.yourdomain.com to the actual domain you are using for your server.
Step 6. Set Up Password Authentication Through Nginx
As you can see, Netdata is accessible at http://netdata.yourdomain.com now, but it’s still accessible to all visitors. To prevent unauthorized visitors from seeing your server information through Netdata, we can configure Nginx to use HTTP authentication. That way, when users access http://netdata.yourdomain.com they will be prompted to enter a username and password. Let’s create a .htpassword file first. That file is what stores the user and password credentials.
# htpasswd -c /etc/nginx/.htpasswd netdata
You will be asked to create the password. The output of the command should look like this.
New password:
Re-type new password:
Adding password for user netdata
At this point, we have ‘netdata’ as the username and the password we typed earlier. Make sure to save a copy of the password or remember it. Next, let’s edit the Nginx configuration file.
# nano /etc/nginx/conf.d/netdata.conf
Add these two lines inside of the location / block:
auth_basic "NetData Admin";
auth_basic_user_file /etc/nginx/.htpasswd;
It should look like this:
location / {
        proxy_set_header X-Forwarded-For $proxy_add_x_forwarded_for;
        proxy_set_header X-Forwarded-Host $host;
        proxy_set_header X-Forwarded-Server $host;
    	proxy_pass http://netdata;
    	proxy_http_version 1.1;
        proxy_pass_request_headers on;
        proxy_set_header Connection "keep-alive";
        proxy_store off;
	auth_basic "NetData Admin";
	auth_basic_user_file /etc/nginx/.htpasswd;
    }
}
Save the file, then restart Nginx.
Next time you access http://netdata.yourdomain.com you will be prompted for a username and password. Once you enter it, you’ll be able to use Netdata as usual.
The install is straightforward, however you wouldn’t have to install Netdata on Debian 12 yourself if you use one of our Debian Hosting services, in which case you can simply ask our admins, sit back, and relax. Our admins will install and set up Netdata on Debian 12 immediately without any additional fee, along with many other useful configurations and optimizations we can do for you and your websites. Managing Netdata is not just about the installation; we can help you optimize your Netdata installation if you have a VPS with us.
PS. If you liked this post on how to install Netdata on Debian 12, please share it with your friends on social networks or simply leave a reply below. Thanks.