Nextcloud is one of the most popular free and open-source self-hosted file sync and sharing applications. You can use it to store your personal files, contacts, pictures, music, and much more and it allows you to access them or share them with your friends at any time. It is a popular alternative to another widely used file hosting application called ownCloud. In this tutorial, we will show you how to install the latest version 14 of Nextcloud on CentOS.
Table of Contents
Prerequisite
- CentOS 7
- SSH access with root privileges
- PHP 7 or above
Step 1: Log in to your server via SSH:
# ssh root@IP_Address -p Port_number
Before starting, enter the command below to check whether you have the proper version of CentOS installed on your machine:
# cat /etc/redhat-release
which should give you the underneath output:
CentOS Linux release 7.5.1804 (Core)
Step 2: Update the system
Make sure your server is fully up to date:
# yum update
If your system has not been updated for a while, it will take a few minutes to complete.
# yum install -y epel-release
Step 3: Install Web Server
In this step, you can choose whether you want to install Apache or Nginx.
Install Nginx web server
# yum install nginx
Enable Nginx to start on boot and start the service using:
# systemctl enable nginx

# systemctl start nginx
Install Apache web server
If you would like to choose Apache instead of Nginx, you can skip the Nginx installation above then install Apache.
# yum install httpd
Enable Apache to start on boot and start the service using:
# systemctl enable httpd

# systemctl start httpd
Step 4: Install PHP 7
The default PHP version on CentOS 7 is PHP 5.4 and Nextcloud 14 requires PHP 7 or above, in this step, we will install PHP version 7.
Install Remi and EPEL repository packages:
# rpm -Uvh http://rpms.remirepo.net/enterprise/remi-release-7.rpm
Enable Remi PHP 7 repo:
# yum-config-manager –enable remi-php70
and install PHP 7 and several PHP modules required by Nextcloud by executing the following command:
# yum install php php-mysql php-pecl-zip php-xml php-mbstring php-gd php-fpm php-intl
Now, let’s find the following strings in /etc/php-fpm.d/www.conf
user = apache
group = apache
Replace the values with
user = nginx
group = nginx
Then, change the permission for the PHP session directory, you need to skip this step if you want to use Apache instead of Nginx.
# chown -R root:nginx /var/lib/php/session/
Finally, restart php-fpm
# systemctl restart php-fpm
Step 5: Install MariaDB database server
# nano /etc/yum.repos.d/MariaDB.repo
[mariadb]
name = MariaDB
baseurl = http://yum.mariadb.org/10.2/centos7-amd64
gpgkey=https://yum.mariadb.org/RPM-GPG-KEY-MariaDB
gpgcheck=1
# yum install MariaDB-server MariaDB-client
# systemctl start mariadb
# systemctl enable mariadb
# systemctl status mariadb
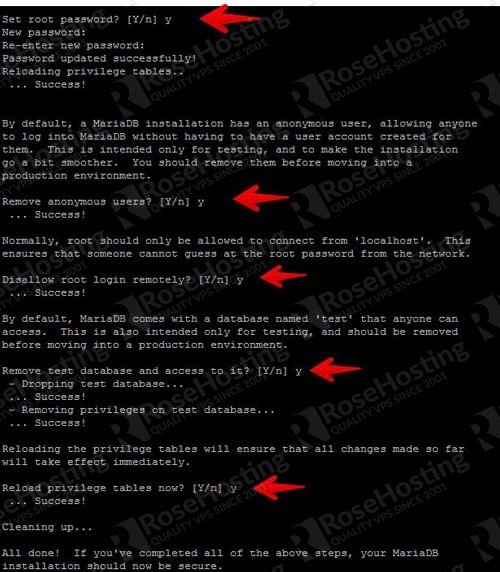
At this point, MariaDB is running and we are now going to create a password for the root user. Run the following command to create a root password, remove the test database, remove the anonymous user then reload the privileges.
# mysql_secure_installation
Once created, you can test the password by invoking this command, you will be asked for the password:
# mysql -u root -p
Step 6: Create a database
# mysql -uroot -p -e "CREATE DATABASE nextcloud CHARACTER SET utf8mb4 COLLATE utf8mb4_general_ci"
# mysql -uroot -p -e "GRANT ALL on nextcloud.* to nextcloud@localhost identified by 'M0d1fyth15'"
# mysql -uroot -p -e "FLUSH privileges"
Step 7: Configure Web Server
In the previous step, you chose a web server to install, now you will need to configure it.
Nginx configuration
If you want to use Nginx, please create a configuration file for the Nginx server block
nano /etc/nginx/conf.d/yourdomain.com.conf
upstream php {
	server 127.0.0.1:9000;
	}

server {
	server_name yourdomain.com;

	add_header X-Content-Type-Options nosniff;
	add_header X-XSS-Protection “1; mode=block”;
	add_header X-Robots-Tag none;
	add_header X-Download-Options noopen;
	add_header X-Permitted-Cross-Domain-Policies none;

	# Path to the root of your installation
	root /var/www/nextcloud/;

		location = /robots.txt {
		allow all;
		log_not_found off;
		access_log off;
	}

	location = /.well-known/carddav {
		return 301 $scheme://$host/remote.php/dav;
	}

	location = /.well-known/caldav {
		return 301 $scheme://$host/remote.php/dav;
	}

	# set max upload size
	client_max_body_size 512M;
	fastcgi_buffers 64 4K;

	# Enable gzip but do not remove ETag headers
	gzip on;
	gzip_vary on;
	gzip_comp_level 4;
	gzip_min_length 256;
	gzip_proxied expired no-cache no-store private no_last_modified no_etag auth;
	gzip_types application/atom+xml application/javascript application/json application/ld+json application/manifest+json application/rss+xml application/vnd.geo+json application/vnd.ms-fontobject application/x-font-ttf application/x-web-app-manifest+json application/xhtml+xml application/xml font/opentype image/bmp image/svg+xml image/x-icon text/cache-manifest text/css text/plain text/vcard text/vnd.rim.location.xloc text/vtt text/x-component text/x-cross-domain-policy;

	location / {
		rewrite ^ /index.php$request_uri;
	}

	location ~ ^/(?:build|tests|config|lib|3rdparty|templates|data)/ {
		deny all;
	}
	location ~ ^/(?:\.|autotest|occ|issue|indie|db_|console) {
		deny all;
	}

	location ~ ^/(?:index|remote|public|cron|core/ajax/update|status|ocs/v[12]|updater/.+|ocs-provider/.+)\.php(?:$|/) {
		fastcgi_split_path_info ^(.+?\.php)(/.*)$;
		include fastcgi_params;
		fastcgi_param SCRIPT_FILENAME $document_root$fastcgi_script_name;
		fastcgi_param PATH_INFO $fastcgi_path_info;
		fastcgi_param HTTPS on;
		#Avoid sending the security headers twice
		fastcgi_param modHeadersAvailable true;
		fastcgi_param front_controller_active true;
		fastcgi_pass php;

		fastcgi_intercept_errors on;
		fastcgi_request_buffering off;
	}

	location ~ ^/(?:updater|ocs-provider)(?:$|/) {
		try_files $uri/ =404;
		index index.php;
	}

	# Adding the cache control header for js and css files
	# Make sure it is BELOW the PHP block
	location ~ \.(?:css|js|woff|svg|gif)$ {
		try_files $uri /index.php$request_uri;
		add_header Cache-Control “public, max-age=15778463”;

		add_header X-Content-Type-Options nosniff;
		add_header X-XSS-Protection “1; mode=block”;
		add_header X-Robots-Tag none;
		add_header X-Download-Options noopen;
		add_header X-Permitted-Cross-Domain-Policies none;
		# Optional: Don’t log access to assets
		access_log off;
	}

	location ~ \.(?:png|html|ttf|ico|jpg|jpeg)$ {
		try_files $uri /index.php$request_uri;
		# Optional: Don’t log access to other assets
		access_log off;
	}
}
Test Nginx configuration file, then restart the service
nginx -t
systemctl restart nginx
Apache configuration
Create a virtual host configuration file for the domain you want to use to host Nextcloud.
nano /etc/httpd/conf.d/yourdomain.com.conf
<VirtualHost *:80>

ServerAdmin admin@yourdomain.com
DocumentRoot /var/www/nextcloud
ServerName yourdomain.com
ServerAlias www.yourdomain.com

<Directory /var/www/html/nextcloud>
Options +FollowSymlinks
AllowOverride All

<IfModule mod_dav.c>
Dav off
</IfModule>

SetEnv HOME /var/www/nextcloud
SetEnv HTTP_HOME /var/www/nextcloud
</Directory>

ErrorLog /var/log/httpd/nextcloud-error_log
CustomLog /var/log/httpd/nextcloud-access_log common

</VirtualHost>
Go to Nextcloud’s official website and download the latest stable release of the application
wget https://download.nextcloud.com/server/releases/nextcloud-14.0.0.zip
unpack the downloaded zip archive to the document root directory on your server
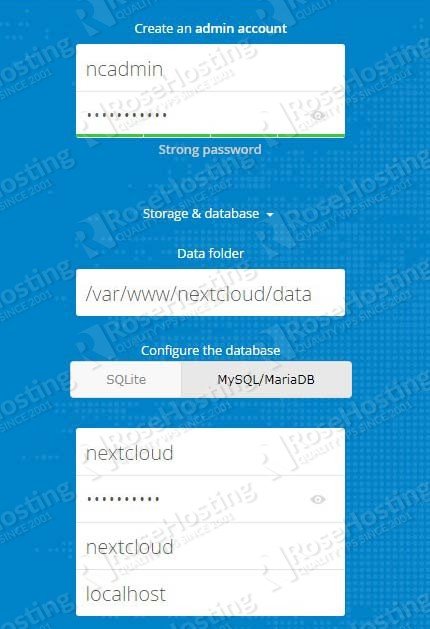
# unzip nextcloud-14.0.0.zip -d /var/www/
# mkdir /var/www/nextcloud/data
# chown -R nginx: /var/www/nextcloud

If you chose Apache, then you need to set the permission for Apache user
# chown -R apache: /var/www/nextcloud

You can now proceed with Nextcloud 14 installation via web installer at http://yourdomain.com, fill the blank as required, then click on the “Finish setup” button to finish it.
It is recommended to run the Nextcloud 14 in HTTPS mode. We will need to install an SSL certificate for this. In this step, we will show you how to install an SSL certificate from Letsencrypt.
# yum install certbot-nginx certbot-apache
# certbot
You will be asked for your email address then you need to agree with the ToS to proceed with the certificate installation.
If there is no issue when requesting the certificate, Certbot will automatically edit your existing Nginx server block to install the certificate.
At this point, you can access your Nextcloud 14 installation on https://yourdomain.com
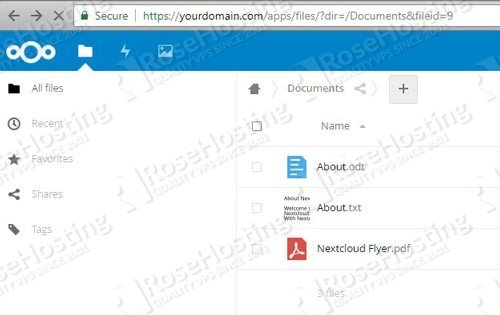
And that’s it, with the last step of this tutorial we have successfully installed Nextcloud 14 on your CentOs 7 and you can log in with the login credentials of your admin user. For more information, you can visit the official documentation of Nextcloud 14.
RoseHosting has been listed as a recommended Nextcloud hosting provider on Nextcloud.com. If you want to try our fully managed Nextcloud VPS hosting, use the coupon code: 50FIRST to get 50% off your first-month invoice. We have 30 days money-back guarantee. If you are one of our clients, you don’t have to install Nextcloud 14 on CentOS 7, you can simply ask our system administrators to install and configure your Nextcloud instance on CentOS or any other Linux OS. They are available 24×7 and will take care of your request immediately.
PS. If you liked this post, on How To Install Nextcloud 14 on CentOS 7, please share it with your friends on the social networks using the buttons on the left or simply leave a reply below. Thanks.
Thanks for this how-to.
Step 5, I had to remove a ‘#’ at the beginning of the file
Step 7, im having an error using these directive: add_header X-XSS-Protection “1; mode=block”;
nginx: [emerg] unknown directive “mode=block”” in /etc/nginx/conf.d/yourdomain.com.conf:9
nginx: configuration file /etc/nginx/nginx.conf test failed
Any ideas ?
Hi Eric,
Please make sure that there are straight double quotes on line 9 in the nginx configuration file. It should look like this:
add_header X-XSS-Protection “1; mode=block”;instead of this:
add_header X-XSS-Protection ^ ^ 1; mode=block ^ ^ ;Doesnt work
What exactly is now working? Please provide us with more information.
Also, have you tried to install PHP by following the steps at https://www.rosehosting.com/blog/how-to-install-php-7-2-on-centos-7 ?
When you copy paste his config you get wrong quoto .
It littary says so in the error,
So go to line 9 remove quota and manualy add them again.
Then repeat, you will have to change like 3-4 time.
If using nano add -c to get row count or use “go plz kill it ” -> vim
Its because the “” are not copying in the correct format, you will need to delete and read them throughout the file or copy to a decent text editor first
Following “Step 4: Install PHP 7” results in:
Package php-5.4.16-45.el7.x86_64 already installed and latest version
Steps to reproduce:
yum install -y epel-releasePackage epel-release-7-11.noarch already installed and latest version
Nothing to do
rpm -Uvh http://rpms.remirepo.net/enterprise/remi-release-7.rpm
1:remi-release-7.5-2.el7.remi ################################# [100%]
yum-config-manager –enable remi-php70
yum-config-manager: command not found
yum whatprovides yum-config-manager
yum-utils-1.1.31-46.el7_5.noarch : Utilities based around the yum package manager
yum install yum-utils
Installed:
yum-utils.noarch 0:1.1.31-46.el7_5
Complete!
yum-config-manager -enable remi-php70
Loaded plugins: fastestmirror
/usr/lib/python2.7/site-packages/yum/misc.py:133: UnicodeWarning: Unicode equal comparison failed to convert both arguments to Unicode - interpreting them as being unequal
return lambda s: s.lower() == pat
===================================================== repo: remi-php70 =====================================================
[remi-php70]
async = True
...
yum install php php-mysql php-pecl-zip php-xml php-mbstring php-gd php-fpm php-intl
Package php-5.4.16-45.el7.x86_64 already installed and latest version
Try using the following command:
Or follow the instructions at https://www.rosehosting.com/blog/how-to-install-php-7-2-on-centos-7 about how to install PHP 7 on your server.
Awesome write up! I had been running mine in a FreeBSD jail for sometime but wanted to move it to a BHYVE VM using CentOS. This write up was exactly what I needed. One note you might want to add to your write up. On a fresh install of CentOS 7 you will need to disable SELINUX otherwise you will go crazy trying to figure out why you keep getting PHP permissions denied on your Nextcloud install directory. Spent several hours on this before I realized this.
edit /etc/selinux/config and change the lines noted below:
Before:
SELINUX=enforcing
After:
SELINUX=disabled
Thanks for this post. I’ve followed your instructions But I get this when I’m trying to reach the web install wizard :
Internal Server Error
The server encountered an internal error and was unable to complete your request.
Please contact the server administrator if this error reappears multiple times, please include the technical details below in your report.
More details can be found in the webserver log.
Do you have any idea where I should look at ?
You can check disable Selinux.
Please check your log files for more details.
[Sat Jan 19 13:11:51.853417 2019] [:error] [pid 17285] [client 192.168.100.107:39162] {"reqId":"XEK-p9Zusp@H1WypjZoXyAAAAAE","level":3,"time":"2019-01-19T06:11:51+00:00","remoteAddr":"192.168.100.107","user":"--","app":"PHP","method":"GET","url":"\\/index.php","message":"chmod(): No such file or directory at \\/var\\/www\\/nextcloud\\/lib\\/private\\/Log\\/File.php#141","userAgent":"Mozilla\\/5.0 (X11; Linux x86_64; rv:60.0) Gecko\\/20100101 Firefox\\/60.0","version":""},any ideas?, i got internal server error
This looks like a file permissions problem. Make sure that all file permissions are correctly set and owned by the nginx user as explained in our tutorial.
Hi, Very good writeup!
I have been following the guide setting up an Centos 7 as a VM on Freenas.
It’s looks like it went well, only to the point where I can see the Nginx page, when going to
http://mydomain.com/nextcloudthis is what I get, instead of the nextcloud setup page:
“Welcome to nginx on Fedora!
This page is used to test the proper operation of the nginx HTTP server after it has been installed. If you can read this page, it means that the web server installed at this site is working properly.
Website Administrator
This is the default index.html page that is distributed with nginx on Fedora. It is located in /usr/share/nginx/html.
You should now put your content in a location of your choice and edit the root configuration directive in the nginx configuration file /etc/nginx/nginx.conf.
[ Powered by nginx ] [ Powered by Fedora ] ”
so I cannot see the nextcloud setup page
https://mydomain.com/nextcloud, and therefore I’m stuck at step:“You can now proceed with Nextcloud 14 installation via web installer at
http://yourdomain.com, fill the blank as required, then click on the “Finish setup” button to finish it.”Many thanks for any advice.
Please go through Step 7 of the tutorial and make sure that the Nginx server block for your domain is properly created. You should also pay attention to the following line:
root /var/www/nextcloud/;If your NextCloud installation is located in a different directory, you will need to update this line to match your actual location. Do not forget to reload/restart your Nginx after any changes have been made.
Nice share , but i got error like this while trying access nextcloud from browser
PHP module zip not installed.
Please ask your server administrator to install the module.
PHP modules have been installed, but they are still listed as missing?
Please ask your server administrator to restart the web server.
You need to install PHP zip extension on your server.
There is an error here MySQL -uroot -p -e “GRANT ALL on nextcloud.* to nextcloud@localhost identified by ‘M0d1fyth15″
at the end of the command line, there is a apostrophe missing it should be ‘M0d1fyth15′”
Slight typo on step 5 I think. In the text for the MariaDB.repo file, it has:
# [mariadb]
name = MariaDB
baseurl = http://yum.mariadb.org/10.2/centos7-amd64
gpgkey=https://yum.mariadb.org/RPM-GPG-KEY-MariaDB
gpgcheck=1
You get an error with this and I think that initial “#” shouldn’t be there.