
NextCloud is a free and open-source self-hosted file sharing and communication platform built using PHP. It is a great alternative to some of the popular services available on the market, such as Dropbox, Google Drive, OwnCloud, etc. With NextCloud, you can easily store your data on your Ubuntu 18.04 VPS, create and manage your contacts, calendars, to-do lists, and much more. In this tutorial, we will install NextCloud version 15 on an Ubuntu 18.04 VPS – version 15 is a major release that comes with a lot of new features and improvements.
We have an updated version of this tutorial on How to Install Nextcloud on Ubuntu 20.04
Table of Contents
Prerequisites:
– An Ubuntu 18.04 VPS
– A system user with root privileges
– MySQL or MariaDB database server version 5.5 or newer with InnoDB storage engine.
– Apache 2.4 with mod_php enabled
– PHP version 7.0 or newer
Log in and update the server:
Log in to your Ubuntu 18.04 VPS via SSH as user root:
ssh root@IP_Address -p Port_number
Don’t forget to replace ‘IP_Address’ and ‘Port_number’ with the actual IP address of your server and the SSH service port.
Run the following commands to make sure that all installed packages on your Ubuntu 18.04 VPS are updated to the latest available version:
apt update && apt upgrade
Install Apache and PHP:
We need to install the Apache web server in order to serve the NextCloud files. It can be done easily by using the following command:
apt -y install apache2
Once the web server is installed, enable it to automatically start after a server restart:
systemctl enable apache2
Verify that the web server is up and running on your server:
service apache2 status
This is what the output should look like:
apache2.service - The Apache HTTP Server
   Loaded: loaded (/lib/systemd/system/apache2.service; enabled; vendor preset: enabled)
  Drop-In: /lib/systemd/system/apache2.service.d
           ââapache2-systemd.conf
   Active: active (running) since Thu 2018-12-27 05:13:26 CST; 12min ago
Since NextCloud is a PHP-based application, our next step is to install PHP and some PHP extensions required by NextCloud:
apt -y install php php-cli php-common php-curl php-xml php-gd php-mbstring php-zip php-mysql
Restart the Apache web server to load the PHP modules:
systemctl restart apache2
Now check the PHP version installed on your server:
php -v
PHP 7.2.10-0ubuntu0.18.04.1 (cli) (built: Sep 13 2018 13:45:02) ( NTS )
Copyright (c) 1997-2018 The PHP Group
Zend Engine v3.2.0, Copyright (c) 1998-2018 Zend Technologies
Install MariaDB and create a database:
NextCloud needs an SQL database to store information. For this purpose, we will install the MariaDB database server by executing the following command:
apt -y install mariadb-server
Just like with Apache, enable MariaDB to automatically start after server reboot:
systemctl enable mariadb
Next, run the ‘mysql_secure_installation’ post-installation script to set a password for the MariaDB root user and to further improve the security of your MariaDB server. Once all steps are completed, you can go ahead and log in to the MariaDB server as the root user. We will then create a new user and database – both of which are necessary for installing NextCloud.
mysql -u root -p

MariaDB [(none)]> CREATE DATABASE nextcloud;
MariaDB [(none)]> GRANT ALL PRIVILEGES ON nextcloud.* TO 'nextcloud_user'@'localhost' IDENTIFIED BY 'PASSWORD';
MariaDB [(none)]> FLUSH PRIVILEGES;
MariaDB [(none)]> exit;
Don’t forget to replace ‘PASSWORD’ with a strong password.
Download and install NextCloud:
Go to NextCloud’s official website and download the latest stable release of the application. At the time of this article being published, the latest version of NextCloud is version 15.0.0.
wget https://download.nextcloud.com/server/releases/nextcloud-15.0.0.zip
Once the zip archive is downloaded, unpack it to the document root directory on your server:
unzip nextcloud-15.0.0.zip -d /var/www/html/
All files will be stored under a directory named ‘nextcloud’.
Remove the zip archive and change the ownership of the NextCloud files:
rm -f nextcloud-15.0.0.zip
chown -R www-data:www-data /var/www/html/nextcloud
That was the last step of configuring your server and installing NextCloud through the command line. Now, you can open your preferred web browser and access http://Your_IP/nextcloud to continue with the setup. Make sure to replace “Your_IP” with your server’s IP address or domain name. If everything is properly configured, you will get the following screen:
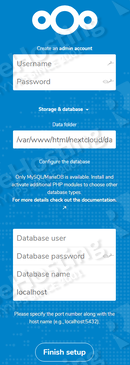
Create an administrative account, set the data folder and enter the MariaDB details for the user and database we created earlier in this tutorial.
That’s all – if you followed the steps in the tutorial, you will have successfully installed NextCloud version 15 on your Ubuntu 18.04 VPS. For more details about its configuration and usage, please check their official documentation. We published a newer version here: How to Install Nextcloud on Ubuntu 20.04.
Of course, you don’t need to Install NextCloud 15 on Ubuntu 18.04 yourself if you use one of our NextCloud Hosting services, in which case you can simply ask our expert Linux admins to install and set this up for you. They are available 24×7 and will take care of your request immediately.
PS. If you liked this post on How To Install NextCloud 15 on Ubuntu 18.04, please share it with your friends on the social networks by using the buttons on the left, or simply leave a reply below. Thanks.