
Nextcloud is recognized as the leading open-source self-hosted file sync and sharing software. It presents itself as an alternative to various file-sharing applications, such as Google Drive, Dropbox, and OwnCloud, among others. Nextcloud offers an extensive range of functionalities, including file synchronization and sharing, online document editing, calendar organization, contact management, and many others. With NextCloud, you can manage files of any size on your own servers, instead of servers owned by service providers (e.g., Google Drive, OneDrive, Dropbox, etc.). In this tutorial, we will illustrate how to install Nextcloud on AlmaLinux 10.
Table of Contents
Prerequisite
- An AlmaLinux 10 VPS.
- SSH access with sudo privileges or root access.
Conventions
# – given commands should be executed with root privileges either directly as a root user or by use of sudo command
$ – given commands should be executed as a regular user
Step 1: Install PHP 8
AlmaLinux 10 ships with PHP 8.3. We will be installing PHP 8.3 and using it for the NextCloud installation.
# dnf install php php-{bz2,ctype,curl,fpm,gd,imagick,intl,json,fileinfo,libxml,mbstring,mysqlnd,openssl,posix,session,simplexml,xmlreader,xmlwriter,zip,zlib}
Once the installation is completed, the PHP-FPM service is running but is not enabled upon server reboot.
Step 2. Configure PHP-FPM
In an AlmaLinux machine, the ‘user’ and ‘group’ in /etc/php-fpm.d/www.conf are set to ‘apache’ by default. And, since we are going to use nginx as the web server, we need to edit the configuration file.
# vim /etc/php-fpm.d/www.conf
Change the ‘user’ and ‘group’ to ‘nginx’.
user = nginx
group = nginx
Save the file, then exit.
Next, we have to edit some PHP values required for Nextcloud installation.
# vim /etc/php.ini
Modify the configuration values as follows.
memory_limit = 768M
date.timezone = America/Chicago
cgi.fixpathinfo = 0
We also need to change the permissions of the PHP session and OpCache directories.
# chown -R root.nginx /var/lib/php/opcache/
# chown -R root.nginx /var/lib/php/session/
Then, let’s restart PHP-FPM and enable it upon reboot.
# systemctl restart php-fpm
# systemctl enable php-fpm
Step 3: Install and Configure Nginx
We can use any web server we like to host a NextCloud website. But in this step, we are going to install and configure nginx as the web server, not Apache or any other web server. Let’s execute this command to install nginx from the AlmaLinux repository.
# dnf install nginx -y
Start nginx and enable it on boot.
# systemctl enable --now nginx
Let’s create an nginx server block or virtual host.
# vim /etc/nginx/conf.d/cloud.yourdomain.com.conf
Paste the following into the file
upstream nextcloud {
    server unix:/run/php-fpm/www.sock;
}

# Set the `immutable` cache control options only for assets with a cache busting `v` argument
map $arg_v $asset_immutable {
    "" "";
    default "immutable";
}


server {
    listen 80;
    server_name cloud.yourdomain.com;

    # Path to the root of your installation
    root /var/www/nextcloud;

     # Prevent nginx HTTP Server Detection
    server_tokens off;

    # set max upload size and increase upload timeout:
    client_max_body_size 512M;
    client_body_timeout 300s;
    fastcgi_buffers 64 4K;

    # Enable gzip but do not remove ETag headers
    gzip on;
    gzip_vary on;
    gzip_comp_level 4;
    gzip_min_length 256;
    gzip_proxied expired no-cache no-store private no_last_modified no_etag auth;
    gzip_types application/atom+xml application/javascript application/json application/ld+json application/manifest+json application/rss+xml application/vnd.geo+json application/vnd.ms-fontobject application/wasm application/x-font-ttf application/x-web-app-manifest+json application/xhtml+xml application/xml font/opentype image/bmp image/svg+xml image/x-icon text/cache-manifest text/css text/plain text/vcard text/vnd.rim.location.xloc text/vtt text/x-component text/x-cross-domain-policy;


    # HTTP response headers borrowed from Nextcloud `.htaccess`
    add_header Referrer-Policy                      "no-referrer"   always;
    add_header X-Content-Type-Options               "nosniff"       always;
    add_header X-Download-Options                   "noopen"        always;
    add_header X-Frame-Options                      "SAMEORIGIN"    always;
    add_header X-Permitted-Cross-Domain-Policies    "none"          always;
    add_header X-Robots-Tag                         "none"          always;
    add_header X-XSS-Protection                     "1; mode=block" always;

    # Remove X-Powered-By, which is an information leak
    fastcgi_hide_header X-Powered-By;

    index index.php index.html /index.php$request_uri;

    # Rule borrowed from `.htaccess` to handle Microsoft DAV clients
    location = / {
        if ( $http_user_agent ~ ^DavClnt ) {
            return 302 /remote.php/webdav/$is_args$args;
        }
    }

    location = /robots.txt {
        allow all;
        log_not_found off;
        access_log off;
    }

    # Make a regex exception for `/.well-known` so that clients can still
    # access it despite the existence of the regex rule
    # `location ~ /(\.|autotest|...)` which would otherwise handle requests
    # for `/.well-known`.
    location ^~ /.well-known {
        # The rules in this block are an adaptation of the rules
        # in `.htaccess` that concern `/.well-known`.

        location = /.well-known/carddav { return 301 /remote.php/dav/; }
        location = /.well-known/caldav  { return 301 /remote.php/dav/; }

        location /.well-known/acme-challenge    { try_files $uri $uri/ =404; }
        location /.well-known/pki-validation    { try_files $uri $uri/ =404; }

        # Let Nextcloud's API for `/.well-known` URIs handle all other
        # requests by passing them to the front-end controller.
        return 301 /index.php$request_uri;
    }

    # Rules borrowed from `.htaccess` to hide certain paths from clients
    location ~ ^/(?:build|tests|config|lib|3rdparty|templates|data)(?:$|/)  { return 404; }
    location ~ ^/(?:\.|autotest|occ|issue|indie|db_|console)                { return 404; }

    # Ensure this block, which passes PHP files to the PHP process, is above the blocks
    # which handle static assets (as seen below). If this block is not declared first,
    # then Nginx will encounter an infinite rewriting loop when it prepends `/index.php`
    # to the URI, resulting in a HTTP 500 error response.
    location ~ \.php(?:$|/) {
        # Required for legacy support
        rewrite ^/(?!index|remote|public|cron|core\/ajax\/update|status|ocs\/v[12]|updater\/.+|oc[ms]-provider\/.+|.+\/richdocumentscode\/proxy) /index.php$request_uri;

        fastcgi_split_path_info ^(.+?\.php)(/.*)$;
        set $path_info $fastcgi_path_info;

        try_files $fastcgi_script_name =404;

        include fastcgi_params;
        fastcgi_param SCRIPT_FILENAME $document_root$fastcgi_script_name;
        fastcgi_param PATH_INFO $path_info;
        fastcgi_param HTTPS on;

        fastcgi_param modHeadersAvailable true;         # Avoid sending the security headers twice
        fastcgi_param front_controller_active true;     # Enable pretty urls
        fastcgi_pass nextcloud;

        fastcgi_intercept_errors on;
        fastcgi_request_buffering off;

        fastcgi_max_temp_file_size 0;
    }

    location ~ \.(?:css|js|svg|gif|png|jpg|ico|wasm|tflite|map)$ {
        try_files $uri /index.php$request_uri;
        add_header Cache-Control "public, max-age=15778463, $asset_immutable";
        access_log off;     # Optional: Don't log access to assets

        location ~ \.wasm$ {
            default_type application/wasm;
        }
    }

    location ~ \.woff2?$ {
        try_files $uri /index.php$request_uri;
        expires 7d;         # Cache-Control policy borrowed from `.htaccess`
        access_log off;     # Optional: Don't log access to assets
    }

    # Rule borrowed from `.htaccess`
    location /remote {
        return 301 /remote.php$request_uri;
    }

    location / {
        try_files $uri $uri/ /index.php$request_uri;
    }
}
Save the file, then exit. Ensure that you replace the domain name part with your actual domain or subdomain that points to your server.
Step 4: Install MySQL Server
The latest version of Nextcloud supports multiple database engines, including PostgreSQL, Oracle, SQLite, MySQL 8.0/8.4, and MariaDB 10.6/10.11 (recommended) or 11.4. Since AlmaLinux ships with MariaDB 10.11, we will install and use it.
# dnf install mysql mariadb-server
# systemctl enable --now mariadb
The MySQL server is now up and running, and it will be automatically restarted upon reboot. You can check the status by running this command:
# systemctl status mariadb
The command will return an output like this:
[root@almalinux10 ~]-# systemctl status mariadb
● mariadb.service - MariaDB 10.11 database server
     Loaded: loaded (/usr/lib/systemd/system/mariadb.service; enabled; preset: disabled)
     Active: active (running) since Sun 2025-06-01 18:16:26 WIB; 2h 18min ago
 Invocation: 25a00fcefb6f42239e32e02169f42252
       Docs: man:mariadbd(8)
             https://mariadb.com/kb/en/library/systemd/
   Main PID: 985 (mariadbd)
     Status: "Taking your SQL requests now..."
      Tasks: 8 (limit: 22942)
     Memory: 219.8M (peak: 221.5M)
        CPU: 2.019s
     CGroup: /system.slice/mariadb.service
             └─985 /usr/libexec/mariadbd --basedir=/usr
Jun 01 18:16:24 localhost.localdomain systemd[1]: Starting mariadb.service - MariaDB 10.11 database server...
Jun 01 18:16:25 localhost.localdomain mariadb-prepare-db-dir[924]: Database MariaDB is probably initialized in /var/lib/mysql already, nothing is done.
Jun 01 18:16:25 localhost.localdomain mariadb-prepare-db-dir[924]: If this is not the case, make sure the /var/lib/mysql is empty before running mariadb-prepare-db-dir.
Jun 01 18:16:25 localhost.localdomain (mariadbd)[985]: mariadb.service: Referenced but unset environment variable evaluates to an empty string: MYSQLD_OPTS, _WSREP_NEW_CLUSTER
Jun 01 18:16:26 localhost.localdomain systemd[1]: Started mariadb.service - MariaDB 10.11 database server.
Step 5: Create a Database
After installing the MySQL server in the previous step, we can proceed with creating a new database and a user for our Nextcloud website.
# mysql
mysql> CREATE DATABASE nextcloud CHARACTER SET utf8mb4 COLLATE utf8mb4_general_ci;
mysql> CREATE USER 'nextcloud'@'localhost' IDENTIFIED BY "mod1fyth15";
mysql> GRANT ALL PRIVILEGES ON nextcloud.* TO 'nextcloud'@'localhost';
mysql> FLUSH PRIVILEGES;
mysql> \q
Remember to replace ‘m0d1fyth15’ with a stronger password.
Step 6: Install SSL Certificate
In this step, we will install Certbot. Certbot is an ACME tool to generate SSL certificates provided by Let’s Encrypt.
# dnf install certbot python3-certbot-nginx -y
Once installed, you can run this command to issue an SSL certificate. Again, ensure that you replace the subdomain with your actual domain or subdomain name, as it should match the one specified in the nginx server block configuration file we created earlier. Also, make sure the domain or subdomain is already pointing to your server’s IP address.
# certbot
You will be prompted for a few questions, and you will see an output like this:
Saving debug log to /var/log/letsencrypt/letsencrypt.log
Enter email address (used for urgent renewal and security notices)
 (Enter 'c' to cancel): you@yourdomain.com

- - - - - - - - - - - - - - - - - - - - - - - - - - - - - - - - - - - - - - - -
Please read the Terms of Service at
https://letsencrypt.org/documents/LE-SA-v1.5-February-24-2025.pdf. You must
agree in order to register with the ACME server. Do you agree?
- - - - - - - - - - - - - - - - - - - - - - - - - - - - - - - - - - - - - - - -
(Y)es/(N)o: y

- - - - - - - - - - - - - - - - - - - - - - - - - - - - - - - - - - - - - - - -
Would you be willing, once your first certificate is successfully issued, to
share your email address with the Electronic Frontier Foundation, a founding
partner of the Let's Encrypt project and the non-profit organization that
develops Certbot? We'd like to send you email about our work encrypting the web,
EFF news, campaigns, and ways to support digital freedom.
- - - - - - - - - - - - - - - - - - - - - - - - - - - - - - - - - - - - - - - -
(Y)es/(N)o: n
Account registered.

Which names would you like to activate HTTPS for?
We recommend selecting either all domains, or all domains in a VirtualHost/server block.
- - - - - - - - - - - - - - - - - - - - - - - - - - - - - - - - - - - - - - - -
1: cloud.yourdomain.com
- - - - - - - - - - - - - - - - - - - - - - - - - - - - - - - - - - - - - - - -
Select the appropriate numbers separated by commas and/or spaces, or leave input
blank to select all options shown (Enter 'c' to cancel): 1
Requesting a certificate for cloud.yourdomain.com

Successfully received certificate.
Certificate is saved at: /etc/letsencrypt/live/cloud.yourdomain.com/fullchain.pem
Key is saved at:         /etc/letsencrypt/live/cloud.yourdomain.com/privkey.pem
This certificate expires on 2025-08-30.
These files will be updated when the certificate renews.
Certbot has set up a scheduled task to automatically renew this certificate in the background.

Deploying certificate
Successfully deployed certificate for cloud.yourdomain.com to /etc/nginx/conf.d/cloud.yourdomain.com.conf
Congratulations! You have successfully enabled HTTPS on https://cloud.yourdomain.com

- - - - - - - - - - - - - - - - - - - - - - - - - - - - - - - - - - - - - - - -
If you like Certbot, please consider supporting our work by:
 * Donating to ISRG / Let's Encrypt:   https://letsencrypt.org/donate
 * Donating to EFF:                    https://eff.org/donate-le
- - - - - - - - - - - - - - - - - - - - - - - - - - - - - - - - - - - - - - - -
Step 7: Install NextCloud
Finally, we can proceed with installing NextCloud. First, we need to download the installation archive file. Go to their download page https://download.nextcloud.com/server/releases/ and choose to download a specific version.
In this article, we will download the latest available version. Let’s run this command:
# wget https://download.nextcloud.com/server/releases/latest.zip -O latest.zip
Then, extract the downloaded zip archive to the document root directory on your server
# unzip latest.zip -d /var/www/
# mkdir /var/www/nextcloud/data
# chown -R nginx: /var/www/nextcloud
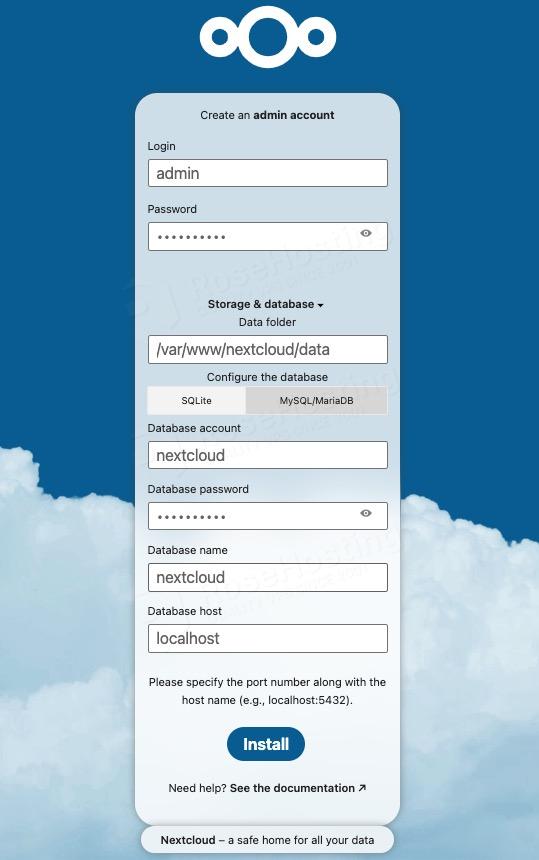
Once extracted, you can now proceed with Nextcloud installation via web installer at http://cloud.yourdomain.com, click on the MySQL/MariaDB tab, then fill in the blanks as required, then click on the “Install” button to finish it.
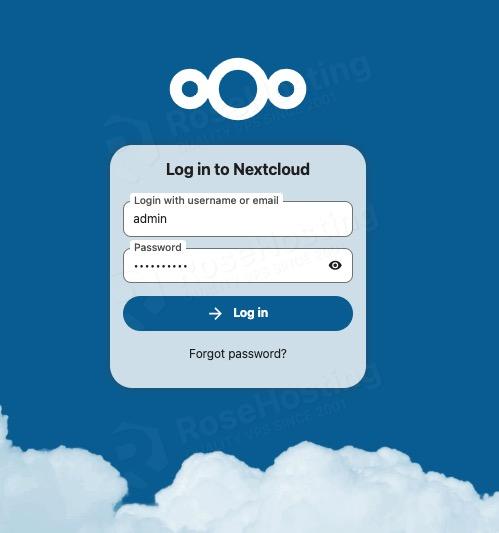
Once finished, you will be directed to the website’s backend login form.
In this tutorial, SELinux is considered disabled. If you encounter an issue during NextCloud installation on AlmaLinux 10, it is most likely related to SELinux. You can refer to the NextCloud documentation for guidance on resolving this issue.
That’s it all! You have successfully installed NextCloud on AlmaLinux 10.
If you are one of our web hosting customers and use our managed Almalinux Hosting, you don’t have to follow this tutorial and install NextCloud on AlmaLinux 10 yourself, our Linux admins will set up and configure a NextCloud VPS for you. They are available 24/7 and will take care of your request immediately. All you need to do is submit a ticket. Installing Nextcloud is not just about the installation; we can help you optimize your Nextcloud installation if you have an active service with us. If you liked this post, please share it with your friends or leave a comment below.