In this blog post, we will guide you through the process of how to install Nextcloud on Debian 13. Nextcloud is free and open-source software written in PHP that is used for creating its own cloud storage and file-sharing services. The files are stored in MySQL, MariaDB, or PostgreSQL database management systems and can be synchronized across multiple devices, which makes the process of accessing the files easier. Nextcloud offers a variety of features, including contacts, calendars, and online document editing. To function correctly, Nextcloud must be installed with the LAMP stack, which we will also cover.
Installing Nextcloud on Debian 13 with the LAMP stack is a straightforward process that can take up to 20 minutes. Let’s get started!
Table of Contents
Prerequisites
- A server running Debian 13 OS
- User privileges: root or non-root user with sudo privileges
- A valid domain with a pointed A record to the server
Step 1. Update the System
Before we start with the installation of Nextcloud and the LAMP stack, we will update the system packages to their latest versions. Execute the following command:
sudo apt update -y && sudo apt upgrade -y
Step 2. Install the LAMP Stack
LAMP stack stands for Linux, Apache, MySQL, and PHP. Since we already updated the Debian 13 Linux distribution, we are ready to proceed with the rest. First, we will install the Apache web server. To do that, execute the following command:
sudo apt install apache2 -y
Once installed,d start and enable the Apache service:
sudo systemctl start apache2 && sudo systemctl enable apache2
Check the status of the service:
sudo systemctl status apache2
You should get the following output:</p
root@host:~# systemctl status apache2
● apache2.service - The Apache HTTP Server
     Loaded: loaded (/usr/lib/systemd/system/apache2.service; enabled; preset: enabled)
     Active: active (running) since Fri 2025-05-30 05:26:54 CDT; 2min 22s ago
 Invocation: 0de5618bc141476ba37080e48db47200
       Docs: https://httpd.apache.org/docs/2.4/
   Main PID: 46110 (apache2)
      Tasks: 55 (limit: 4640)
     Memory: 5M (peak: 5.4M)
        CPU: 125ms
     CGroup: /system.slice/apache2.service
             ├─46110 /usr/sbin/apache2 -k start
             ├─46112 /usr/sbin/apache2 -k start
             └─46113 /usr/sbin/apache2 -k start

May 30 05:26:54 host.test.vps systemd[1]: Starting apache2.service - The Apache HTTP Server...
Next in the LAMP stack will be the MariaDB database service. To install it, execute the command below:
sudo apt install mariadb-server -y
Once installed, start and enable the MariaDB service:
sudo systemctl start mariadb && sudo systemctl enable mariadb
Check the status of the service:
sudo systemctl status mariadb
You should get the following output:
root@host:~# sudo systemctl status mariadb
● mariadb.service - MariaDB 11.8.1 database server
     Loaded: loaded (/usr/lib/systemd/system/mariadb.service; enabled; preset: enabled)
     Active: active (running) since Fri 2025-05-30 05:35:17 CDT; 13s ago
 Invocation: 630594037c7044c6b36db03520352aa2
       Docs: man:mariadbd(8)
             https://mariadb.com/kb/en/library/systemd/
   Main PID: 47112 (mariadbd)
     Status: "Taking your SQL requests now..."
      Tasks: 14 (limit: 30624)
     Memory: 296.5M (peak: 386.5M)
        CPU: 12.452s
     CGroup: /system.slice/mariadb.service
             └─47112 /usr/sbin/mariadbd
Last is the PHP with its extensions. To install it, execute the following command:
sudo apt install php libapache2-mod-php php-cgi php-mysqli php-pear php-phpseclib php-mysql php-mbstring php-zip php-gd php-curl php-common -y
Once installed, execute the following command to check the PHP version:
php -v
You should get the following output:
root@host:~# php -v
PHP 8.4.6 (cli) (built: Apr 14 2025 16:59:47) (NTS)
Copyright (c) The PHP Group
Zend Engine v4.4.6, Copyright (c) Zend Technologies
    with Zend OPcache v8.4.6, Copyright (c), by Zend Technologies
Step 3. Create Nextcloud Database and User
To create the Nextcloud database, database user, and assign the privileges, log in to the MariaDB terminal and execute the following commands:
CREATE USER 'nextuser'@'localhost' IDENTIFIED BY 'StrongPasswordHere';

CREATE DATABASE nextdb;

GRANT ALL PRIVILEGES ON nextdb.* TO 'nextuser'@'localhost';

FLUSH PRIVILEGES;

EXIT;
Step 4. Download and Install Nextcloud
Download Nextcloud into the Apache document root:
cd /var/www/html

wget https://download.nextcloud.com/server/releases/latest.zip
Unzip the latest.zip file and set the correct permissions:
unzip latest.zip

chown -R www-data:www-data nextcloud/

find . -type f -exec chmod 644 {} \;

find . -type d -exec chmod 755 {} \;
Once done, you can remove the latest.zip file:
rm latest.zip
Step 5. Create Apache Virtual Host File
The Apache Configuration file for our Nextcloud installation is necessary if we want to access it via a domain name. To create the file, execute the following command:
sudo touch /etc/apache2/sites-available/nextcloud.conf
Open the file and paste the following lines of code
<VirtualHost *:80>
ServerName yourdomainhere.com
DocumentRoot /var/www/html/nextcloud

<Directory /var/www/html/nextcloud>
AllowOverride All
</Directory>

ErrorLog ${APACHE_LOG_DIR}/error.log
CustomLog ${APACHE_LOG_DIR}/access.log combined

</VirtualHost>
Save the file and close it.
Enable the Apache configuration files for WordPress along with the rewrite module.
sudo a2enmod rewrite

sudo a2ensite nextcloud.conf

sudo a2dissite 000-default.conf
Check the Apache2 syntax:
apachectl -t
You should receive the following output:
root@host:/var/www/html/nextcloud# apachectl -t
Syntax OK
If the syntax is OK, restart the Apache service.
systemctl restart apache2
That’s it. Now you can access the Nextcloud at http://yourdomainhere.com
Step 6. Finish the Nextcloud Installation
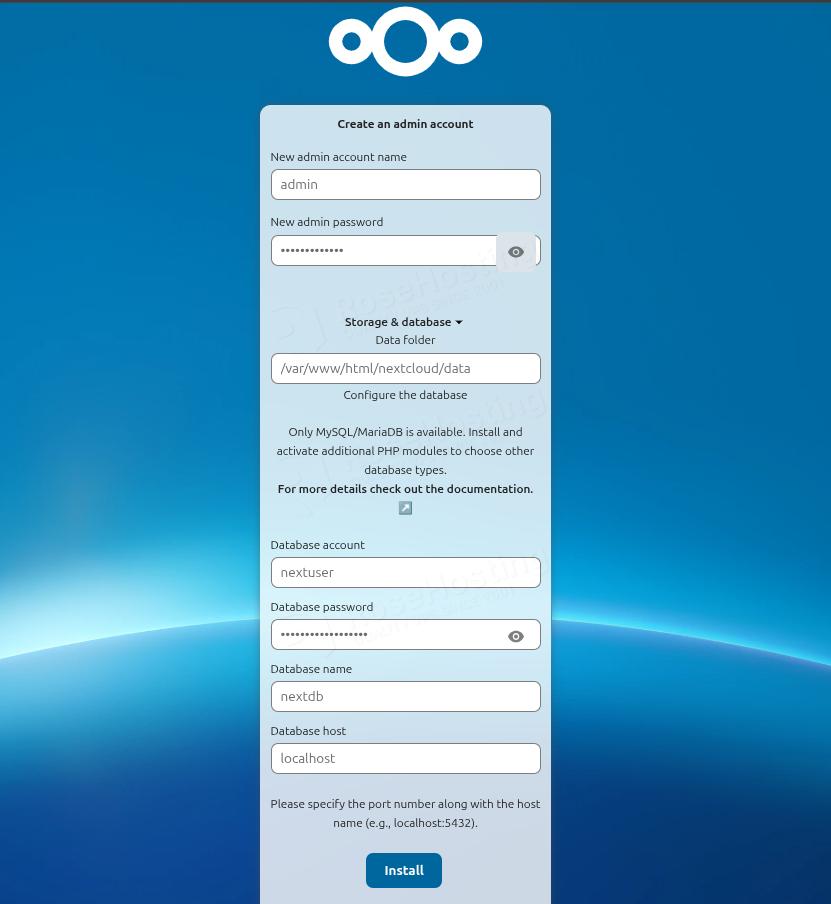
Once you access the domain in the browser, you will get a screen where you will have to enter data for username and password, and below the database credentials we set in step 3 in this tutorial:
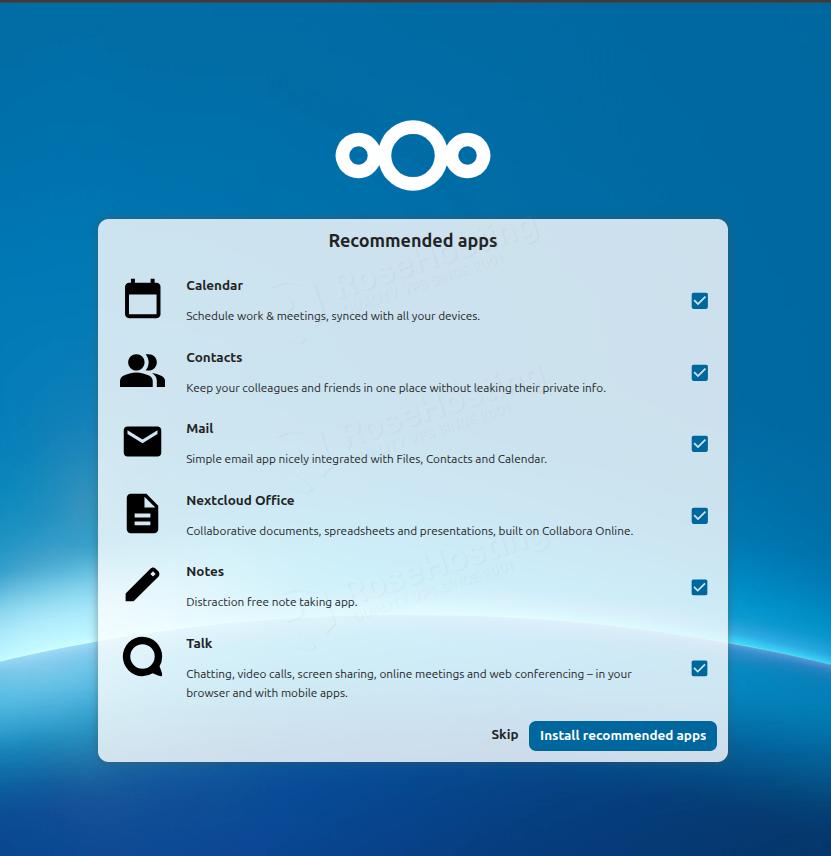
Then you can install the recommended apps by clicking on the respective button:
Once the apps are installed, you will be redirected to the Nextcloud Dashboard:
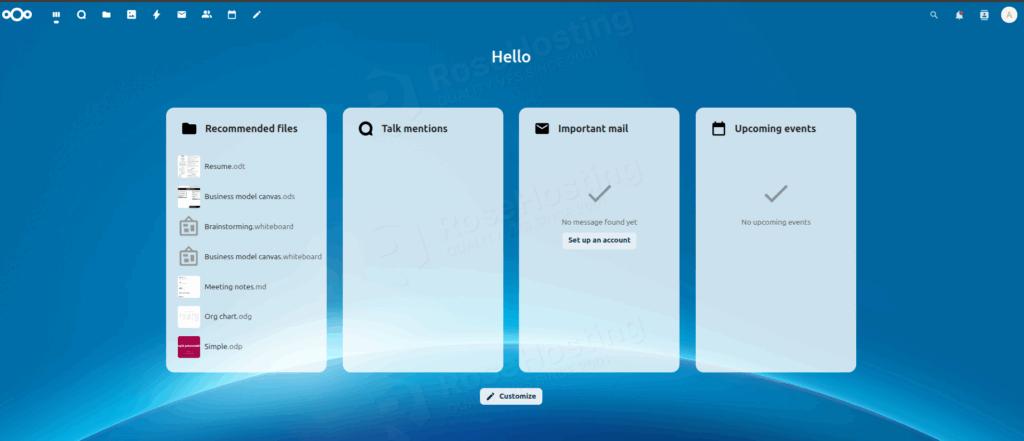
That’s it. You have successfully installed Nextcloud on the Debian 13 operating system.
Of course, you don’t have to install Nextcloud if you have difficulties and you are not familiar with Linux. You can always contact our technical support. You only need to sign up for one of our Managed Nextcloud hosting plans and submit a support ticket. We are available 24/7 and will attend to your request promptly.
If you liked this post on how to install Nextcloud on Debian 13, please share it with your friends or leave a comment down below.