
![]() In this tutorial, we will show you how to install Odoo 13 ERP software on a CentOS 8 VPS. Odoo is one of the most popular enterprise resource planning (ERP) platforms ever made. Built using Python and utilizing PostgresSQL for its database, Odoo is 100% open-source and free. Odoo also has a rich feature set – it comes with a wide range of business applications such as CRM, POS, Website builder, Warehouse Management, Project Management, eCommerce, Marketing, Billing & Accounting, Manufacturing, and lots more.
In this tutorial, we will show you how to install Odoo 13 ERP software on a CentOS 8 VPS. Odoo is one of the most popular enterprise resource planning (ERP) platforms ever made. Built using Python and utilizing PostgresSQL for its database, Odoo is 100% open-source and free. Odoo also has a rich feature set – it comes with a wide range of business applications such as CRM, POS, Website builder, Warehouse Management, Project Management, eCommerce, Marketing, Billing & Accounting, Manufacturing, and lots more.
Odoo apps are integrated with each other and allow you to fully automate your business processes. The main feature of Odoo is its intuitive interface and drag & drop editor that allows you to quickly manage your content. Odoo also supports third-party modules, further allowing you to expand the functionality to fit your exact needs.
Let’s start with the installation, which shouldn’t take too long.
Table of Contents
Prerequisites
- A CentOS 8 VPS with root access enabled (our VPSes all have root access) or a user with sudo privileges.
- At least 2 GB of RAM.
Log in via SSH and Update your Server
First, you will need to log in to your CentOS 8 VPS via SSH as the root user:
ssh root@IP_ADDRESS -p PORT_NUMBER
Replace IP_ADRRESS and PORT_NUMBER with the values for your VPS. IP_ADDRESS is required, and PORT_NUMBER is 22 by default, but may be different depending on your setup.
Next, run the following commands to upgrade all installed packages on your VPS:
dnf update -y
Once all the packages are updated, restart your system to apply the changes. This ensures a clean slate on which we’ll be installing our Odoo instance.
Install Required Dependencies
First, you will need to install Python package and other Odoo dependencies in your system. You can install all of them using the following command:
dnf install python3 python3-devel git gcc redhat-rpm-config libxslt-devel bzip2-devel openldap-devel libjpeg-devel freetype-devel curl unzip -y
Once all the packages are installed, you will need to install wkhtmltopdf package in your system. Wkhtmltopdf is an open-source tool that can be used to converts the HTML format to PDF so that Odoo can print PDF reports.
You can install it by running the following command:
dnf install https://github.com/wkhtmltopdf/wkhtmltopdf/releases/download/0.12.5/wkhtmltox-0.12.5-1.centos8.x86_64.rpm
Once you are finished, you can proceed to the next step.
Install and Configure PostgreSQL
Odoo uses PostgreSQL to store its data. You can install the PostgreSQL server with the following command:
dnf install postgresql postgresql-server postgresql-contrib -y
Once the installation is completed, initialize the database with the following command:
postgresql-setup initdb
You should get the following output:
* Initializing database in '/var/lib/pgsql/data'

* Initialized, logs are in /var/lib/pgsql/initdb_postgresql.log
Next, start the PostgreSQL service and enable it to start at boot with the following command:
systemctl start postgresql

systemctl enable postgresql
Next, log in to the PostgreSQL shell and create a new PostgreSQL user with the following command:
su - postgres -c "createuser -s odoo13"
Install and Configure Odoo 13
Before starting, create a separate user in CentOS which we’ll use to run the Odoo service.
useradd -m -U -r -d /opt/odoo13 -s /bin/bash odoo13
Note : Make sure the username must be the same as PostgreSQL user.
Next, log in with your odoo13 user and download Odoo 13 from the GitHub repository:
su - odoo13

git clone https://www.github.com/odoo/odoo --depth 1 --branch 13.0 /opt/odoo13/odoo
You should get the following output:
Cloning into '/opt/odoo13/odoo'...

warning: redirecting to https://github.com/odoo/odoo.git/

remote: Enumerating objects: 28242, done.

remote: Counting objects: 100% (28242/28242), done

remote: Compressing objects: 100% (23893/23893), done.

Receiving objects:  96% (27370/28242), 110.95 MiB | 13.39 MiB/s

remote: Total 28242 (delta 8481), reused 10433 (delta 3462), pack-reused 0

Receiving objects: 100% (28242/28242), 120.16 MiB | 9.46 MiB/s, done.

Resolving deltas: 100% (8481/8481), done.

Checking out files: 100% (25288/25288), done.
Next, change your current working directory to /opt/odoo13 and create a new Python virtual environment with the following command:
cd /opt/odoo13

python3 -m venv odooenv
Next, activate the virtual environment with the following command:
source odooenv/bin/activate
Once that is done, install all required Python modules with the following command:
pip3 install -r odoo/requirements.txt
After installing all modules, deactivate the environment with the following command:
deactivate
Next, create a new directory to store the custom addons:
mkdir /opt/odoo13/odoo-custom-addons
From there, exit from the Odoo13 user with the following command:
exit
Finally, create a new Odoo 13 configuration file with your database details, master password and addons path:
nano /etc/odoo13.conf
Add the following lines to the file:
[options]

admin_passwd = your-secure-password

db_host = False

db_port = False

db_user = odoo13

db_password = False

addons_path = /opt/odoo13/odoo/addons, /opt/odoo13/odoo-custom-addons
Make sure you set a strong password. Save and close the file.
Create a Systemd Unit File for Odoo 13
Using systemd to easily start and stop your Odoo instance is very convenient. This step is not mandatory, but it adds a great quality-of-life feature that is nice to have, and it makes managing Odoo that much easier.
You can create the service with the following command:
nano /etc/systemd/system/odoo13.service
Open the file, and add the following lines:
[Unit]

Description=Odoo13

Requires=postgresql.service

After=network.target postgresql.service

[Service]

Type=simple

SyslogIdentifier=odoo13

PermissionsStartOnly=true

User=odoo13

Group=odoo13

ExecStart=/opt/odoo13/venv/bin/python3 /opt/odoo13/odoo/odoo-bin -c /etc/odoo13.conf

StandardOutput=journal+console

[Install]

WantedBy=multi-user.target
Save and close the file then reload the systemd daemon with the following command:
systemctl daemon-reload
Next, start the Odoo 13 service and enable it to start at boot with the following command:
systemctl start odoo13

systemctl enable odoo13
You can verify the status of Odoo 13 with the following command:
systemctl status odoo13
You should get the following output:
● odoo13.service - Odoo13

Loaded: loaded (/etc/systemd/system/odoo13.service; enabled; vendor preset: disabled)

Active: active (running) since Sun 2020-05-24 08:35:45 EDT; 3s ago

Main PID: 23874 (python3)

Tasks: 4 (limit: 25028)

Memory: 60.8M

CGroup: /system.slice/odoo13.service

└─23874 /opt/odoo13/venv/bin/python3 /opt/odoo13/odoo/odoo-bin -c /etc/odoo13.conf

May 24 08:35:45 centos8 systemd[1]: Started Odoo13.

May 24 08:35:46 centos8 odoo13[23874]: /opt/odoo13/venv/lib64/python3.6/site-packages/psycopg2/__init__.py:144: UserWarning: The psycopg2 whee>

May 24 08:35:46 centos8 odoo13[23874]:   """)

May 24 08:35:46 centos8 odoo13[23874]: 2020-05-24 12:35:46,298 23874 INFO ? odoo: Odoo version 13.0

May 24 08:35:46 centos8 odoo13[23874]: 2020-05-24 12:35:46,299 23874 INFO ? odoo: Using configuration file at /etc/odoo13.conf

May 24 08:35:46 centos8 odoo13[23874]: 2020-05-24 12:35:46,300 23874 INFO ? odoo: addons paths: ['/opt/odoo13/odoo/odoo/addons', '/opt/odoo13/>

May 24 08:35:46 centos8 odoo13[23874]: 2020-05-24 12:35:46,300 23874 INFO ? odoo: database: odoo13@default:default

May 24 08:35:46 centos8 odoo13[23874]: 2020-05-24 12:35:46,893 23874 INFO ? odoo.addons.base.models.ir_actions_report: Will use the Wkhtmltopd>

May 24 08:35:47 centos8 odoo13[23874]: 2020-05-24 12:35:47,367 23874 INFO ? odoo.service.server: HTTP service (werkzeug) running on centos8:80>

lines 1-18/18 (END)
At this point, Odoo is running and listening on port 8069. You can already access it from a browser by specifying the IP and Port for Odoo.
Configure Nginx as a Reverse Proxy
It is a good idea to configure Nginx as a reverse proxy for Odoo. This is done so that you can access the Odoo instance without needing to specify the port every time. Nginx is a popular web server focused on customizability and versatility.
First, install Nginx with the following command:
dnf install nginx -y
Once installed, create a new Nginx virtual host configuration file:
nano /etc/nginx/conf.d/odoo13.example.conf
Add the following lines:
upstream odoo {

server 127.0.0.1:8069;

}

upstream odoochat {

server 127.0.0.1:8072;

}

server {

listen 80;

server_name odoo13.example.com;

proxy_read_timeout 720s;

proxy_connect_timeout 720s;

proxy_send_timeout 720s;

# Proxy headers

proxy_set_header X-Forwarded-Host $host;

proxy_set_header X-Forwarded-For $proxy_add_x_forwarded_for;

proxy_set_header X-Forwarded-Proto $scheme;

proxy_set_header X-Real-IP $remote_addr;

# log files

access_log /var/log/nginx/odoo13.access.log;

error_log /var/log/nginx/odoo13.error.log;

# Handle longpoll requests

location /longpolling {

proxy_pass http://odoochat;

}

# Cache static files

location ~* /web/static/ {

proxy_cache_valid 200 90m;

proxy_buffering on;

expires 864000;

proxy_pass http://odoo;

}

gzip_types text/css text/less text/plain text/xml application/xml application/json application/javascript;

gzip on;

}
You should replace “example.com” with your registered domain name.
Save and close the file. Then, you will need to configure hash_bucket_site in Nginx default configuration file.
Open the Nginx default configuration file as shown below:
nano /etc/nginx/nginx.conf
Add the following line below the line http {:
server_names_hash_bucket_size 64;
Save and close the file. Then, check Nginx for any syntax errors with the following command:
nginx -t
You should get the following output:
nginx: the configuration file /etc/nginx/nginx.conf syntax is ok

nginx: configuration file /etc/nginx/nginx.conf test is successful
Finally, start the Nginx service and enable it to start at boot with the following command:
systemctl start nginx

systemctl enable nginx
Next, you will also need to configure Odoo to use the proxy. You can do it by editing the file /etc/odoo13.conf:
nano /etc/odoo13.conf
Add the following line to the end of the file:
proxy_mode = True
Save and close the file, then restart the Odoo 13 service to implement the changes:
systemctl restart odoo13
Secure Odoo 13 with Let’s Encrypt
It is recommended to secure the Odoo instance with Let’s Encrypt SSL. This is not a mandatory step, but it provides secure connections for your Odoo instance.
First, install the Certbot client in your system to manage the SSL:
wget https://dl.eff.org/certbot-auto

mv certbot-auto /usr/local/bin/certbot-auto

chmod 0755 /usr/local/bin/certbot-auto
Now, run the following command to obtain and install an SSL certificate for your Odoo 13 website. Replace “example.com” with your registered domain name.
certbot-auto --nginx -d odoo13.example.com
The above command will first install all the required dependencies on your server. Once installed, you will be asked to provide an email
address and accept the term of service as shown below:
Saving debug log to /var/log/letsencrypt/letsencrypt.log

Plugins selected: Authenticator nginx, Installer nginx

Enter email address (used for urgent renewal and security notices)

(Enter 'c' to cancel): admin@example.com

- - - - - - - - - - - - - - - - - - - - - - - - - - - - - - - - - - - - - - - -

Please read the Terms of Service at

https://letsencrypt.org/documents/LE-SA-v1.2-November-15-2017.pdf. You must

agree in order to register with the ACME server at

https://acme-v02.api.letsencrypt.org/directory

- - - - - - - - - - - - - - - - - - - - - - - - - - - - - - - - - - - - - - - -

(A)gree/(C)ancel: A

- - - - - - - - - - - - - - - - - - - - - - - - - - - - - - - - - - - - - - - -

Would you be willing to share your email address with the Electronic Frontier

Foundation, a founding partner of the Let's Encrypt project and the non-profit

organization that develops Certbot? We'd like to send you email about our work

encrypting the web, EFF news, campaigns, and ways to support digital freedom.

- - - - - - - - - - - - - - - - - - - - - - - - - - - - - - - - - - - - - - - -

(Y)es/(N)o: N
Make your choice and hit Enter to continue. Once the certificate has been installed, you should see the following output:
Obtaining a new certificate

Performing the following challenges:

http-01 challenge for odoo13.example.com

Waiting for verification...

Cleaning up challenges

Deploying Certificate to VirtualHost /etc/nginx/nginx.conf

Redirecting all traffic on port 80 to ssl in /etc/nginx/nginx.conf

- - - - - - - - - - - - - - - - - - - - - - - - - - - - - - - - - - - - - - - -

Congratulations! You have successfully enabled https://odoo13.example.com

You should test your configuration at:

https://www.ssllabs.com/ssltest/analyze.html?d=odoo13.example.com

- - - - - - - - - - - - - - - - - - - - - - - - - - - - - - - - - - - - - - - -

IMPORTANT NOTES:

- Congratulations! Your certificate and chain have been saved at:

/etc/letsencrypt/live/odoo13.example.com/fullchain.pem

Your key file has been saved at:

/etc/letsencrypt/live/odoo13.example.com/privkey.pem

Your cert will expire on 2020-08-22. To obtain a new or tweaked

version of this certificate in the future, simply run certbot-auto

again with the "certonly" option. To non-interactively renew *all*

of your certificates, run "certbot-auto renew"

- If you like Certbot, please consider supporting our work by:

Donating to ISRG / Let's Encrypt:   https://letsencrypt.org/donate

Donating to EFF:                    https://eff.org/donate-le
At this point, your Odoo 13 instance is secured with Let’s Encrypt SSL.
Access the Odoo 13 Instance
Now, open your web browser and type the URL https://odoo13.example.com. You should see the following page:
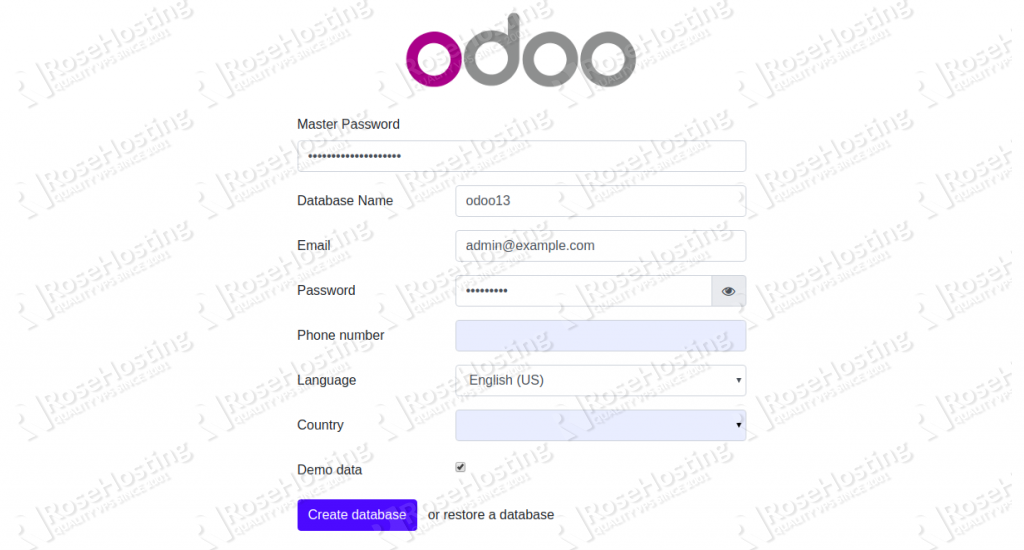
Provide your Master password, database details, email, and password before clicking on the Create database button. You should see the Odoo 13 dashboard in the following page:
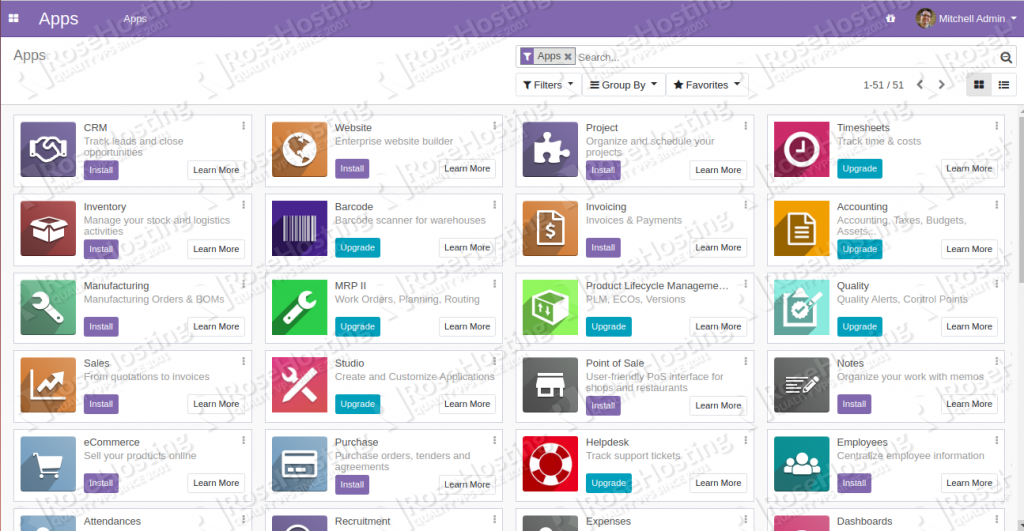
Congratulations, if you carefully followed our instructions in this tutorial, you will have successfully installed the latest Odoo 13 on your CentOS 8 VPS. You can create your first database and start using the latest Odoo 13 version.
![]() Of course, you don’t have to install Odoo 13 on CentOS 8 if you use one of our Odoo VPS Hosting services, in which case you can simply ask our team of expert Linux admins to install and configure Odoo 13 for you. They are available 24×7 and will take care of your request immediately. We take the guesswork out of installing your Odoo platform – just tell us what you need and it’ll be done.
Of course, you don’t have to install Odoo 13 on CentOS 8 if you use one of our Odoo VPS Hosting services, in which case you can simply ask our team of expert Linux admins to install and configure Odoo 13 for you. They are available 24×7 and will take care of your request immediately. We take the guesswork out of installing your Odoo platform – just tell us what you need and it’ll be done.
PS. If you liked this post on how to install Odoo 13 on CentOS 8, please share it with your friends on the social networks using the share shortcuts below, or simply leave a reply in the comments section. Thanks.