
In this tutorial, we will show you how to install Odoo 14 on an Ubuntu 20.04 VPS. Odoo is one of the most popular and most powerful open-source ERP business management software.

Written using the Python programming language, OpenERP (or Odoo as it is now called) is a modular ERP platform that adapts to your business’s needs, giving you the freedom to manage your business the way you want to.
The installation of Odoo 14 on an Ubuntu 20.04 VPS should take about ten minutes if you follow the very easy steps described below. Let’s begin.
Table of Contents
Prerequisites
- Ubuntu 20.04 VPS with 2GB of memory or higher (we’ll be using our Managed Ubuntu SSD 2 VPS for this)
- Python 3
- PostgreSQL
- Apache 2 with
proxyandproxy_httpmodules enabled - SSH access with root privileges, or access to the root user. We give all of our users full root access on their VPSes.
Step 1 – Getting Started
Log in to your Ubuntu 20.04 VPS with SSH as the root user or as a sudo user by entering this command in your terminal session:
ssh root@IP_Address -p Port_number
Make sure you replace IP_Address and Port_number with their respective values. The default SSH port is 22, but your server may have a different one.
You can check the Ubuntu version installed on your server with the following command:
cat /etc/issue
You should get this output:
Ubuntu 20.04.1 LTS \n \l
Once you are logged in, run the following command to update all installed OS packages to the latest available version:
sudo apt update
sudo apt upgrade
Step 2 – Install the PostgreSQL Server
Odoo requires a PostgreSQL database to store its information, so we will have to install the PostgreSQL server to serve and accept database operations. In order to install PostgreSQL, we’ll run the following command:
apt install postgresql
Once installed, PostgreSQL server will be started and enabled to automatically start at server boot.
Step 3 – Install Odoo 14
We will install Odoo in a virtual environment. We have to install the following packages and dependencies required for the Odoo 14 installation. This includes Python and several extensions that are required for Odoo to work properly:
sudo apt install build-essential git nodejs node-less npm python3-pip python3-dev python3-venv python3-wheel python3-setuptools libpq-dev libldap2-dev libsasl2-dev libxslt1-dev
Next, we need to create a new system user for our Odoo 14 instance and a new PostgreSQL user with the same name. You can name your user however you like, but we will create a user named odoo14 and define /opt/odoo14 as its home directory:
sudo useradd -m -d /opt/odoo14 -U -r -s /bin/bash odoo14
sudo su - postgres -c "createuser -s odoo14"
Switch to the odoo14 user we have created in the previous step:
sudo su - odoo14
Clone the Odoo 14 source code from the Odoo GitHub repository:
git clone https://www.github.com/odoo/odoo --depth 1 --branch 14.0 /opt/odoo14/odoo
Create a new python virtual environment as the user odoo14:
cd /opt/odoo14
python3 -m venv odoo14-venv
Activate the virtual environment:
source odoo14-venv/bin/activate
All Odoo dependencies are listed in the requirements.txt file, located in the /opt/odoo14/odoo directory. Additionally, we will need to install the wheel package using pip. To install all of these from within the virtual environment, run the following commands:
(odoo14-venv) $ pip3 install wheel
(odoo14-venv) $ pip3 install -r odoo/requirements.txt
Once the installation is complete, we can exit the virtual environment and switch back to the sudo or root user using this command:
(odoo14-venv) $ deactivate && exit
The following commands are optional and can be used if you want to use custom modules for the Odoo instance. The best practice is to install custom Odoo modules in a separate directory. Therefore we will create a new directory for the custom modules and change its ownership to the odoo14 user.
mkdir /opt/odoo14/odoo/custom-addons
chown odoo14: /opt/odoo14/odoo/custom-addons
For debugging purposes, we will create a log file for the new Odoo 14 instance and change its ownership to the odoo14 user:
mkdir /var/log/odoo14
touch /var/log/odoo14/odoo.log
chown -R odoo14: /var/log/odoo14/
We have to create a configuration file for the Odoo 14 instance as well:
nano /etc/odoo14.conf
In the file that we just opened, add the following lines:
[options]
admin_passwd = master_password
db_host = False
db_port = False
db_user = odoo14
db_password = False
xmlrpc_port = 8069
logfile = /var/log/odoo14/odoo.log
addons_path = /opt/odoo14/odoo/addons,/opt/odoo14/odoo/custom-addons
Do not forget to change the master_password and use a strong password. You can generate a strong password through the command line. Save and close the Odoo 14 configuration file.
Create a systemd unit file that we can use to run our Odoo 14 instance as a service.
Create a file named odoo14.service and open it using your favorite text editor:
nano /etc/systemd/system/odoo14.service
Add the following lines:
[Unit]
Description=Odoo14
Requires=postgresql.service
After=network.target postgresql.service

[Service]
Type=simple
SyslogIdentifier=odoo14
PermissionsStartOnly=true
User=odoo14
Group=odoo14
ExecStart=/opt/odoo14/odoo14-venv/bin/python3 /opt/odoo14/odoo/odoo-bin -c /etc/odoo14.conf
StandardOutput=journal+console

[Install]
WantedBy=multi-user.target
Run the following command for systemd to read the newly created service configuration:
systemctl daemon-reload
Start the Odoo 14 service:
systemctl start odoo14
Enable the Odoo 14 instance to start automatically on a server boot:
systemctl enable odoo14
To check and verify the status of our Odoo 14 service, run the following command:
systemctl status odoo14
You should receive the following output:
#systemctl status odoo14
● odoo14.service - Odoo14
Loaded: loaded (/etc/systemd/system/odoo14.service; enabled; vendor preset: enabled)
Active: active (running) since Fri 2020-10-02 16:51:41 UTC; 12s ago
Main PID: 29627 (python3)
Tasks: 4 (limit: 19101)
Memory: 58.3M
CGroup: /system.slice/odoo14.service
└─29627 /opt/odoo14/odoo14-venv/bin/python3 /opt/odoo14/odoo/odoo-bin -c /etc/odoo14.conf
If you want to install another Odoo instance, you can repeat all of the steps from this section. Do not forget to use a different name for the second Odoo user, third Odoo user, and so on. You can name the user however you want, just do not forget to create a PostgreSQL user with the same name.
Step 4 – Setting up Apache as a Reverse Proxy
If you only need to access Odoo using an IP address, then you are finished with installing Odoo 14 on Ubuntu 20.04. You can access it in your web browser by using your IP address at the default port, 8069.
However, if you have a valid domain name and you would like to use it in order to access your Odoo 14 instance instead of typing the IP address and the port number in the URL, you will have to set up a reverse proxy. We’ll be using Apache to accomplish that task in this tutorial.
Apache is considered as the most widely-used and user-friendly web server software. It is fast, secure, reliable, and can be easily customized depending on your needs.
To install Apache on the server, run the following command:
apt install apache2
Once the installation is complete, enable Apache to start automatically upon system boot using the following command:
systemctl enable apache2
To verify that Apache is running, open your web browser and enter your server’s IP address (e.g. http://111.222.333.444). If Apache is successfully installed, you should see a message saying “It works!”.
Enable the proxy and proxy_http modules in Apache using the following commands:
a2enmod proxy
a2enmod proxy_http
Create a new Apache configuration file for your domain:
nano /etc/apache2/sites-available/yourdomain.com.conf
Name the above file using your registered domain name. Then open the file and add the following lines:
<VirtualHost *:80>
ServerName yourdomain.com
ServerAlias www.yourdomain.com

ErrorLog ${APACHE_LOG_DIR}/yourdomain-error.log
CustomLog ${APACHE_LOG_DIR}/access.log combined

ProxyRequests Off
<Proxy *>
Order deny,allow
Require all granted
</Proxy>

ProxyPass / http://yourdomain.com:8069/
ProxyPassReverse / http://yourdomain.com:8069/
<Location />
Order allow,deny
Require all granted
</Location>
</VirtualHost>
Do not forget to replace all occurrences of yourdomain.com with your actual registered domain name.
Enable the newly created Apache configuration:
a2ensite yourdomain.com
Finally, restart Apache for the changes to take effect:
service apache2 restart
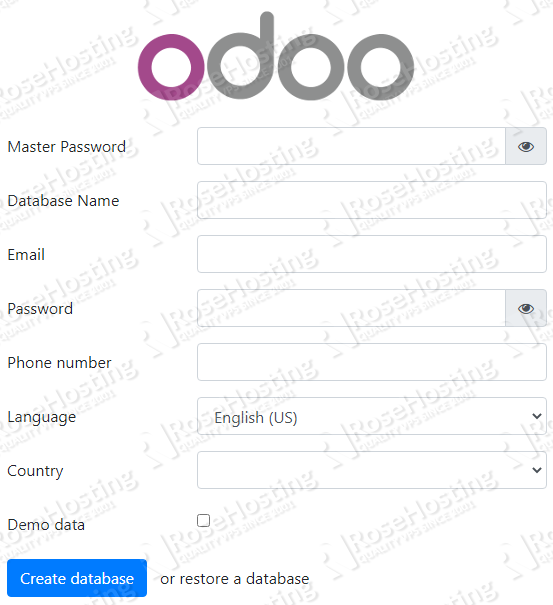
Now you should be able to access the Odoo 14 instance with your domain name at http://yourdomain.com. Open http://yourdomain.com using your favorite web browser and you will be automatically redirected to http://yourdomain.com/web/database/manager. From there, you can complete the Odoo installation by using their setup wizard.
Create a new Odoo database:
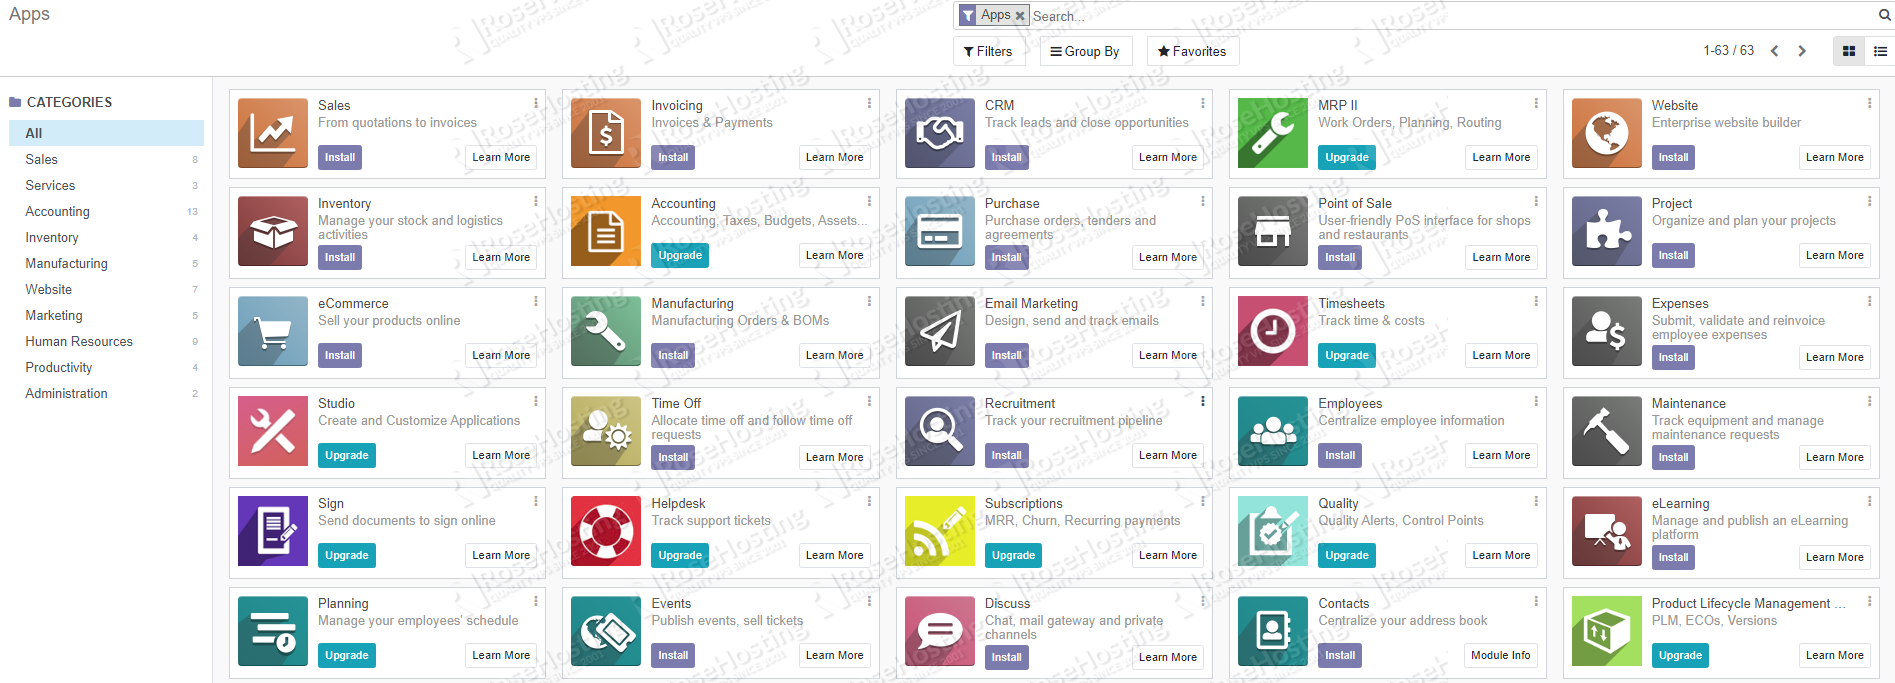
Log in to the Odoo back-end. You can now add new modules, new users, modify the settings, etc.
That’s all there is to it! You now have a successful install of Odoo 14 on your Ubuntu 20.04 VPS while also using Apache as a reverse proxy. You can also set up additional instances of Odoo easily.

Managing your business can take a lot of your time and effort away from keeping your back-end systems maintained properly. Our expert admins are able to completely maintain and optimize your Odoo experience if you use our Managed Odoo hosting services. The lifetime support is included in the price and covers anything from maintenance to requests of any kind, including installation and configuration of software.
We would greatly appreciate you sharing this post on social media by using our share shortcuts if we helped you install Odoo 14 on your Ubuntu 20.04 VPS. You can also leave a comment in our comment section if you have any suggestions or questions about this guide. Thank you.