
In this blog post, we will explain how to install OpenClaw on Ubuntu 26.04 OS. OpenClaw is a popular, open-source, self-hosted autonomous AI agent that acts as a personalized assistant, capable of executing tasks such as managing emails, scheduling calendar events, and running terminal commands. It can be installed on various operating systems, including Windows, macOS, and Linux. It runs continuously on local hardware or a server, enabling it to manage workflows on your server and communicate via messaging apps like WhatsApp or Telegram.
Installing OpenClaw is a straightforward process that typically takes about 5 minutes. Let’s get started!
Table of Contents
Prerequisites
- A server running Ubuntu 26.04 OS
- User privileges: root or non-root user with sudo privileges
- A valid domain name pointed to the server IP address
Step 1. Update the system
Before we start with the installation process of the prerequisites and OpenClaw, we need to update the packages to their latest available versions. To do that, execute the following command:
apt update -y && apt upgrade -y
Step 2. Install NodeJS
NodeJS for OpenClaw is necessary for self-managed installs and compatibility. Choose manual npm only if you already manage Node.js yourself and you want the package without the bootstrap scripts.
First, we will install curl since we need it for downloading NodeJS 24 source. To install curl, execute the following command:
apt install curl -y
Once installed, execute the following command to download the Node source:
curl -fsSL https://deb.nodesource.com/setup_24.x | sudo -E bash -
Once downloading is finished, install NodeJS:
apt install nodejs -y
Verify the installation of node and npm (npm installs along with the node):
node -v && npm -v
You should get output similar to this:
root@host:~# node -v && npm -v
v24.14.1
11.11.0
Step 3. Install OpenClaw
We will install OpenClaw using a script that automatically detects our environment and installs any missing components. To install OpenClaw, execute the following script command:
curl -fsSL https://openclaw.ai/install.sh | bash
Once you execute the script, the output should be like this:
root@host:~# curl -fsSL https://openclaw.ai/install.sh | bash

  🦞 OpenClaw Installer
  I read logs so you can keep pretending you don't have to.

✓ Detected: linux

Install plan
OS: linux
Install method: npm
Requested version: latest

[1/3] Preparing environment
✓ Node.js v24.14.1 found
· Active Node.js: v24.14.1 (/usr/bin/node)
· Active npm: 11.11.0 (/usr/bin/npm)

[2/3] Installing OpenClaw
· Git not found, installing it now
✓ Git installed
· Installing OpenClaw v2026.4.1
.
.
There will be a couple of questions. We have installed OpenClaw with the following values:
I understand this is personal-by-default and shared/multi-user use requires lock-down. Continue?

 Yes /No

================================================================================================
Setup mode

QuickStart(Configure details later via openclaw configure.)

================================================================================================
Model/auth provider

Skip for now

================================================================================================

Filter models by provider

All providers

================================================================================================

Default model

 Keep current (default: anthropic/claude-opus-4-6)
The installation will start, and the following message will appear:
  Model check ────────────────────────────────────────────────────────────────────────────╮
│                                                                                          │
│  No auth configured for provider "anthropic". The agent may fail until credentials are   │
│  added. Run `openclaw models auth login --provider anthropic`, `openclaw configure`, or  │
│  set an API key env var.
After this, there will be a couple of choices again. We have proceeded with the installation with the following values:
================================================================================================
Select channel (QuickStart)

Skip for now

================================================================================================

Search provider

Skip for now

================================================================================================
Configure skills now?

Yes / No

================================================================================================

Enable hooks?

Skip for now
================================================================================================

Configure skills now? (recommended)

Yes
================================================================================================

Install missing skill dependencies

Skip for now
================================================================================================

Set GOOGLE_PLACES_API_KEY for goplaces?

No

================================================================================================

Set NOTION_API_KEY for notion?

No

================================================================================================

Set OPENAI_API_KEY for openai-whisper-api?

No

================================================================================================

Set ELEVENLABS_API_KEY for sag?

No

================================================================================================

How do you want to hatch your bot?

Do this later

================================================================================================
Once the installation is complete, you should receive the following message:
Web UI: http://127.0.0.1:18789/
Web UI (with token):
http://127.0.0.1:18789/#token=9904cbe70604c8caa4df3ab323dee9df4e74473b1aad0001
Gateway WS: ws://127.0.0.1:18789
Gateway: reachable
Docs: https://docs.openclaw.ai/web/control-ui
To check the status of the OpenClaw, execute the following command:
openclaw gateway status
You should get the following output:
root@host:~# openclaw gateway status

🦞 OpenClaw 2026.4.1 (da64a97) — Claws out, commit in—let's ship something mildly responsible.

│
◇
Service: systemd (enabled)
File logs: /tmp/openclaw/openclaw-2026-04-02.log
Command: /usr/bin/node /usr/lib/node_modules/openclaw/dist/index.js gateway --port 18789
Service file: ~/.config/systemd/user/openclaw-gateway.service
Service env: OPENCLAW_GATEWAY_PORT=18789

Config (cli): ~/.openclaw/openclaw.json
Config (service): ~/.openclaw/openclaw.json

Gateway: bind=loopback (127.0.0.1), port=18789 (service args)
Probe target: ws://127.0.0.1:18789
Dashboard: http://127.0.0.1:18789/
Probe note: Loopback-only gateway; only local clients can connect.

Runtime: running (pid 6840, state active, sub running, last exit 0, reason 0)
RPC probe: ok

Listening: 127.0.0.1:18789
Troubles: run openclaw status
Troubleshooting: https://docs.openclaw.ai/troubleshooting
As you can see, the URL is with localhost, and if you want to make OpenClaw accessible in a browser via IP address, you need to do the following:
openclaw config set gateway.bind custom

openclaw config set gateway.customBindHost YourServerIPAddress


After execution of these commands, the output should be like this:

root@host:~# openclaw config set gateway.bind custom

🦞 OpenClaw 2026.4.1 (da64a97) — We ship features faster than Apple ships calculator updates.

Config overwrite: /root/.openclaw/openclaw.json (sha256 0b17201b87d287a6eefd25e339989c91de754916756ee9256f1d6989c571cb2a -> e5b46c3bad6608485643efd92b944c609e29e31def7a26e66deb8310a48af8ad, backup=/root/.openclaw/openclaw.json.bak)
Updated gateway.bind. Restart the gateway to apply.
root@host:~# openclaw config set gateway.customBindHost YourServerIPAddress

🦞 OpenClaw 2026.4.1 (da64a97) — Running on your hardware, reading your logs, judging nothing (mostly).

Config overwrite: /root/.openclaw/openclaw.json (sha256 e5b46c3bad6608485643efd92b944c609e29e31def7a26e66deb8310a48af8ad -> 8ee6193685b3928f7e465bd2fe691bf93f46013588ea98332b8aa5a54a02bb40, backup=/root/.openclaw/openclaw.json.bak)
Updated gateway.customBindHost. Restart the gateway to apply.
Then we need to restart the opeclaw gateway:
openclaw gateway restart
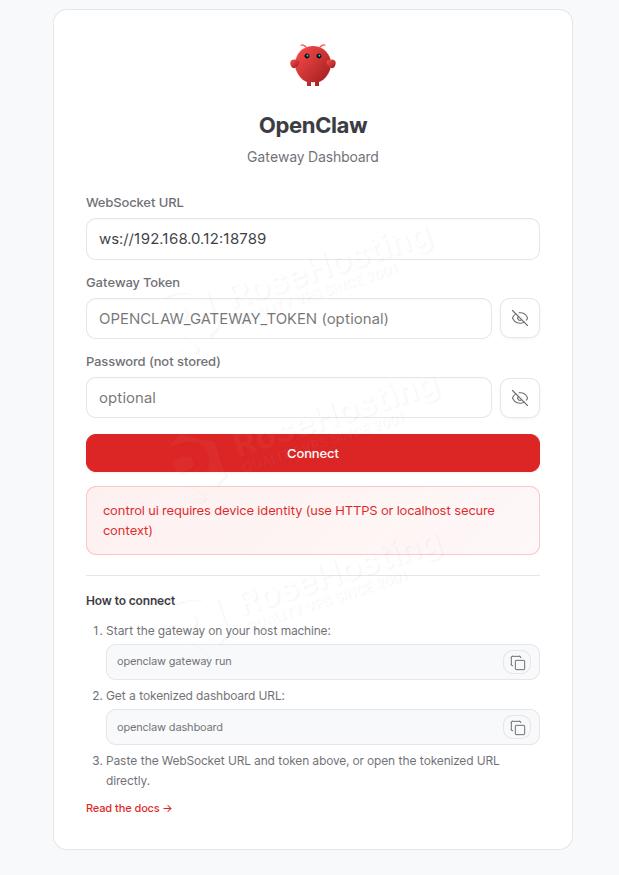
Now, you can access the OpenClaw dashboard at http://YourServerIPAddress:18789.
Conclusion
That’s it. You successfully installed OpenClaw on Ubuntu 26.04 OS.
Of course, you don’t have to install OpenClaw on Ubuntu 26.04 if you have difficulties and are not familiar with Linux. You can always contact our technical support. You only need to sign up for one of our OpenClaw hosting plans and submit a support ticket. We are available 24/7 and will take care of your request immediately.
If you liked this post about installing OpenClaw on Ubuntu 26.04, please share it with your friends or leave a comment down below.