In this tutorial, we will show you how to install PHP 7.3 on Debian 9. PHP (Hypertext Preprocessor) is an open-source server-side scripting language designed primarily for creating dynamic interactive websites. PHP is one of the most popular languages and it is freely available for redistribution and modifications. PHP powers WordPress, the most popular content management system used for blogging and building websites, as well as many other e-commerce websites, customer relationship management software, enterprise resource planning software, and much more.
The latest PHP 7.3 version has been officially released on December 6th, 2018. It comes with a number of new features and a few incompatibilities that you should be aware of before upgrading from the previous version.
Table of Contents
Requirements:
For the purposes of this tutorial, we will use a Debian 9 VPS.
Full SSH root access or a user with sudo privileges is also required.
1. Getting Started
First, you will need to log in to your server via SSH as a user with root access, or the root user:
ssh root@IP_ADDRESS -p PORT_NUMBER
and replace “IP_ADDRESS” and “PORT_NUMBER” with your actual server IP address and SSH port number.
Once logged in, let’s make sure that your Debian 9 server is up-to-date by running the following commands:
apt-get update
apt-get upgrade
This will update the package index and will update the software currently installed on the server to the latest version.
Once your system is fully up-to-date, we can now proceed with the installation of PHP 7.3.
2. Install PHP 7.3 on Debian 9
First, let’s install the following required packages:
apt-get install ca-certificates apt-transport-https lsb-release
Next, import the signing key and enable the PPA for PHP 7.3 by using the following commands:
wget -O /etc/apt/trusted.gpg.d/php.gpg https://packages.sury.org/php/apt.gpg
echo "deb https://packages.sury.org/php/ $(lsb_release -sc) main" | tee /etc/apt/sources.list.d/php7.3.list
Run the update command again:
apt-get update
You can now install PHP 7.3 on your Debian 9 VPS.
To view the list all of all available PHP 7.3 packages, you can execute the following command:
apt-cache search php7.3
Output:
php7.3 - server-side, HTML-embedded scripting language (metapackage)
php7.3-bcmath - Bcmath module for PHP
php7.3-bcmath-dbgsym - debug symbols for php7.3-bcmath
php7.3-bz2 - bzip2 module for PHP
php7.3-bz2-dbgsym - debug symbols for php7.3-bz2
php7.3-cgi - server-side, HTML-embedded scripting language (CGI binary)
php7.3-cgi-dbgsym - debug symbols for php7.3-cgi
php7.3-cli - command-line interpreter for the PHP scripting language
php7.3-cli-dbgsym - debug symbols for php7.3-cli
php7.3-common - documentation, examples and common module for PHP
php7.3-common-dbgsym - debug symbols for php7.3-common
...
To install PHP 7.3, together with some of the most commonly used extensions, run the following command:
apt-get install php7.3 php7.3-cli php7.3-common php7.3-opcache php7.3-curl php7.3-mbstring php7.3-mysql php7.3-zip php7.3-xml
To verify the installation is completed, run the following command:
php -v
The output should be similar to this:
PHP 7.3.0-2+0~20181217092659.24+stretch~1.gbp54e52f (cli) (built: Dec 17 2018 09:26:59) ( NTS )
Copyright (c) 1997-2018 The PHP Group
Zend Engine v3.3.0-dev, Copyright (c) 1998-2018 Zend Technologies
with Zend OPcache v7.3.0-2+0~20181217092659.24+stretch~1.gbp54e52f, Copyright (c) 1999-2018, by Zend Technologies
3. Editing the PHP 7.3 settings on a Debian VPS
The next thing you may want to do is to customize the settings of PHP 7.3 according to your requirements. You can do this by editing the php.ini file. To find the path to this file, you can use the command below:
php --ini | grep "Loaded Configuration File"
It will return the path to the php.ini file which is currently loaded.
# php --ini | grep "Loaded Configuration File"
Loaded Configuration File: /etc/php/7.3/cli/php.ini
Edit the file using a text editor of your choice. We will use nano in this example.
nano /etc/php/7.3/cli/php.ini
Once you are finished with changing any settings, save and close the file. If you are using Apache as a web server, you need to restart it for the new configuration to be loaded and for the changes to take effect. If you are using Nginx and PHP-FPM, you should restart the PHP-FPM service.
4. Verify If the PHP Files are Being Executed on the Server
To check if your PHP files are being executed on the server, you can create a sample info.php file and access it from your web browser.
To create the file, run the following command:
nano /var/www/html/info.php
Next, enter the following content:
<?php

phpinfo();

?>
Save and close the file, then open your preferred web browser and access the file by using your server IP address in the URL followed by the name of the file.
http://IP-ADDRESS/info.php
You should be able to see the following information:
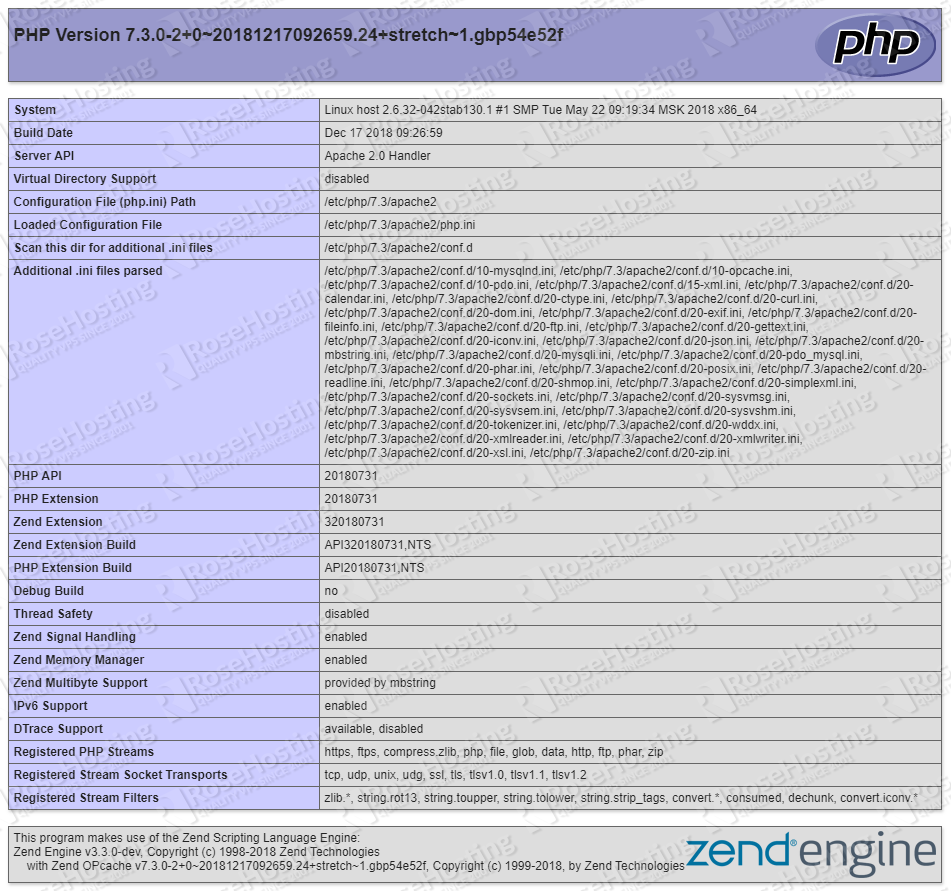
Congratulations! You have successfully installed PHP 7.3 on a Debian 9 server. For more detailed information about PHP 7.3, you can check the official PHP documentation.
Of course, you don’t have to install PHP 7.3 on Debian 9 if you use one of our Managed PHP Hosting services, in which case you can simply ask our expert system administrators to install PHP 7.3 on Debian 9 for you, using the LAMP or LEMP stack or any other web hosting stack of your choice. They are available 24×7 and will take care of your request immediately.
PS. If you liked this post on how to install PHP 7.3 on a Debian 9 server, please share it with your friends on the social networks using the buttons below, or simply leave a comment in the comments section. Thanks.