
In this tutorial, we will cover the steps needed for installing Plone CMS on Ubuntu 18.04.
![]() Plone is a free and flexible Open Source Management System built on top of the Zope application server. It is based on the Python programming language but also contains large amounts of HTML, JavaScript, and CSS. Plone offers a lot of features for public websites, private intranets, multi-site Management, enterprise integrations, search capabilities, multi-language support, and much more. Plone is in the top 2% of all open source projects, with more than 300 core developers and 300+ solution providers.
Plone is a free and flexible Open Source Management System built on top of the Zope application server. It is based on the Python programming language but also contains large amounts of HTML, JavaScript, and CSS. Plone offers a lot of features for public websites, private intranets, multi-site Management, enterprise integrations, search capabilities, multi-language support, and much more. Plone is in the top 2% of all open source projects, with more than 300 core developers and 300+ solution providers.
Table of Contents
Requirements:
For the purposes of this tutorial, we will use an Ubuntu 18.04 VPS.
Full SSH root access or a user with sudo privileges is also required.
Step 1: Getting Started
First, Connect to your server via SSH as the root user using the following command:
ssh root@IP_ADDRESS -p PORT_NUMBER
and replace “IP_ADDRESS” and “PORT_NUMBER” with your actual server IP address and SSH port number.
Before starting with the installation, you will need to update your system packages to their latest version.
You can do this by running the following command:
apt-get update
apt-get upgrade
Step 2: Install Dependencies
We will need to install some required dependencies before installing Plone. You can install them by using the following command:
apt-get install build-essential gcc libjpeg-dev wget readline-common libssl-dev libxml2-dev libxslt1-dev python2.7 python-dev
Once the installation is done, we can install Plone.
Step 3: Install Plone
We will download the latest version of Plone from their website in the /opt directory. At the time of writing this tutorial, the latest Plone version is 5.1.5 .
We can download it using the following command:
cd /opt
wget https://launchpad.net/plone/5.1/5.1.5/+download/Plone-5.1.5-UnifiedInstaller.tgz
Unpack the downloaded archive and create a new directory:
tar -xvzf Plone-5.1.5-UnifiedInstaller.tgz
mkdir plone
Move all the files from Plone-5.1.5-UnifiedInstaller into the plone directory.
mv /opt/Plone-5.1.5-UnifiedInstaller/* /opt/plone
We will start the installation by running the ‘install.sh’ script and install Plone. It is important to execute the command with the sudo utility for a server-mode install. Also, we need to replace the password field with a strong password.
After the installation, if you missed or you didn’t save your admin password for some reason you can check it from the /opt/plone/zinstance/adminPassword.txt file.
cd /opt/plone
sudo ./install.sh standalone --target=/opt/plone --password=strong_password --with-python=/usr/bin/python2.7
Once the installation has been completed successfully, we should get the following output:
#####################################################################
###################### Installation Complete ######################
Plone successfully installed at /opt/plone
See /opt/plone/zinstance/README.html
for startup instructions.
Use the account information below to log into the Zope Management Interface
The account has full 'Manager' privileges.
Username: admin
Password: strong_password
This account is created when the object database is initialized. If you change
the password later (which you should!), you'll need to use the new password.
Use this account only to create Plone sites and initial users. Do not use it
for routine login or maintenance.- If you need help, ask in IRC channel #plone on irc.freenode.net. - The live support channel also exists at http://plone.org/chat - You can also ask for help on https://community.plone.org - Submit feedback and report errors at https://github.com/plone/Products.CMFPlone/issues (For install problems, https://github.com/plone/Installers-UnifiedInstaller/issues)
We can start the Plone service using the following command:
sudo /opt/plone/zinstance/bin/plonectl start
Output:
instance: .
daemon process started, pid=32266
In the next section, we will show you how to create a Plone systemd service – that way you don’t have to run the server in a terminal session.
If you want to check the status of Plone, run the following command:
sudo /opt/plone/zinstance/bin/plonectl status
Output:
instance: program running; pid=32266
To stop the Plone service we can use the following command:
sudo /opt/plone/zinstance/bin/plonectl stop
Output:
instance: .
daemon process stopped
Step 4: Create a Systemd Service
We can simplify the process of starting, stopping and checking the status of the Plone service by simply creating a new systemd plone service.
First, we will create a service file called plone.service in /etc/systemd/system
cd /etc/systemd/system
nano plone.service
Paste the following content:
[Unit]
Description=Plone content management system
After=network.target
[Service]
Type=forking
ExecStart=/opt/plone/zinstance/bin/plonectl start
ExecStop=/opt/plone/zinstance/bin/plonectl stop
ExecReload=/opt/plone/zinstance/bin/plonectl restart
[Install]
WantedBy=multi-user.target
Save and close it.
To make the systemd aware of it run the following command:
systemctl daemon-reload
You can enable the Plone service and configure it to start on server boot with the following command:
systemctl enable plone.service
We can activate the Plone service immediately with the following command:
systemctl start plone.service
We can check status of the Plone service with the following command:
systemctl status plone.service
Step 5: Access Plone
Now, we should open the favorite web browser and type the URL: http://server-IP-address:8080. We will be redirected to the following page:
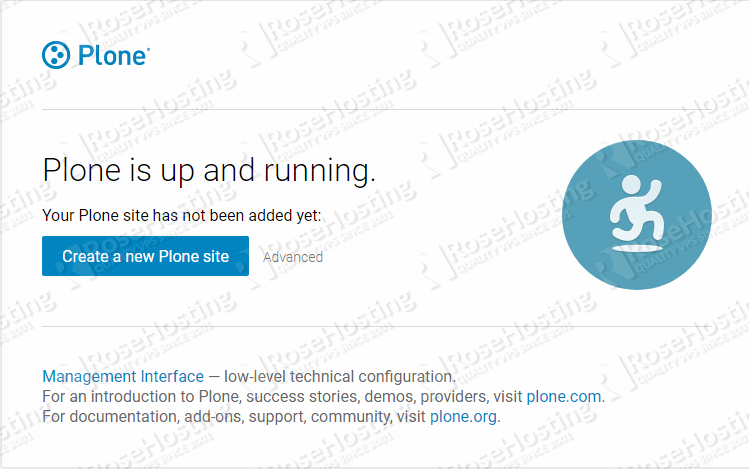
Congratulations! If you followed our steps closely, you will have successfully installed Plone on your Ubuntu 18.04 VPS.
![]() Of course, you don’t have to install and configure Plone on Ubuntu 18.04 if you use one of our Managed Plone Hosting solutions, in which case you can simply ask our expert Linux admins to set up and configure Plone on Ubuntu 18.04 for you. They are available 24×7 and will take care of your request immediately.
Of course, you don’t have to install and configure Plone on Ubuntu 18.04 if you use one of our Managed Plone Hosting solutions, in which case you can simply ask our expert Linux admins to set up and configure Plone on Ubuntu 18.04 for you. They are available 24×7 and will take care of your request immediately.
PS. If you liked this post on how to install Plone on an Ubuntu 18.04 VPS, please share it with your friends on the social networks using the share shortcuts below, or simply leave a reply in the comments section. Thanks.