“SIMPLE, MODERN, AND FAST” – this is RainLoop’s webmail strong points over other web-based mail clients, according to its developers and maintainers. RainLoop is a web-based email client that provides a fresh, modern design, fast performance, hassle-free installation and upgrades, and many more features, including:
- Administrator panel
- Emails are accessed directly and not stored on the server
- Support for modern mail security protocols
- Facebook, Twitter, Google, and Dropbox integration capabilities
- Drag-and-Drop enabled interface
- Configurable cache system
RainLoop is developed using PHP, and it supports Nginx as the main web server. It provides an open-source (community edition) and a premium version (standard edition). The community edition is licensed under the GNU Affero General Public License v3.
In this blog post, we will show you how to install RainLoop Webmail on a CentOS 7 VPS.
Table of Contents
Prerequisites:
We will be using one of our managed CentOS VPS servers for this tutorial. Please make sure that you have met the following prerequisites:
- A publicly-accessible VPS with CentOS 7 installed
- A domain or subdomain name pointing to your server public IP address
- Account with root access, or access to the root user
Check for Updates and Install Dependencies
Log in to your public server via SSH using the following commands on your preferred terminal:
ssh [username]@[server_ip_address]
Be sure to replace “[username] “with the account name of a root-enabled user found on the server (or the root user itself), and replace “[server_ip_address]” with the IP address of your server.
Before proceeding, it is best to update the packages on your CentOS 7 system to their latest versions if they are available:
yum update -y
It is also recommended to install EPEL and its basic dependencies for CentOS 7 to avoid hiccups caused by missing libraries in the future:
yum install https://dl.fedoraproject.org/pub/epel/epel-release-latest-7.noarch.rpm
yum groupinstall -y "Development Tools"
Installing and Configuring LEMP Stack
1. Installing Nginx
Nginx is one of the most modern web servers available. To install it, enter the following command:
yum install nginx
After installation, we can enable our Nginx service to start at boot:
systemctl enable nginx
Verify that the Nginx service is running using:
systemctl start nginx
systemctl status nginx
You should see the following output:
● nginx.service - The nginx HTTP and reverse proxy server
   Loaded: loaded (/usr/lib/systemd/system/nginx.service; enabled; vendor preset: disabled)
   Active: active (running) since Wed 2019-03-27 22:49:42 CDT; 1s ago
2. Installing PHP v7.2
RainLoop webmail is powered by PHP. It is recommended to install the latest stable version of PHP, which is PHP v7.2 at the time of publishing.
To proceed, use the following commands to install PHP:
yum install http://rpms.remirepo.net/enterprise/remi-release-7.rpm
yum-config-manager --enable remi-php72
Continue by installing all PHP extensions and libraries required by RainLoop Webmail:
yum install php72 php72-php-fpm php72-php-cli php72-php-mysqlnd php72-php-curl php72-php-opcache php72-php-xml php72-php-xmlrpc php72-php-gd php72-php-mbstring php72-php-json php72-php-common
To verify that you are using PHP 7.2, type the following command:
php72 -v
You should see the following text as the output:
PHP 7.2.16 (cli) (built: Mar  5 2019 13:10:50) ( NTS )
Copyright (c) 1997-2018 The PHP Group
Zend Engine v3.2.0, Copyright (c) 1998-2018 Zend Technologies
    with Zend OPcache v7.2.16, Copyright (c) 1999-2018, by Zend Technologies
To use “php” instead of the “php72” command when calling PHP, we will need to create a symbolic link:
ln -s /usr/bin/php72 /usr/bin/php
Verify the changes using:
php -v
You should see the same message as before, but this time by using “php” as the command.
Finally, we will need to start and enable the PHP-FPM service.
systemctl start php72-php-fpm

systemctl enable php72-php-fpm
Verify that our PHP-FPM service is running:
systemctl status php72-php-fpm
3. Installing MariaDB Server (optional)
Note that RainLoop can work without using a database server. If you need to have contacts set up for email accounts, it is required to install a database. For this, we recommend MariaDB as the database server.
To proceed with the installation, use this simple one-line command:
yum install mariadb-server
After a successful installation, it is best to improve the security of our MariaDB server. Use the following built-in command:
mysql_secure_installation
It will first ask to replace the root password. It will then ask some questions – you can answer the prompts with “Y” for YES. We recommend answering with Yes to all of these, as they all will help improve the security of your database server:
Remove anonymous users? (Press y|Y for Yes, any other key for No) : Y
Disallow root login remotely? (Press y|Y for Yes, any other key for No) : Y
Remove test database and access to it? (Press y|Y for Yes, any other key for No) : Y
Reload privilege tables now? (Press y|Y for Yes, any other key for No) : Y
To verify the version of MySQL currently installed, type the following command:
mysql -V
You should see the following text:
mysql Ver 15.1 Distrib 5.5.60-MariaDB, for Linux (x86_64) using readline 5.1
3. Creating the RainLoop Webmail Database for Contacts
Log in to the database server CLI by using this command. Note that it will ask for a password – it is the one you set up previously while running the secure installation command.
mysql -u root -p
We can now proceed in creating the database and database user. We will also need to assign the new database user to the database with full privileges.
Remember to replace “[password]” with a strong password.
CREATE DATABASE rainloop_db;
CREATE USER 'rainloop_user'@'localhost' IDENTIFIED BY '[password]';
GRANT ALL PRIVILEGES ON rainloop_db.* TO 'rainloop_user'@'localhost' IDENTIFIED BY '[password]' WITH GRANT OPTION;
FLUSH PRIVILEGES;
EXIT;
Installing RainLoop Webmail
After successfully installing and setting up our LEMP stack, we can now proceed with the download and installation of our RainLoop Webmail. At the time of writing, the latest stable version of RainLoop Webmail is v1.12.1.
Fortunately, RainLoop Webmail developers have already created an installer script that will provide hassle-free download and extraction of the web files.
First, we need to create our RainLoop Webmail directory:
mkdir -p /var/www/rainloop
After creating the directory, we can now use “curl” to download and activate the installer script, which is based on PHP.
cd /var/www/rainloop
curl -sL https://repository.rainloop.net/installer.php | php
If the installation was a success, you should see the following message:
[Success] Installation is finished!
It is recommended to use the correct permissions for our RainLoop Webmail files:
chown -R apache:apache /var/www/rainloop
find /var/www/rainloop -type d -exec chmod 755 {} \;
find /var/www/rainloop -type f -exec chmod 644 {} \;
Creating the Nginx Virtual Block
Create and modify the following file. Modify yourdomain.com with your domain or subdomain.
nano /etc/nginx/conf.d/rainloop.conf
server {

    listen 80;

    server_name rainloop.yourdomain.com; root /var/www/rainloop; access_log /var/log/nginx/rainloop-access.log; error_log /var/log/nginx/rainloop-error.log; index index.php; location / { try_files $uri $uri/ /index.php?$query_string; } location ~ \.php$ { fastcgi_index index.php; fastcgi_split_path_info ^(.+\.php)(.*)$; fastcgi_keep_conn on; include fastcgi_params; fastcgi_pass 127.0.0.1:9000; fastcgi_param SCRIPT_FILENAME $document_root$fastcgi_script_name; } location ^~ /data { deny all; } location ~ /\.ht { deny all; } }
As you can see in the Nginx virtual block, access to folder data has been denied, since it contains important configuration files.
Finally, save the file and restart the Nginx service to activate our new virtual block:
systemctl restart nginx
Accessing RainLoop Webmail
You may now visit your domain or subdomain using your preferred web browser. Once loaded, you should be able to see RainLoop Webmail’s login, which looks like this:

To access the administrator panel, you will need to visit the admin login page by going to: http://[your-domain.com]/?admin
The default login is admin and the default password is 12345.
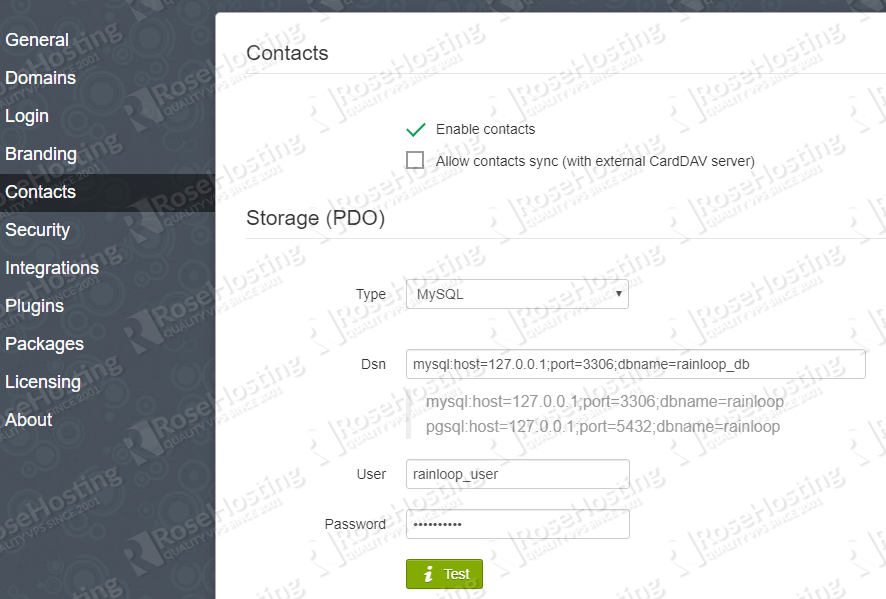
To enable Contacts, you will need to log in to the Administrator panel and navigate to Contacts > Enable Contacts
You will simply need to supply the database details we have created earlier after installing MariaDB and click the “Test” button to check for database connectivity.
That’s it – you now have a working RainLoop Webmail server running on your CentOS 7 server.
Of course, you don’t have to install RainLoop Webmail on CentOs 7 if you have CentOS Hosting with us. You can simply ask our support team to install RainLoop Webmail on CentOS 7 for you. They are available 24/7 and will be able to help you with the installation.
PS. If you enjoyed reading this blog post on how to install RainLoop Webmail on CentOs 7, feel free to share it on social networks using the shortcuts below, or simply leave a comment in the comments section. Thanks.