
In this blog post, we will explain how to install Vaultwarden Password Manager on Debian 13 OS. Developers implemented Vaultwarden as an open-source version of the Bitwarden server API in the Rust programming language. Vaultwarden is designed to be compatible with Bitwarden clients, browser extensions, and the web interface, allowing users to self-host their password management solutions. In this post, we will install Vaultwarden with Docker service.
Installing Vaultwarden with Docker on Debian 13 is a straightforward process and may take up to 20 minutes. Let’s get started installing the Password Manager on your system!
Table of Contents
Prerequisites
- A server running Debian 13 OS
- User privileges: root or non-root user with sudo privileges
- A valid domain with a pointed A record to the server, which is crucial for running a Password Manager smoothly on Debian 13
Step 1. Update the System
Before we start with the installation of Docker and then with Vaultwarden, we assume that you have a freshly installed OS, so we will update the system packages to their latest versions. To do that, execute the following command and maintain your system ready for the Password Manager on Debian 13.
sudo apt update -y && sudo apt upgrade -y
Step 2. Install Docker and Docker Compose
To install Docker on Debian 13, first, we need to install its prerequisites with the command below:
sudo apt install apt-transport-https ca-certificates curl -y
Next, we need to add Docker’s GPG repository and the key. To add the key, execute the following command:
curl -fsSL https://download.docker.com/linux/debian/gpg | sudo gpg --dearmor -o /usr/share/keyrings/docker.gpg
Once the key is added, we can add the repository:
echo "deb [arch=$(dpkg --print-architecture) signed-by=/usr/share/keyrings/docker.gpg] https://download.docker.com/linux/debian trixie stable" | sudo tee /etc/apt/sources.list.d/docker.list > /dev/null
Update the system and install Docker:
sudo apt update -y

sudo apt install docker-ce docker-ce-cli containerd.io docker-buildx-plugin docker-compose-plugin
To start and enable the Docker service, execute the following command for your Password Manager setup on Debian 13.
sudo systemctl start docker && sudo systemctl enable docker
To check the status of the Docker service, execute the command below:
sudo systemctl status docker
You should get the following output:
root@test.vps:~# sudo systemctl status docker
● docker.service - Docker Application Container Engine
     Loaded: loaded (/usr/lib/systemd/system/docker.service; enabled; preset: enabled)
     Active: active (running) since Fri 2025-08-22 10:02:13 CDT; 4min 49s ago
 Invocation: cacb9367094c47078fc020f5e7300b7d
TriggeredBy: ● docker.socket
       Docs: https://docs.docker.com
   Main PID: 43274 (dockerd)
      Tasks: 9
     Memory: 24.1M (peak: 26.1M)
        CPU: 1.077s
     CGroup: /system.slice/docker.service
             └─43274 /usr/bin/dockerd -H fd:// --containerd=/run/containerd/containerd.sock
Next, we need to install Docker Compose:
sudo curl -L "https://github.com/docker/compose/releases/latest/download/docker-compose-linux-$(uname -m)" -o /usr/local/bin/docker-compose
Make the Docker Compose executable:
sudo chmod +x /usr/local/bin/docker-compose
To verify the installation, check the Docker Compose version:
docker-compose version
You should get the following output:
root@host:/opt/vaultwarden# docker-compose version
Docker Compose version v2.39.2
Step 3. Install Vaultwarden Password Manager with Docker Compose
Now, when Docker is installed with all the prerequisites, we can proceed with installing the Vaulwarden Password Manager. First, we will create the vaultwarden directory for your new Password Manager on Debian 13.
mkdir -p /opt/vaultwarden && cd /opt/vaultwarden
Next, we need to create a Docker network for the vaultwarden:
docker network create vaultwarden_network
After execution of this command, you will get output similar to this:
root@host:/opt/vaultwarden# docker network create vaultwarden_network
fd90a66b87abbdd0e55f91113a286a03bfd42c28e1d6046ae4419ef097eeae92
Next, we need to create a Vaultwarden administration token. To do that, we need to spin up a temporary Vaultwarden Docker instance and generate a password that is at least 8 characters long. To execute this, run the following command, and when asked, enter your password twice:
docker run --rm -it vaultwarden/server /vaultwarden hash
Once the password is entered and the admin token is generated, the output should look like this:
root@host:/opt/vaultwarden# docker run --rm -it vaultwarden/server /vaultwarden hash
Unable to find image 'vaultwarden/server:latest' locally
latest: Pulling from vaultwarden/server
59e22667830b: Pull complete
cc18e03c8cd8: Pull complete
f6e0865da50e: Pull complete
6bec2bc6dc05: Pull complete
aa7aba5b8287: Pull complete
Digest: sha256:84fd8a47f58d79a1ad824c27be0a9492750c0fa5216b35c749863093bfa3c3d7
Status: Downloaded newer image for vaultwarden/server:latest
Generate an Argon2id PHC string using the 'bitwarden' preset:

Password:YourStrongPasswordHere
Confirm Password: YourStrongPasswordHere

ADMIN_TOKEN='$argon2id$v=19$m=65540,t=3,p=4$HdxUFeMv9jWy2zCo+jSgEXdomYqCvPlQhPE5Olt2ssg$bESoT5IBl3Zr0K/hhRQXsvQNNVFiwsQVHMPuXFPElts'

Generation of the Argon2id PHC string took: 1.40477794s
Once the token is generated, take the part with the single quotes, pass it to echo, and pipe it to the sed command, as shown below.
echo '$argon2id$v=19$m=65540,t=3,p=4$HdxUFeMv9jWy3qCo+jSgEXdomYqCvPlQhPE5Olt2ssg$bESoT5IBl3Zr0K/hhRQXsvQNNVFiwsQVHMPuXFPElts' | sed 's#\$#\$\$#g'
Save the output of the command since we need to use it in the docker.compose file.
root@test.vps:/opt/vaultwarden# echo '$argon2id$v=19$m=65540,t=3,p=4$HdxUFeMv9jWy3qCo+jSgEXdomYqCvPlQhPE5Olt2ssg$bESoT5IBl3Zr0K/hhRQXsvQNNVFiwsQVHMPuXFPElts' | sed 's#\$#\$\$#g'
$$argon2id$$v=19$$m=65540,t=3,p=4$$HdxUFeMv9jWy3qCo+jSgEXdomYqCvPlQhPE5Olt2ssg$$bESoT5IBl3Zr0K/hhRQXsvQNNVFiwsQVHMPuXFPElts
Now, when we have the network created and the admin token, let’s create the docker.compose file:
sudo nano docker-compose.yaml
Paste the following lines of code:
services:
  vaultwarden:
    image: vaultwarden/server:latest
    container_name: vaultwarden
    labels:
      caddy: YourDomainNameHere
      caddy.reverse_proxy: "{{upstreams}}"
    restart: always
    environment:
      - WEBSOCKET_ENABLED=true
      - SIGNUPS_ALLOWED=true
      - INVITATIONS_ALLOWED=false
      - ADMIN_TOKEN=$$argon2id$$v=19$$m=65540,t=3,p=4$$HdxUFeMv9jWy3qCo+jSgEXdomYqCvPlQhPE5Olt2ssg$$bESoT5IBl3Zr0K/hhRQXsvQNNVFiwsQVHMPuXFPElts
      - DOMAIN=https://YourDomainNameHere
    volumes:
      - vaultwarden_data:/data
    networks:
      - vaultwarden_network
    depends_on:
      - caddy

  caddy:
    image: lucaslorentz/caddy-docker-proxy:ci-alpine
    container_name: reverse-proxy
    ports:
      - 80:80
      - 443:443
    environment:
      - CADDY_INGRESS_NETWORKS=vaultwarden_network
    networks:
      - vaultwarden_network
    volumes:
      - /var/run/docker.sock:/var/run/docker.sock
      - caddy_data:/data
    restart: unless-stopped

networks:
  vaultwarden_network:
    external: true
volumes:
  vaultwarden_data: {}
  caddy_data: {}
Save the file, close it, and execute the following command to start the Docker container for the Vaultwarden installation in the background on Debian 13.
docker-compose up -d
If everything is OK, in a couple of seconds the container will be created, and the output should look like this:
root@host:/opt/vaultwarden# docker-compose up -d
[+] Running 2/2
 ✔ Container reverse-proxy  Started
 ✔ Container vaultwarden    Started
This means that the Caddy reverse-proxy container and the Vaultwarden container are created and started successfully on your Debian system.
Now, you can access the Vaultwarden installation in your browser at https://YourDomainHere.
Step 4. Create Vaultwarden User Account
To finish the installation and create a Vaultwarden User Account, access the URL you set in the Docker compose file.
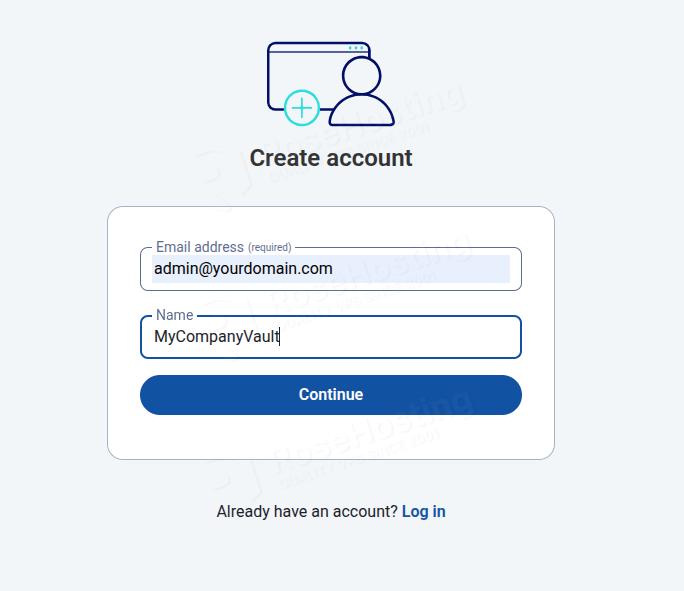
Click on the Create account button

Enter your email, the name of the Account, and click on the Continue button.
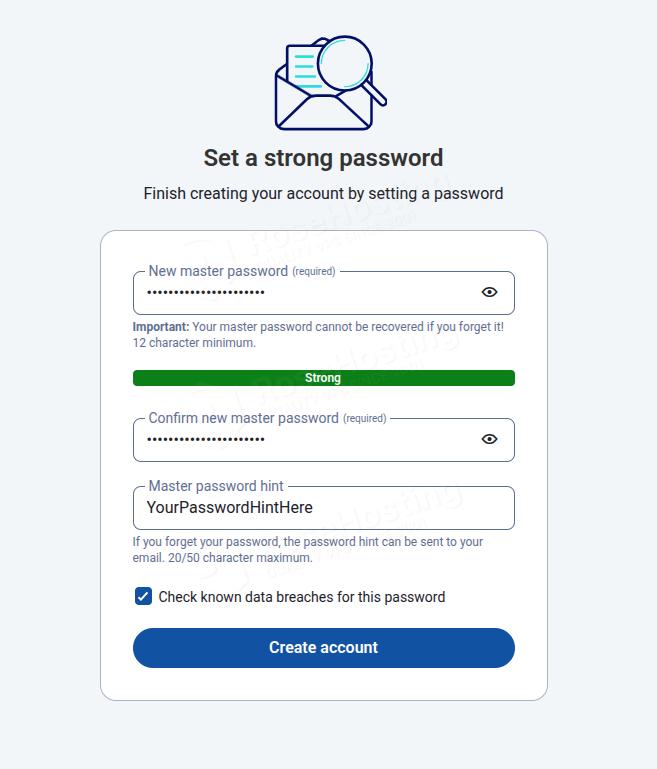
Enter your master password twice, and your password hint. Once done, click on the Create Account button.
You will be automatically redirected to the Vaulwarden admin dashboard.

That’s it. You’ve successfully gone through the steps to set up the Vaultwarden Password Manager on Debian 13 OS.
Of course, you don’t have to install Vaultwarden Password Manager on Debian 13 if you have difficulties and you are not familiar with Linux. You can always contact our technical support. You only need to sign up for one of our NVMe VPS plans and submit a support ticket. We are available 24/7 and will take care of your request immediately.
If you liked this post about installing Vaultwarden Password Manager on Debian 13, please share it with your friends or leave a comment down below.