
MySQL is the most popular database server – odds are your website is using MySQL to store its data. Sometimes we need to check or do other database related work on our website. The default configuration of MySQL server restricts access – only allowing connections from localhost, limiting connections solely to applications hosted on the same server. To enable remote access, we’ll have to modify the server settings to allow connections from external sources, adjust the permissions of the database user, configure the firewall, and so on. In this article, we will demonstrate how to log into remote MySQL server.
Table of Contents
Step 1. Configure Remote MySQL Server
Before connecting to our remote MySQL server, we need to allow remote connections to it. This should be done at the remote MySQL server you want to connect to. First, we need to configure MySQL server to listen not only on localhost, but also on any available IP addresses. Let’s edit our my.cnf file.
$ sudo nano /etc/my.cnf
Please note that your MySQL configuration path might not be the same. Your MySQL configuration file could be loaded from /etc/mysql/mariadb.conf.d/50-server.cnf or /etc/mysql/mysql.conf.d/mysqld.conf, so make sure to edit the correct configuration file.
Find bind_address, if it looks like this:
bind-address = 127.0.0.1
or
bind-address = localhost
We need to edit the value. Replace 127.0.0.1 or localhost with our MySQL server’s IP address or 0.0.0.0 if you want MySQL to be accessible from any IP address present on the server.
bind-address = 0.0.0.0
If you are using MySQL version 8.0.13 and above or MariaDB version 10.11 and above, you can also combine multiple IP addresses if you want to choose only specific IP addresses or if you want to maintain access using localhost. For example:
bind-address = x.x.x.x, 127.0.0.1
Replace x.x.x.x with the IP address that you want to allow MySQL to let connections in through.
Save the changes then exit from the nano text editor. Keep in mind that every time we make changes to MySQL configuration file, we need to restart the MySQL service.
$ sudo systemctl restart mysql
or
$ sudo systemctl restart mariadb
At this point, MySQL is listening on a specific IP address or all available IP addresses on your server, and not only localhost. If you have a firewall enabled, you should open port 3306 now. We have a handy guide on how to open ports using iptables if you need help with that.
Step 2. Create MySQL User
To connect to a remote MySQL server, we need to have the database details. The details should be the database name, database username, and database user’s password. Let’s consider we already have a database called database_2024. We will create a new database user and its password. Let’s log in to the MySQL command line:
$ mysql -u root -p
You will be prompted to type your MySQL root password. Once logged in, you will get into MySQL shell, like this:
Welcome to the MariaDB monitor.  Commands end with ; or \g.
Your MariaDB connection id is 31
Server version: 10.11.4-MariaDB-1~deb12u1 Debian 12

Copyright (c) 2000, 2018, Oracle, MariaDB Corporation Ab and others.

Type 'help;' or '\h' for help. Type '\c' to clear the current input statement.

MariaDB [(none)]>
Let’s run the commands below to create a new MySQL user:
CREATE USER 'youruser'@'localhost' IDENTIFIED BY 'm0d1fyth15';
Please replace m0d1fyth15 with a stronger password, like a password that does not contain any dictionary words. Next, let’s say we want to give our new user the permission to access only the database ‘database_2024’ on our MySQL server. We can do that by executing the following command:
GRANT ALL ON database_2024.* TO 'youruser'@'localhost';
FLUSH PRIVILEGES;
Now, pay attention to the 'youruser'@'localhost' part. If you want to give the access from an IP address like 123.123.123.123, then you need to replace 'youruser'@'localhost' with 'youruser'@'123.123.123.123' – the command would look like this:
CREATE USER 'youruser'@'123.123.123.123' IDENTIFIED BY 'm0d1fyth15';
GRANT ALL ON database_2024.* TO 'youruser'@'123.123.123.123';
Or, if you want to allow this user to login from any IP address, we can run this command:
CREATE USER 'youruser'@'%' IDENTIFIED BY 'm0d1fyth15';
GRANT ALL ON database_2024.* TO 'youruser'@'%';
That’s it! You can run the flush privileges command once again.
If you have a control panel on your server like cPanel or DirectAdmin, you can use their interface to create the MySQL user and whitelist/allow the IP address you want to connect to MySQL from.
Step 3. Log into Remote MySQL Server
Now that you have the credentials to connect to your remote MySQL server, we can execute this command below from another server.
$ mysql -u youruser -h 1.2.3.4 -p
Replace youruser with your own MySQL username and replace 1.2.3.4 with your MySQL server IP address, the command above will ask for your password for the user youruser, you can type the password and hit ENTER. If your password is correct, you should be connected to your remote MySQL server now.
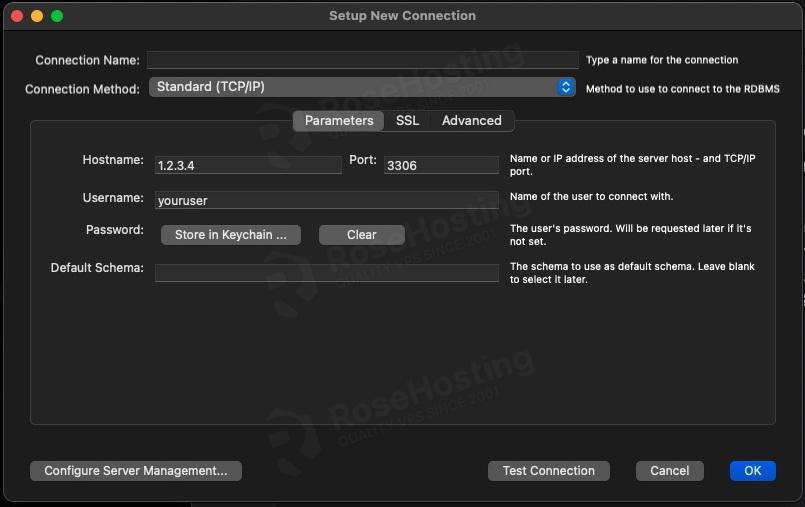
If you are not familiar with the command line interface and prefer to use a MySQL client with graphical interface like MySQL Workbench, you can use your MySQL database credentials to connect to your remote MySQL server.
Do you want to connect to your MySQL server through an SSH tunnel? If yes, you can check our blog post on accessing your database remotely using an SSH tunnel.
Congratulations! You have just learned how to log into remote MySQL server. Hopefully, you have a better understanding of connecting to a remote MySQL server.
Of course, you don’t have to follow this article and try to configure your server by hand. If you need connect to your MySQL server remotely and you are one of our Fully-Managed hosting customers, our Linux admins will help you configure everything for you and provide you with MySQL login credentials to use. Simply contact our expert admins through our live chat or submit a ticket in the client area. Our expert administrators are available 24×7 and will take care of your request immediately.
PS. If you liked this post, please consider sharing it with your friends on the social networks. Also, if you have any other ways of configuring remote access to a MySQL database, we’d love to hear it! Feel free to leave a reply below. Thanks!