SSH is a “Secure Shell Protocol” used to connect and manage remote Linux systems securely over an unsecured network. It is very useful for system administrators to perform day-to-day tasks on the remote server. So securing an SSH server is an essential part of any system administrator.
By default, you can connect to SSH with a password or using the private key. That means, it is only a single factor authentication. So it is a good idea to implement multi-factor authentication in the SSH server to add an extra layer of security. In multi-factor authentication, you will need to provide your system user password and another password generated on a mobile device. This will significantly enhance your server’s security.
In this tutorial, we will show you how to set up multi-factor authentication for SSH on Ubuntu 20.04 VPS.
Table of Contents
Prerequisites
- An Ubuntu 20.04 VPS (we’ll be using our SSD 2 VPS plan)
- Access to the root user account (or access to an admin account with root privileges)
Step 1: Log in to the Server & Update the Server OS Packages
First, log in to your Ubuntu 20.04 server via SSH as the root user:
ssh root@IP_Address -p Port_number
You will need to replace ‘IP_Address’ and ‘Port_number’ with your server’s respective IP address and SSH port number. Additionally, replace ‘root’ with the username of the admin account if necessary.
Before starting, you have to make sure that all Ubuntu OS packages installed on the server are up to date. You can do this by running the following commands:
apt-get update -y
apt-get upgrade -y
Step 2: Install Google Authenticator
We will use Google Authenticator for multi-factor authentication. So, you will need to install the Google Authenticator PAM module to your system. You can install it by running the following command:
apt-get install libpam-google-authenticator -y
Once the package has been installed, run the Google Authenticator using the following command:
google-authenticator
During the installation, you will be asked the following question:
Do you want authentication tokens to be time-based (y/n) y
Warning: pasting the following URL into your browser exposes the OTP secret to Google:
  https://www.google.com/chart?chs=200x200&chld=M|0&cht=qr&chl=otpauth://totp/root@ubuntu2004%3Fsecret%3D4XXQ2QA6FRV72SDM2JWSZTQJE4%26issuer%3D
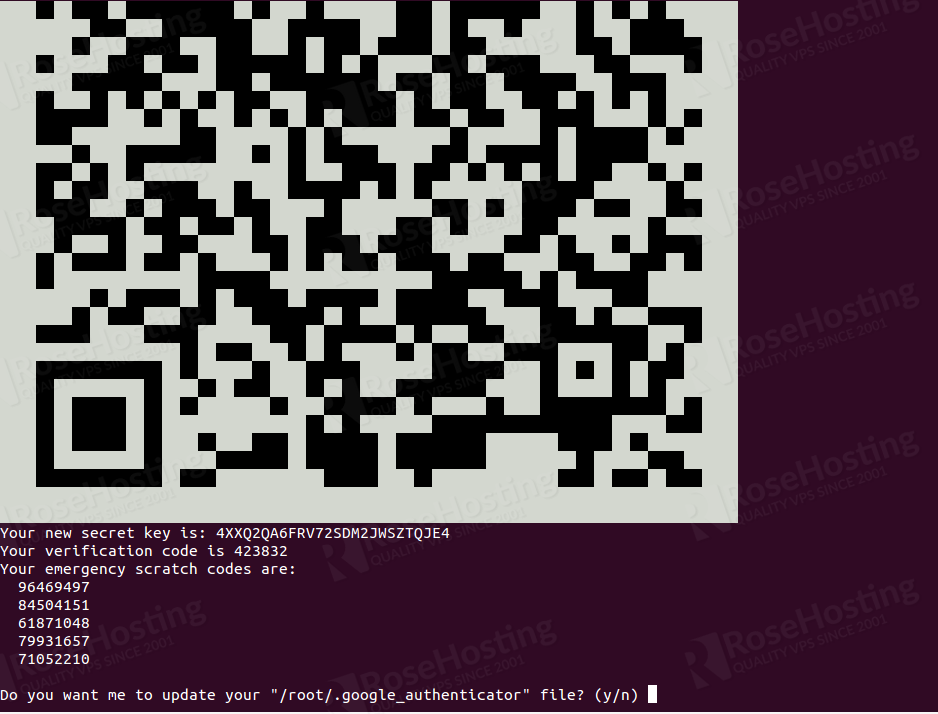
Press y and hit Enter to continue. You should see a QR code in the following screen:

Answer all questions and hit Enter to finish the process as shown below:
Do you want to disallow multiple uses of the same authentication
token? This restricts you to one login about every 30s, but it increases
your chances to notice or even prevent man-in-the-middle attacks (y/n) y

By default, a new token is generated every 30 seconds by the mobile app.
In order to compensate for possible time-skew between the client and the server,
we allow an extra token before and after the current time. This allows for a
time skew of up to 30 seconds between authentication server and client. If you
experience problems with poor time synchronization, you can increase the window
from its default size of 3 permitted codes (one previous code, the current
code, the next code) to 17 permitted codes (the 8 previous codes, the current
code, and the 8 next codes). This will permit for a time skew of up to 4 minutes
between client and server.
Do you want to do so? (y/n) y

If the computer that you are logging into isn't hardened against brute-force
login attempts, you can enable rate-limiting for the authentication module.
By default, this limits attackers to no more than 3 login attempts every 30s.
Do you want to enable rate-limiting? (y/n) If the computer that you are logging into isn't hardened against brute-force
login attempts, you can enable rate-limiting for the authentication module.
By default, this limits attackers to no more than 3 login attempts every 30s.
Do you want to enable rate-limiting? (y/n) y
Step 3: Install Google Authenticator Application
Next, you will need to install the Google Authenticator application on your smartphone. Once installed, open Google Authenticator on your mobile and scan the above QR code. Once the QR code is scanned, you should see a six-digit one-time password on your phone as shown below:

This password will expire within 30 seconds, So you will need to open Google Authenticator Application and see new a password in order to log in to the Ubuntu server via SSH.
You can also see the secret key, verification code and emergency scratch code in the above output. It is recommended to save it to a safe place for later use.
Your new secret key is: 4XXQ2QA6FRV72SDM2JWSZTQJE4
Your verification code is 423832
Your emergency scratch codes are:
  96469497
  84504151
  61871048
  79931657
  71052210
Step 4: Configure SSH to Use Google Authenticator
Next, you will also need to configure SSH to use Google Authenticator. You can configure it by editing the file /etc/ssh/sshd_config:
nano /etc/ssh/sshd_config
Change the following lines:
UsePAM yes
ChallengeResponseAuthentication yes
Save and close the file when you are finished. Then, restart the SSH service to apply the configuration:
systemctl restart sshd
Next, you will need to edit /etc/pam.d/sshd file and define PAM rules for SSH service:
nano /etc/pam.d/sshd
Add the following line after @include common-auth :
auth required pam_google_authenticator.so
Save and close the file.
Step: 5 Test Two Factor Authentication
At this point, Your SSH server is now configured with multi-factor authentication. It’s time to connect it and test it.
On the remote system, open your terminal and login to your server via SSH as shown below:
ssh root@ssh-server-ip
You will be asked to provide your system password and Verification code generate by Google Authenticator. Provide your system password shown in the Google Authenticator App and hit Enter to login to the server as shown below:

Congratulations! your SSH server is now secured with multi-factor authentication..
Of course, you don’t have to set up multi-factor authentication for SSH on Ubuntu VPS if you use one of our Managed Hosting services, in which case you can simply ask our expert Linux admins to set up multi-factor authentication for SSH on Ubuntu, for you. They are available 24×7 and will take care of your request immediately.
PS. If you liked this post on how to set up multi-factor authentication for SSH on Ubuntu, please share it with your friends on the social networks using the buttons on the left or simply leave a reply below. Thanks.