 eXo Platform is an out-of-the-box social intranet solution written in Java. It allows developers to build modern business portals with complete collaborative and content management features.
With eXo you can also create social intranets with rich collaboration features such as wikis, forums, calendars and documents smartly integrated around activity streams, social networking and workspaces. It is carefully designed to instantly engage users. It runs within the trusted security of an enterprise platform and is highly customizable to adapt when your needs evolve.
In this article, we will cover the steps needed for installing eXo Platform on a Debian 8 VPS.
REQUIREMENTS
We will be using our SSD 4 Linux VPS Hosting plan for this tutorial.
Login to your server via SSH
# ssh root@server_ip
You can check whether you have the proper version of Debian installed on our server with the below command:
# lsb_release -a
Which should give you the underneath output:
Distributor ID: Debian
Description: Debian GNU/Linux 8.2 (jessie)
Release: 8.2
Codename: jessie
UPDATE THE SYSTEM
Make sure your server is fully up to date. Also, install wget and unzip:
# apt-get update && apt-get upgrade

# apt-get install unzip wget
INSTALL ORACLE JAVA 7
In order to run eXo Platform, you need to install Java on your server. Therefore, add the Java PPA repository in your Debian system. Then install Oracle Java 7 with the following commands:
# echo "deb http://ppa.launchpad.net/webupd8team/java/ubuntu trusty main" | tee /etc/apt/sources.list.d/webupd8team-java.list

# echo "deb-src http://ppa.launchpad.net/webupd8team/java/ubuntu trusty main" | tee -a /etc/apt/sources.list.d/webupd8team-java.list

# apt-key adv --keyserver keyserver.ubuntu.com --recv-keys EEA14886
Update the package index and install Java 7:
# apt-get update

# apt-get install oracle-java7-installer
Check if Java has been properly installed:
# java -version
You should receive the following output:
java version "1.7.0_80"
Java(TM) SE Runtime Environment (build 1.7.0_80-b15)
Java HotSpot(TM) 64-Bit Server VM (build 24.80-b11, mixed mode)
INSTALL eXo
We will download and unzip eXo in the /opt directory. Run the below commands:
# cd /opt

# wget http://sourceforge.net/projects/exo/files/latest/download -O eXo-Platform-community.zip

# unzip eXo-Platform-community.zip
Rename and move the unpacked installation into the /usr/share directory:
# mv platform-community-* platform-community

# mv platform-community /usr/share/platform-community
Once that is done, you can start eXo. But, let’s not get ahead of ourselfs. First we need to install Nginx.
INSTALL NGINX
Basically what you need to do is to install Nginx and setup a configuration file so you can run eXo from your domain.
Install, start and enable Nginx to start on boot with the three below commands:
# apt-get install nginx

# systemctl start nginx

# systemctl enable nginx
Now, open a new Nginx configuration file.
# nano /etc/nginx/sites-available/exo
Once opened, paste the following:
upstream exo {
    server 127.0.0.1:8080;
}

server {
    listen      80;
    server_name your_domain;

    access_log  /var/log/nginx/exo.access.log;
    error_log   /var/log/nginx/exo.error.log;

    proxy_buffers 16 64k;
    proxy_buffer_size 128k;

location / {
        proxy_pass  http://exo;
        proxy_next_upstream error timeout invalid_header http_500 http_502 http_503 http_504;
        proxy_redirect off;

        proxy_set_header    Host            $host;
        proxy_set_header    X-Real-IP       $remote_addr;
        proxy_set_header    X-Forwarded-For $proxy_add_x_forwarded_for;
        proxy_set_header    X-Forwarded-Proto https;
    }

}
Do not forget to replace your_domain with your actual domain.
Enable the new configuration by creating a sym link:
# ln -s /etc/nginx/sites-available/exo /etc/nginx/sites-enabled/
Restart Nginx:
# service nginx restart
The last thing you need to do is to start eXo Platform. We will use the below command to start eXo as a background process:
# /usr/share/platform-community/start_eXo.sh &
You can stop eXo with:
# /usr/share/platform-community/stop_eXo.sh
Now, open your favorite browser and navigate to http://your_domain. You will be welcomed by a page like the one in the underneath image:
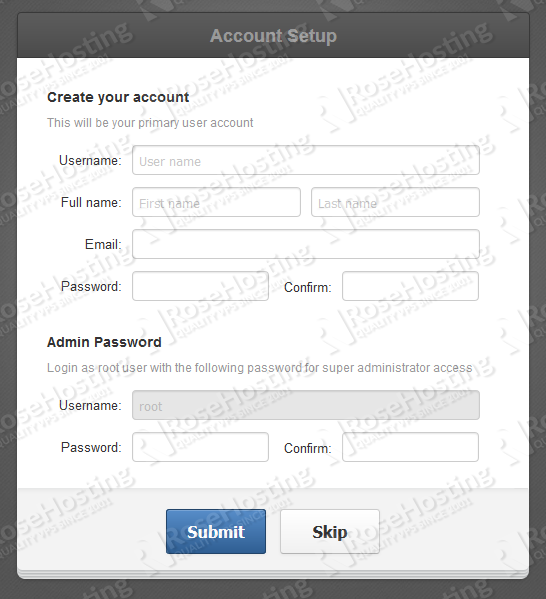
Do the configuration according to your needs and finish the eXo Platform installation.
Congratulations, you have successfully installed eXo Platform on your Debian 8 VPS.
Of course you don’t have to do any of this if you use one of our Linux VPS Hosting services in which case you can simply ask our expert Linux admins to install eXo Platform for you. They are available 24×7 and will take care of your request immediately.
PS. If you liked this post please share it with your friends on the social networks using the buttons on the left or simply leave a reply below. Thanks.