 The following tutorial will guide you through the details on how to install and run MODX on a Debian 7 VPS.
MODX is a free, open source content management system and web application framework that allows you to build sites of any size and manage them with ease from the back-end administration. It gives you complete control over your site and content, with the flexibility and scalability to adapt to your changing needs.
Before you start the installation, please make sure that you have LAMP stack installed on your server. If not, follow our excellent tutorial about how to set up LAMP (Linux, Apache, MariaDB, PHP) stack on Debian Wheezy.
REQUIREMENTS
We will be using our SSD 1 Linux VPS Hosting plan for this tutorial.
UPDATE THE SYSTEM
Login to your server as user ‘root’ and make sure your server is fully up-to-date:
# ssh root@hostname
# apt-get update && apt-get upgrade -y
Let’s install some needed PHP extensions:
# apt-get install php5-gd

# apt-get install imagemagick
DOWNLOAD MODX
During the writing of this tutorial the current version of MODX is: 2.3.2. For our purposes we will download MODX into the Apache root directory by issuing the following commands:
# cd /var/www

# wget http://modx.com/download/direct/modx-2.3.2-pl-sdk.zip
After the download is finished, unzip the archive.
# unzip modx-2.3.2-pl-sdk.zip
The command ls -la will list the files in the current directory which will reveal the long name that the unzipped archive has. Therefore, let’s change it to something that is easier to type.
# mv modx-2.3.2-pl modx
CONFIGURE PHP, APACHE
In order for MODX to function normally on your server, you need to do a couple of things. First, make sure that the PHP memory limit is set to at least 32 MB. For that, you need to check your php.ini file. Open the file with your favorite text editor. We will use vim:
# vim /etc/php5/apache2/php.ini
Locate the line memory_limit = ??, where you will replace the question marks with the 32 value.
Second, to prevent an issue that is common if the server timezone isn’t set, in the same file uncomment the line ;date.timezone = by removing the preceding semi-colon and set the PHP timezone. After you modify it, the line should look like this:
date.timezone = US/Central
With this taken care off we will avoid the following error that shows up during the web installation of MODX:
FATAL ERROR: MODX Setup cannot continue.
To use PHP 5.3.0+, you must set the date.timezone setting in your php.ini. Please do set it to a proper timezone before proceeding. A list can be found here.
Third, you should check if the mod_rewrite module is enabled in your Apache. To do that enter the following:
# apache2ctl -M | grep rewrite_module
If you see “rewrite_module” in the output, you are fine. If not, use the following command to enable mod_rewrite:
# a2enmod rewrite
Restart your Apache web server for the changes to take effect:
# /etc/init.d/apache2 restart
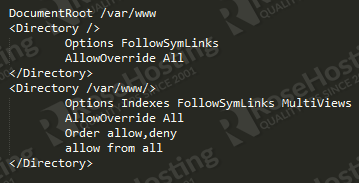
Next, with your preferred text editor, open and edit the Apache default virtual host file to make sure that Allow Override under the /var/www directory is set to All.
# vim /etc/apache2/sites-available/default
Make sure that the changes correspond to the following:
Enter the MODX installation directory and set the correct ownership and permissions by issuing the following commands:
# cd modx/
# chown -R root:www-data core/cache
# chown -R root:www-data core/config
# chown -R root:www-data core/export
# chown -R root:www-data core/packages
# chmod -R 775 core/cache
# chmod -R 775 core/config
# chmod -R 775 core/export
# chmod -R 775 core/packages
CREATE MYSQL DATABASE
Your next step is to create a MySQL database. Enter MySQL as root:
# mysql -u root -p
Then create the needed database:
mysql> CREATE DATABASE modx;

mysql> GRANT ALL PRIVILEGES on modx.* TO 'modxuser'@'localhost' IDENTIFIED BY 'your_password';

mysql> FLUSH PRIVILEGES;

mysql> quit;
You can now finish your MODX installation by opening your favorite web browser and navigate to: http://your_domain/modx/setup.
You should get prompted with the language choice for the new site. Proceed with the installer wizard and follow the instructions on the screen.
Fill in the database connection information such as database, database username etc… and then test the connection right there on the page. Near the bottom, choose a collation and click on Create or test selection of your database. Then a new section for creating an administrator account will open so fill that according to your needs.
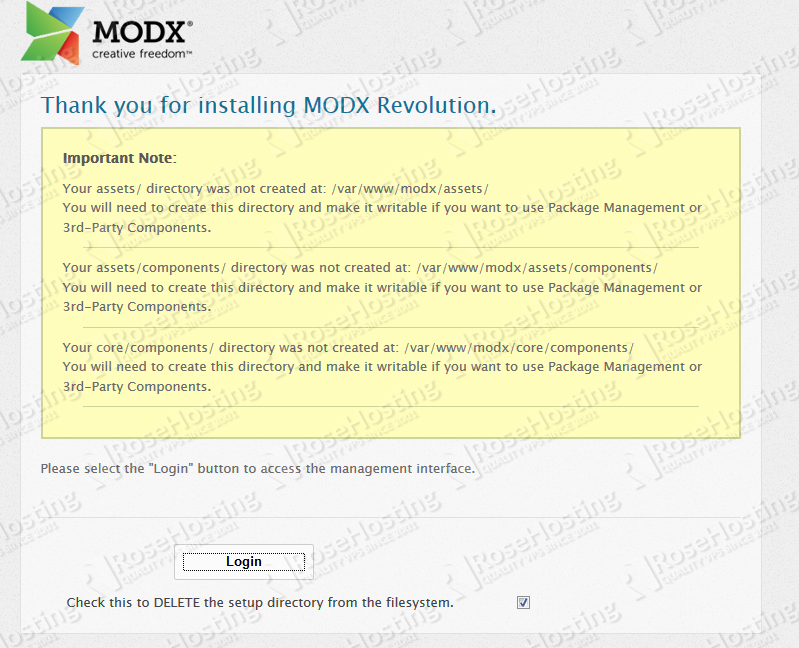
After the installation is finished, you should correct anything that is mentioned in the installation summary page as noted in the picture below. Then access the management interface by clicking Login.
Congratulations, you have successfully installed MODX on your Debian 7 VPS.
Of course you don’t have to do any of this if you use one of our Linux VPS Hosting services, in which case you can simply ask our expert Linux admins to install MODX for you.They are available 24×7 and will take care of your request immediately.
PS. If you liked this post please share it with your friends on the social networks using the buttons on the left or simply leave a reply below. Thanks.