We’ll show you How to Install LAMP on Ubuntu 16.04. LAMP (Linux, Apache, MySQL, PHP) is a combination of open source software, typically installed on a server used for hosting dynamic websites and web applications. It includes the Linux operating system, the Apache web server, MySQL for data storage and management and PHP for handling the dynamic content. Installing LAMP on Ubuntu 16.04 is an easy task, just follow the steps below carefully.
Requirements
SSH access with root privileges to your server, as well as Ubuntu 16.04 is required for you to be able to complete all the steps in this tutorial.
Table of Contents
1. Login via SSH
ssh user@vps_IP
2. Update your system
Before we start, let’s make sure your system is up-to-date by running the following command:
apt-get update && apt-get upgrade
Always keep your system updated. You can also set up automatic updates.
3. Install Apache on Ubuntu 16.04
We will start with installing the Apache web server. Apache is considered as the most widely used web server software. It is fast, secure, reliable and can be easily customized depending on your needs.
To install Apache on your |Ubuntu 16.04 server, run the following command:
apt-get install apache2
After the installation is complete, you should enable Apache to start automatically upon system boot. You can do that with the following command:
systemctl enable apache2
To verify that Apache is running, open your web browser and enter your server IP address, (e.g. http://111.222.333.444). If Apache is successfully installed you should see a message saying “It works!”.
4. Install MySQL on Ubuntu 16.04
Next, we will install MySQL on your server. MySQL is one of the most popular database management systems.
To install MySQL on your system, type the following command and enter Y to continue:
apt-get install mysql-server
During the installation, you will be asked to enter a password for the MySQL root user. Make sure you enter a strong password.
5. Secure MySQL Installation
After the installation is complete, in order to improve the security of your MySQL server, we recommend to do the MySQL secure installation by typing the following command:
mysql_secure_installation
First, you will be asked about setting up the validate password plugin.
Would you like to setup VALIDATE PASSWORD plugin?(Press y|Y for Yes, any other key for No) :
This plugin checks the strength of a password and allows the users to set only passwords which are secure enough.
Whether to enable this or not is entirely up to you, but it’s always recommended to use strong passwords.
If you choose ‘yes’, you will be asked to choose the level of the password validation policy:
There are three levels of password validation policy:

LOW Length >= 8
MEDIUM Length >= 8, numeric, mixed case, and special characters
STRONG Length >= 8, numeric, mixed case, special characters and dictionary file

Please enter 0 = LOW, 1 = MEDIUM and 2 = STRONG:
Next, you will be asked to change the root password, but since we already created it during the MySQL installation, we can skip this step by pressing Enter.
After this, you will get asked a couple of more questions and it is recommended that you answer ‘yes’ to all of them:
Remove anonymous users? (Press y|Y for Yes, any other key for No) :

Disallow root login remotely? (Press y|Y for Yes, any other key for No) :

Remove test database and access to it? (Press y|Y for Yes, any other key for No) :

Reload privilege tables now? (Press y|Y for Yes, any other key for No) :
Again, we can enable MySQL to start on boot with the following command:
systemctl enable mysql
With this, your MySQL installation is now complete.
6. Install PHP 7 on Ubuntu 16.04
The last step in this tutorial is to install PHP. PHP is a programming language mostly used for developing dynamic websites.
We will also include some additional modules, in order to help PHP to connect to our Apache and MySQL.
To do this, enter the following command:
apt-get install php7.0 libapache2-mod-php7.0 php7.0-mysql
Now we can test if PHP is working correctly by placing a file called info.php inside your web server root directory.
To do this, type the following:
nano /var/www/html/info.php
Enter the following inside the file and save it:
<?php
phpinfo();
?>
7. Restart Apache Web Server
And finally, restart the Apache server by typing:
systemctl restart apache2
Now, if you navigate to this page: http://your_server_ip_address/info.php in your web browser, you will see the following page showing your current PHP configuration:
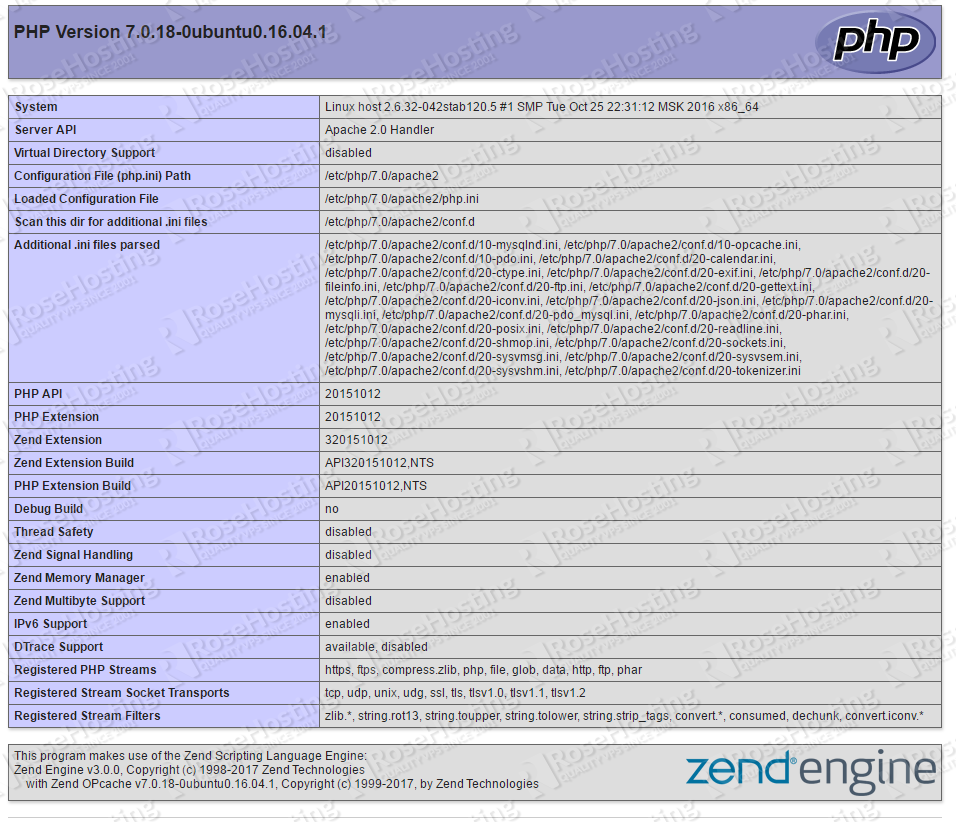
This means PHP is working properly. Additionally, you can install PHPMyAdmin. It will allow you to manage your MySQL databases through a web browser. You can check our phpMyAdmin tutorial to see how you can install it on an Ubuntu 16.04 VPS.
With this, you have completed the LAMP installation on Ubuntu 16.04. Congratulations!
Of course, if you are one of our Lamp Stack Hosting customers, you don’t have to Install LAMP on Ubuntu 16.04, or to know how to install LAMP stack on Ubuntu 16.04, simply ask our admins, sit back and relax. Our admins will install LAMP on Ubuntu 16.04 for you immediately. Using Ubuntu 18.04? We have a detailed guide on how to install LAMP on Ubuntu 18.04, so make sure to check it out.
PS. If you liked this post, on how to install LAMP stack on Ubuntu 16.04, please share it with your friends on the social networks using the buttons below or simply leave a comment in the comments section. Thanks.
How can I fully hide my IP when redirecting my domain to my web server?
Can you please be more specific about this?
We love your way of learning people, Thank you very much for your time.
Hi thanks for your detail tutorial, is there you can make tutorial how to install ioncube loader too ? and also vestapanel ? thanks
Please check https://www.rosehosting.com/blog/getting-started-with-vesta-control-panel/ for more information on how to install VestaCP.
If you have Apache and PHP5 installed on your server, try to install ioncube loaders using the script at https://www.rosehosting.com/blog/script-install-ioncube-on-debian-vps/