 GitLab Community Edition is an open source application that allows a team or developer to manage their project on their own servers, it’s an alternative to GitHub. GitLab Community Edition is designed to be hosted on our own infrastructure, and it provides flexibility in deploying as an internal repository store for our development team, a public way to interface with users, or a means for contributors to host their own projects. GitLab also provides our teams a single data store, one user interface, and one permission model across the DevOps life-cycle allowing teams to collaborate that would significantly reduce cycle time and focus exclusively on building great software quickly. In this article, we will show you How to Install GitLab on Debian 9. GitLab will use some ports on your server, so we encourage you to install this on a fresh server to avoid any conflict with your existing applications.
-
Table of Contents
Prerequisites
A fresh installed Debian 9 server
A sudoer system user
8GB of memory or higherFor more details about hardware requirements, please refer to this link https://docs.gitlab.com/ce/install/requirements.html
-
Log in to your server via SSH:
# ssh root@server_ip
Before starting with the GitLab installation, it is encouraged to check that our system package database is up to date.
-
Update the system
# apt update
# apt upgrade
Now, make sure that we are not running a web server on port 80 because GitLab will install nginx on that port and enable it on boot
# systemctl stop apache2
# systemctl disable apache2
-
Create a system user
# adduser gituser
# usermod -aG sudo gituser
-
Start the GitLab installation
To start the installation, we need to switch to the regular user we created earlier
# su gituser
$ cd
$ sudo apt install ca-certificates curl
-
Add the GitLab package repository.
In this tutorial, we will install GitLab CE (Community Edition), and we have to add the package repository to continue with the installation.
$ sudo curl -LO https://packages.gitlab.com/install/repositories/gitlab/gitlab-ce/script.deb.sh
$ sudo bash script.deb.sh
After adding the repository, run the following command to install GitLab Community Edition on Debian 9
$ sudo apt install gitlab-ce
Next, we need to edit the gitlab.rb file, find external_url string and edit it to your server IP address or domain you want to use to access GitLab.
$ sudo nano /etc/gitlab/gitlab.rb
$ sudo gitlab-ctl reconfigure
The installation will take a few minutes to complete, it will automatically configure and install nginx web server to run GitLab at that defined URL.
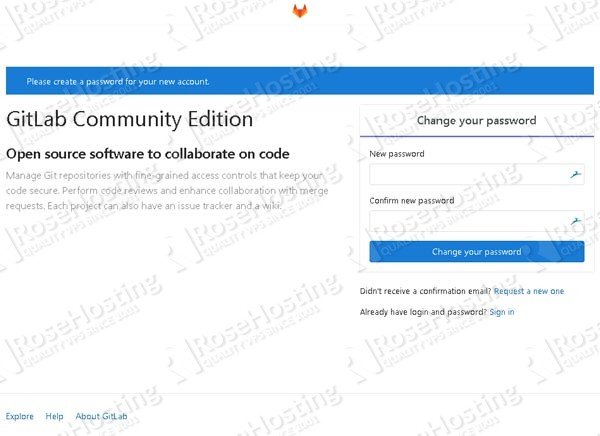
Once completed, navigate to your server IP address or domain name you previously specified in external_url in /etc/gitlab/gitlab.rg in a web browser, you will need to create a new password.
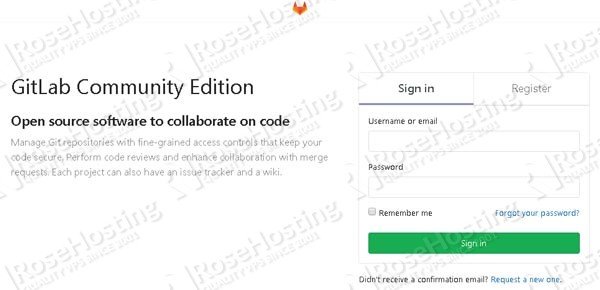
Once created you can log in to your GitLab backend using “root” user and the new password you created earlier. You can change this “root” username in Settings – Account.
gitlab-ctl is the command line utility you can use to manage GitLab. For example, you can start/stop it using the following commands:
$ sudo gitlab-ctl start
$ sudo gitlab-ctl stop
Additional configuration for application email:
By default, GitLab will use sendmail to send emails from the application. If you would rather send application email via an SMTP server instead of via Sendmail, add the following configuration information to /etc/gitlab/gitlab.rb
gitlab_rails['smtp_enable'] = true
gitlab_rails['smtp_address'] = "smtp.gmail.com"
gitlab_rails['smtp_port'] = 587
gitlab_rails['smtp_user_name'] = "my.email@gmail.com"
gitlab_rails['smtp_password'] = "my-gmail-password"
gitlab_rails['smtp_domain'] = "smtp.gmail.com"
gitlab_rails['smtp_authentication'] = "login"
gitlab_rails['smtp_enable_starttls_auto'] = true
gitlab_rails['smtp_tls'] = false
gitlab_rails['smtp_openssl_verify_mode'] = 'peer' # Can be: 'none', 'peer', 'client_once', 'fail_if_no_peer_cert', see http://api.rubyonrails.org/classes/ActionMailer/Base.html
Once edited, you can run this command:
$ sudo gitlab-ctl reconfigure
How to Backup GitLab on Debian 9
The default data backup will be stored in /var/opt/gitlab/backups. You can modify this backup path in /etc/gitlab/gitlab.rb file. If you made changes to the backup configuration, do not forget to run the following command to create the backup.
$ sudo gitlab-rake gitlab:backup:create
You can also add the same command in the cron job to backup your data.
0 3 * * 2-6 sudo gitlab-rake gitlab:backup:create
That’s it, GitLab has been successfully installed and running on your Debian 9 server, you and your team can start working with it now.
Of course, you don’t have to install GitLab on Debian 9 if you have a Debian VPS Hosting with us. You can simply ask our support team to install GitLab on Debian 9 for you. They are available 24/7 and will be able to help you with the installation of GitLab on Debian 9. An updated version of this post is available on How to Install Gitea on Debian 9.
PS. If you enjoy reading this blog post on How to Install GitLab on Debian 9, feel free to share it on social networks using the shortcuts below, or simply leave a comment.