In this tutorial we are going to explain step-by-step instructions on How to install Discourse on Ubuntu 20.04 Also, we will provide you with some useful information about its usage.
Discourse is an open-source platform used for discussions forum, chat rooms, or as a mailing list management software. It is written in Ruby on Rails as a backend language, Ember.js as a frontend, and uses PostgreSQL for data storage. It offers many features such as 2FA (Two-factor authentication), Spam blocking, Comprehensive API, Social Login and etc. Installing Discourse can be done manually with a couple of steps or in an isolated environment with Docker.

In this blog post, we will use docker as an easier and faster solution and the estimated time for the installation should be a few minutes, depending on your network speed. Let’s get started!
Table of Contents
Prerequisites
Before we start with the installation there are a few requirements that need to be fulfilled:
- A VPS with at least 2GB of RAM (Our SSD 2 VPS plan)
- Fresh install of Ubuntu 20.04
- User privileges: root or non-root user with sudo privileges
- Pointed A record of domain or subdomain to your server IP address
- SMTP mail server. May use some external mail services like Mailgun, Sendgrid, Gmail, Hotmail and etc, if you do not have one
Step 1. Update the System
Fresh installation of Ubuntu 20.04 requires the latest software updates. Execute the following command to update the system to its latest version:
sudo apt update -y && sudo apt upgrade -y
Step 2. Install Docker Container
As we mentioned before we will install Discourse in an isolated docker environment. Docker by default is available in Ubuntu 20.04 and we just need to execute the following commands to install it:
sudo apt-get install docker.io -y
Once, the installation is complete start the docker service:
sudo systemctl start docker
After starting the service, you need to enable it with the following command:
sudo systemctl enable docker
To check that the service is up and running, in the terminal execute the command below:
sudo systemctl status docker
You should see the following output:
root@vps:~# systemctl status docker
● docker.service - Docker Application Container Engine
     Loaded: loaded (/lib/systemd/system/docker.service; enabled; vendor preset: enabled)
     Active: active (running) since Thu 2021-10-28 17:52:17 UTC; 1h 14min ago
TriggeredBy: ● docker.socket
       Docs: https://docs.docker.com
   Main PID: 63601 (dockerd)
      Tasks: 32
     Memory: 1.8G
     CGroup: /system.slice/docker.service
             ├─ 63601 /usr/bin/dockerd -H fd:// --containerd=/run/containerd/containerd.sock
             ├─274057 /usr/bin/docker-proxy -proto tcp -host-ip 0.0.0.0 -host-port 443 -container-ip 172.17.0.2 -container-port 443
             └─274071 /usr/bin/docker-proxy -proto tcp -host-ip 0.0.0.0 -host-port 80 -container-ip 172.17.0.2 -container-port 80

Oct 28 19:03:56 vps.example.com dockerd[63601]: time="2021-10-28T19:03:56.213105991Z" level=info msg="ignoring event" container=1baae1c7e1acfab1fd0bc326a021964b0b02257932a70e5a6100e7ff520e318c>
Oct 28 19:03:58 vps.example.com dockerd[265458]: time="2021-10-28T19:03:58Z" level=warning msg="file does not exist: /proc/sys/net/ipv6/conf/all/disable_ipv6 : stat /proc/sys/net/ipv6/conf/all>
Oct 28 19:04:31 vps.example.com dockerd[63601]: time="2021-10-28T19:04:31.892373712Z" level=info msg="ignoring event" container=1baae1c7e1acfab1fd0bc326a021964b0b02257932a70e5a6100e7ff520e318c>
Step 3. Download and Install Discourse
Before we download the installation file for Discourse we will make a separate director for it:
sudo mkdir /var/www/discourse/
Clone the discourse with the command bellow:
sudo git clone https://github.com/discourse/discourse_docker.git /var/www/discourse/
Go into the newly created directory and execute the command for installing Discourse
 cd /var/www/discourse/

 ./discourse-setup
After executing the command for discourse setup, there will be a couple of inputs that need to be entered such as hostname, email address for admin account, SMTP server, SMTP username, SMTP password and email address for Let’s Encrypt as shown below:
Checking your domain name . . .
Connection to discourse.yourdomain.com succeeded.
Email address for admin account(s)? [me@example.com,you@example.com]: discourse@yourdomain.com
SMTP server address? [smtp.example.com]: smtp.yourdomain.com
SMTP port? [587]:
SMTP user name? [user@example.com]: discourse@yourdomain.com
SMTP password? [pa$word]: yourstrongpassword
Optional email address for Let's Encrypt warnings? (ENTER to skip) [me@example.com]: ssl-discourse@yourdomain.com
Once you enter these values, there will be another window to check them again.
Does this look right?

Hostname      : discourse.yourdomain.com
Email         : discourse@yourdomain.com
SMTP address  : smtp.yourdomain.com
SMTP port     : 587
SMTP username : discourse@yourdomain.com
SMTP password : yourstrongpassword
Let's Encrypt : ssl-discourse@yourdomain.com

ENTER to continue, 'n' to try again, Ctrl+C to exit:
Hit “Enter” to approve them and allow some time for the installation to complete.
Once the installation is completed you can check that the docker container is running properly:
root@vps:~# docker ps
You should see the following output:
#root@vps:~# docker ps
CONTAINER ID   IMAGE                 COMMAND        CREATED          STATUS          PORTS                                      NAMES
1baae1c7e1ac   local_discourse/app   "/sbin/boot"   47 minutes ago   Up 16 seconds   0.0.0.0:80->80/tcp, 0.0.0.0:443->443/tcp   app
Step 4. Access The Web Interface
Access the discourse in the browser: https://discourse.yourdomain.com

Now, you need to click on the “Register” button and another form will open for Email, Username and Password.
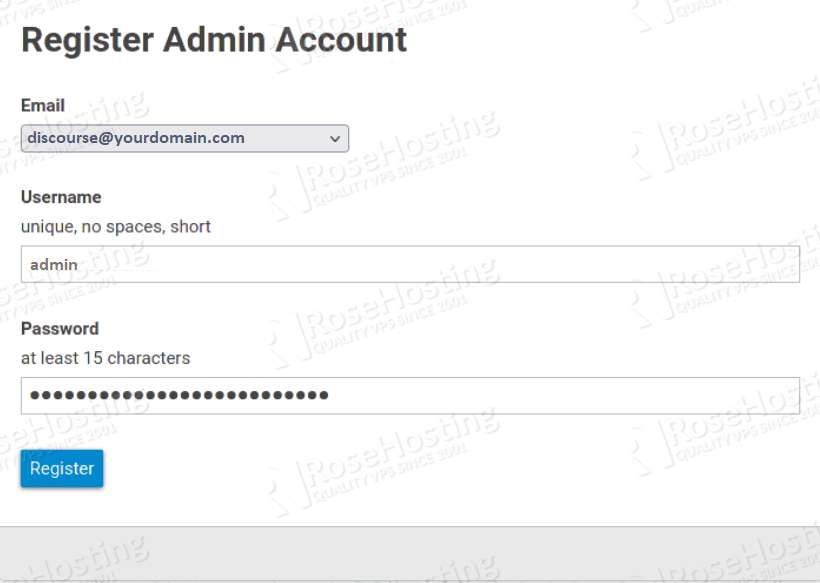
The final step is to check your mailbox to confirm your administrator account creation.
Congratulations! You successfully installed Discourse on Ubuntu 20.04.
Of course, you don’t have to install Discourse on Ubuntu 20.04. If you find it difficult, you can simply ask our expert Linux admins to install Discourse on Ubuntu 20.04 for you. They are available 24×7 and will take care of your request immediately.
If you liked this post on how to install Discourse on Ubuntu 20.04, please share it with your friends on the social networks using the buttons on the left or simply leave a reply below. If you’re interested, check out our Discourse VPS plans. Thanks.