
OwnCloud is an open-source file-sharing and syncing application. It is an alternative to file hosting services like Dropbox, Google Drive, or OneDrive. This platform enables you to store files, share documents, and facilitate team collaboration, all within a fully controlled environment. When you upload a file, ownCloud stores it in a specific directory on the server, while metadata, such as user information and access permissions, is stored in a database. You can access files through a browser, desktop app, or mobile device, with real-time synchronization ensuring data is always up to date. In this tutorial, we will guide you through installing ownCloud on Ubuntu 24.04.
Table of Contents
Prerequisites
- An Ubuntu 24.04 server
- SSH root access or a regular system user with sudo privileges
Conventions
# – given commands should be executed with root privileges either directly as a root user or by use of sudo command
$ – given commands should be executed as a regular user
Step 1. Update the System
Let’s log in to your Ubuntu 24.04 VPS through SSH as a root user or as a regular user with sudo privileges.
ssh root@IP_Address -p Port_numberIf you cannot log in as root, remember to substitute “root” with a user that has sudo privileges. Additionally, change “IP_Address” and “Port_Number” to make sure they match your server’s respective IP address and SSH port.
You can check whether you have the correct Ubuntu version installed on your server with the following command:
# lsb_release -aYou should get this output:
No LSB modules are available.
Distributor ID: Ubuntu
Description:    Ubuntu 24.04.3 LTS
Release:    24.04
Codename:   noble
Step 2. Install PHP
According to their documentation page at https://doc.owncloud.com/server/next/admin_manual/installation/system_requirements.html, ownCloud does not support PHP 8.3. Since Ubuntu 24.04 ships with PHP 8.3 and ownCloud does not support PHP 8.x at the moment, we need to install PHP 7.4. We can utilize a third-party source, Ondřej Surý’s PHP source, which provides access to both current and older PHP packages. Let’s execute the following commands to add the repository
# apt install -y apt-transport-https lsb-release ca-certificates wget
# add-apt-repository ppa:ondrej/php
When prompted to add the PPA to your APT sources, hit ENTER.
WARNING: add-apt-repository is broken with non-UTF-8 locales, see
https://github.com/oerdnj/deb.sury.org/issues/56 for workaround:

# LC_ALL=C.UTF-8 add-apt-repository ppa:ondrej/php
 More info: https://launchpad.net/~ondrej/+archive/ubuntu/php
Press [ENTER] to continue or Ctrl-c to cancel adding it.
Now, let’s refresh the package index files on the system
# apt updateThe necessary PPA on your system and the package index have been updated; we can now proceed with installing the required PHP version.
# apt install php7.4-{fpm,xml,intl,common,json,curl,mbstring,mysql,gd,imagick,zip,opcache} bzip2Step 3. Install and Configure Nginx
In this tutorial, we will install and use Nginx, not Apache. Run the following command to install it
# apt -y install nginxUpon installation, Nginx will automatically run. It is also configured to start automatically upon reboot.
Now, let’s create an Nginx server block for the domain name you will use for accessing ownCloud. For example, we will use yourdomain.com
# nano /etc/nginx/conf.d/owncloud.conf Insert the following into that file.
upstream owncloud {
    server unix:/var/run/php/php7.4-fpm.sock;
}

server {
    listen 80;
    server_name yourdomain.com;
    root /var/www/html/owncloud;

    location = /robots.txt {
        allow all;
        log_not_found off;
        access_log off;
    }

    client_max_body_size 512M;
    fastcgi_buffers 64 4K;

    gzip on;
    gzip_vary on;
    gzip_comp_level 4;
    gzip_min_length 256;
    gzip_proxied expired no-cache no-store private no_last_modified no_etag auth;
    gzip_types application/atom+xml application/javascript application/json application/ld+json application/manifest+json application/rss+xml application/vnd.geo+json application/vnd.ms-fontobject application/x-font-ttf application/x-web-app-manifest+json application/xhtml+xml application/xml font/opentype image/bmp image/svg+xml image/x-icon text/cache-manifest text/css text/plain text/vcard text/vnd.rim.location.xloc text/vtt text/x-component text/x-cross-domain-policy;

    location / {
        rewrite ^ /index.php;
    }

    location ~ ^\/(?:build|tests|config|lib|3rdparty|templates|data)\/ {
        deny all;
    }
    location ~ ^\/(?:\.|autotest|occ|issue|indie|db_|console) {
        deny all;
    }

    location ~ ^\/(?:index|remote|public|cron|core\/ajax\/update|status|ocs\/v[12]|updater\/.+|oc[ms]-provider\/.+|.+\/richdocumentscode\/proxy)\.php(?:$|\/) {
        fastcgi_split_path_info ^(.+?\.php)(\/.*|)$;
        set $path_info $fastcgi_path_info;
        try_files $fastcgi_script_name =404;
        include fastcgi_params;
        fastcgi_param SCRIPT_FILENAME $document_root$fastcgi_script_name;
        fastcgi_param PATH_INFO $path_info;
        fastcgi_param modHeadersAvailable true;
        fastcgi_param front_controller_active true;
        fastcgi_pass owncloud;
        fastcgi_intercept_errors on;
        fastcgi_request_buffering off;
    }

    location ~ ^\/(?:updater|oc[ms]-provider)(?:$|\/) {
        try_files $uri/ =404;
        index index.php;
    }

    location ~ \.(?:css|js|woff2?|svg|gif|map)$ {
        try_files $uri /index.php$request_uri;
        add_header Cache-Control "public, max-age=15778463";
        add_header Referrer-Policy "no-referrer" always;
        add_header X-Content-Type-Options "nosniff" always;
        add_header X-Download-Options "noopen" always;
        add_header X-Frame-Options "SAMEORIGIN" always;
        add_header X-Permitted-Cross-Domain-Policies "none" always;
        add_header X-Robots-Tag "none" always;
        add_header X-XSS-Protection "1; mode=block" always;

        access_log off;
    }

    location ~ \.(?:png|html|ttf|ico|jpg|jpeg|bcmap|mp4|webm)$ {
        try_files $uri /index.php$request_uri;
        access_log off;
    }
}
Save the file, then exit from the editor. To apply the changes, do not forget to restart nginx.
# systemctl restart nginxStep 4. Install MySQL Server
For the database engine, ownCloud supports MySQL 8.0+ or an equivalent MariaDB server, PostgreSQL, Oracle, and SQLite. In this step, we will install the MariaDB server from the default Ubuntu 24.04 repository. To install the MariaDB server, execute the command below:
# apt install mysql-server
MariaDB should be up and running now.
# systemctl status mysqlThe command above will return an output like this:
● mysql.service - MySQL Community Server
     Loaded: loaded (/usr/lib/systemd/system/mysql.service; enabled; preset: enabled)
     Active: active (running) since Sat 2025-11-08 11:29:56 UTC; 1min ago
   Main PID: 8680 (mysqld)
     Status: "Server is operational"
      Tasks: 37 (limit: 4548)
     Memory: 363.9M (peak: 378.1M)
        CPU: 11.364s
     CGroup: /system.slice/mysql.service
             └─8680 /usr/sbin/mysqld

Nov 08 11:29:55 ubuntu24 systemd[1]: Starting mysql.service - MySQL Community Server...
Nov 08 11:29:56 ubuntu24 systemd[1]: Started mysql.service - MySQL Community Server.
Step 5. Create a Database
On Ubuntu 24.04, MariaDB will start automatically upon installation. Since the database server is up and running now, we can let’s log in to MySQL shell and create a database for our ownCloud website.
# mysql
Once logged in to the MySQL shell, we can run the following commands.
mysql> CREATE DATABASE owncloud;
mysql> CREATE USER 'owncloud'@'localhost' IDENTIFIED BY 'm0d1fyth15';
mysql> GRANT ALL PRIVILEGES ON owncloud.* TO 'owncloud'@'localhost';
mysql> FLUSH PRIVILEGES;
mysql> \q
Remember to replace m0d1fyth15 with a stronger password.
Step 6. Download ownCloud
We need to go to the ownCloud download page at https://download.owncloud.com/server/stable/ to check and get the desired version to install. In this step, we will download the latest stable version.
# mkdir /var/www/html/owncloud
# cd /var/www/html/owncloud
# wget https://download.owncloud.com/server/stable/owncloud-latest.tar.bz2
# tar -xf owncloud-latest.tar.bz2 --strip-components 1
The commands above will download and then extract the compressed file into the directory /var/www/html/owncloud. Now, let’s give the correct permissions.
# chown -R www-data: /var/www/html/owncloudStep 7. Install ownCloud
In this step, navigate to http://yourdomain.com using any web browser. Make sure to navigate to the domain you configured earlier when setting up the nginx virtual host.
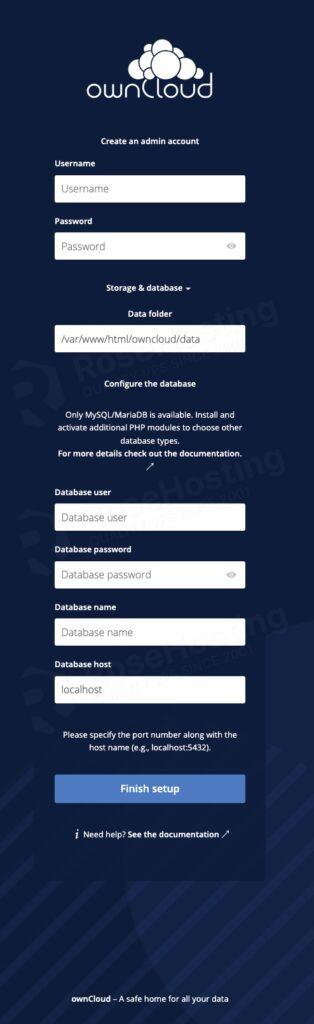
Fill the forms with the administrative user and password you want to create, and also fill the database credentials we created earlier in this post then click on the Finish Setup button

Log in with your administrative account you created in the previous step. Now, you can customize and start working on your freshly installed ownCloud website.
Bringing it all together
That’s it! You have successfully installed ownCloud on Ubuntu 24.04.
Of course, you don’t have to install ownCloud on Ubuntu 24.04 if you use one of our ownCloud Hosting services, in which case you can simply ask our expert Linux administrators to install ownCloud on Ubuntu 24.04 for you for free. They are available 24×7 and will address your request immediately. Managing ownCloud websites is not just about the installation; we can help you optimize your ownCloud installation if you have an active service with us.
If you liked this post about how to install ownCloud on Ubuntu 24.04, please share it with your friends on the social networks using the share buttons below, or simply leave a comment in the comments section. Thanks.