
In this blog post, we will show you how to install Gitea on Ubuntu 26.04 OS. Gitea is a lightweight, open-source Git hosting platform used for managing software development projects and source code. It provides developers with a simple and efficient way to store repositories, track changes, review code, and collaborate with team members. Gitea includes features such as pull requests, issue tracking, project management tools, wikis, and user access control. It supports Git version control while requiring very few system resources, making it suitable for small teams, businesses, and personal projects. Gitea is easy to install, works on multiple operating systems, and can be self-hosted, giving users full control over their code, data, and development environment.
To install Gitea on Ubuntu 26.04 is a straightforward process that may take up to 15 minutes. Let’s get things done!
Table of Contents
Prerequisites
- A server running Ubuntu 26.04 OS
- A valid domain pointed to the server IP address
- User privileges: root or non-root user with sudo privileges
Step 1. Update the System
Before we start installing any software, we will update the system packages to their latest versions. To do that execute the following command:

apt update -y && apt upgrade -y
Step 2. Install Apache Web Server
Apache is important for Gitea because it can act as a reverse proxy, securely handle incoming web requests, support HTTPS, and forward traffic to the Gitea application running on the server.
To install the Apache Web server, execute the following command:
apt install apache2 -y
Once installed, start and enable the Apache service:
systemctl start apache2 && systemctl enable apache2
Check the status of the service:
systemctl status apache2
You should get the following output:
root@host:~# systemctl status apache2
● apache2.service - The Apache HTTP Server
     Loaded: loaded (/usr/lib/systemd/system/apache2.service; enabled; preset: enabled)
     Active: active (running) since Thu 2026-07-09 10:28:09 CDT; 14s ago
 Invocation: 63dbc08f8b52479a854c845767f4d4ea
       Docs: https://httpd.apache.org/docs/2.4/
   Main PID: 22320 (apache2)
     Status: "Total requests: 1; Idle/Busy workers 100/0;Requests/sec: 0.111; Bytes served/sec: 137 B/sec"
      Tasks: 55 (limit: 3770)
     Memory: 6.2M (peak: 6.2M)
        CPU: 180ms
     CGroup: /system.slice/apache2.service
Step 3. Install MariaDB database service
MariaDB is important for Gitea because it provides a reliable and efficient database for storing user accounts, repositories, issues, pull requests, and other application data.
To install the MariaDB database service, execute the following command:
apt install mariadb-server -y
Once installed, start and enable the MariaDB service:
systemctl start mariadb && systemctl enable mariadb
Check the status of the service:
systemctl status mariadb
You should get the following output:
root@host:~# systemctl status mariadb
● mariadb.service - MariaDB 11.8.6 database server
     Loaded: loaded (/usr/lib/systemd/system/mariadb.service; enabled; preset: enabled)
     Active: active (running) since Thu 2026-07-09 10:38:24 CDT; 29s ago
 Invocation: 5cf777443c6d41d79093a880eae1a61d
       Docs: man:mariadbd(8)
             https://mariadb.com/kb/en/library/systemd/
   Main PID: 23573 (mariadbd)
     Status: "Taking your SQL requests now..."
      Tasks: 13 (limit: 24887)
     Memory: 93.5M (peak: 97.9M)
        CPU: 4.237s
     CGroup: /system.slice/mariadb.service
             └─23573 /usr/sbin/mariadbd
Step 4. Create Gitea database and user
To create a Gitea database, Gitea user, and assign the correct permissions, execute the following commands:
CREATE USER 'giteauser'@'localhost' IDENTIFIED BY 'YourStrongPassword';

CREATE DATABASE giteadb;

GRANT ALL PRIVILEGES ON giteadb.* TO 'giteauser'@'localhost';

FLUSH PRIVILEGES;

EXIT;
Step 5. Install Gitea on Ubuntu 26.04
First, we need to add the system user “gitea”:
adduser --system --shell /bin/bash --group --disabled-password --home /home/gitea gitea
Once the user is added, download Gitea, copy it into the directory specified below, and set the correct permissions:
wget https://dl.gitea.com/gitea/1.26.0/gitea-1.26.0-linux-amd64

cp gitea-1.26.0-linux-amd64 /usr/bin/gitea

chmod 755 /usr/bin/gitea

chmod +x /usr/bin/gitea
Next, create the required directories in /var/lib/gitea and /etc/gitea, then set the appropriate ownership and permissions so that the gitea user has the necessary access to them.
mkdir -p /etc/gitea /var/lib/gitea/{custom,data,indexers,public,log}

chown gitea:gitea /etc/gitea /var/lib/gitea/{custom,data,indexers,public,log}

chmod 750 /var/lib/gitea/{data,indexers,log}

chmod 770 /etc/gitea
After creating the required directories and setting the correct ownership and permissions, you can proceed with creating the Gitea service.
Create a new file named gitea.service in the /etc/systemd/system directory using your preferred text editor. In this tutorial, we will use nano.
nano /etc/systemd/system/gitea.service
Paste the following lines of code:
[Unit]
Description=Gitea
[Service]
RestartSec=3s
Type=simple
User=gitea
Group=gitea
WorkingDirectory=/var/lib/gitea/

ExecStart=/usr/bin/gitea web --config /etc/gitea/app.ini
Restart=always
Environment=USER=gitea HOME=/home/gitea GITEA_WORK_DIR=/var/lib/gitea

[Install]
WantedBy=multi-user.target
Save the file, close it, and start and enable the service.
systemctl start gitea && systemctl enable gitea
Check the status of the service:
systemctl status gitea
You should get the following output:
root@host:/home/gitea# systemctl status gitea
● gitea.service - Gitea
     Loaded: loaded (/etc/systemd/system/gitea.service; enabled; preset: enabled)
     Active: active (running) since Thu 2026-07-09 10:49:36 CDT; 4s ago
 Invocation: 4c8ea941525a467aafd68df718ce92ea
   Main PID: 26392 (gitea)
      Tasks: 9 (limit: 3770)
     Memory: 73.6M (peak: 73.6M)
        CPU: 1.222s
     CGroup: /system.slice/gitea.service
             └─26392 /usr/bin/gitea web --config /etc/gitea/app.ini
Step 6. Create Apache Virtual Host File
To create an Apache configuration file, execute the following command:
touch /etc/apache2/sites-available/gitea.conf
Open the file
nano /etc/apache2/sites-available/gitea.conf
Paste the following lines of code:
<VirtualHost *:80>
ServerName yourdomain.com


ErrorLog ${APACHE_LOG_DIR}/yourdomain-error.log
CustomLog ${APACHE_LOG_DIR}/access.log combined

ProxyPreserveHost On
ProxyRequests off
AllowEncodedSlashes NoDecode
ProxyPass / http://localhost:3000/ nocanon
RequestHeader set "X-Forwarded-Proto" expr=%{REQUEST_SCHEME}

</VirtualHost>
Save the file and close it.
Enable the Apache configuration files for Gitea along with the rewrite module.
a2enmod rewrite

a2enmod proxy

a2enmod headers

a2ensite gitea.conf
Check the Apache2 syntax:
apachectl -t
You should receive the following output:
root@host:# apachectl -t
Syntax OK
If the syntax is OK, restart the Apache service.
systemctl restart apache2
That’s it! Now you can access your website securely at https://yourdomain.com
Step 7. Finish Gitea Installation
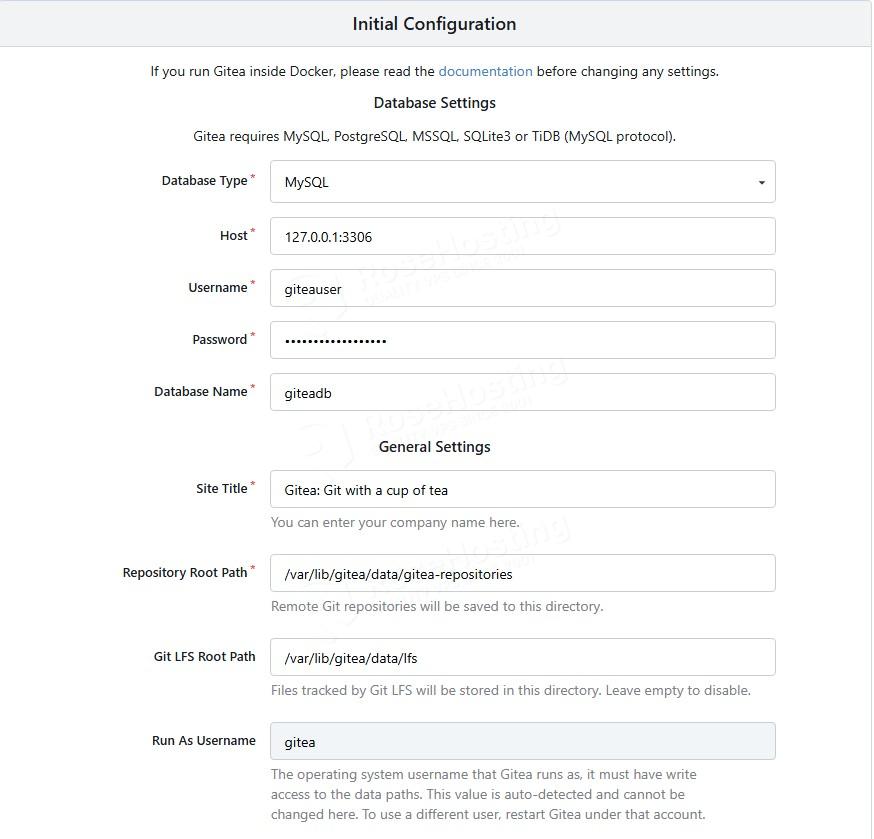
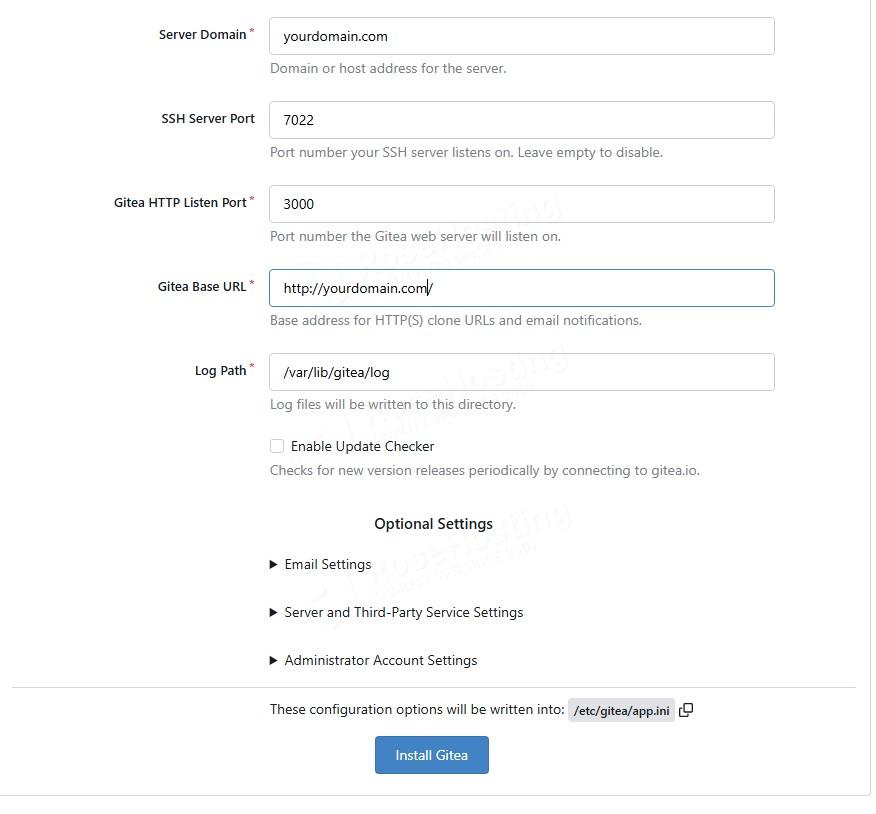
On the first screen, we need to enter the database credentials we created in step 4 above, and click “Install Gitea” to install Gitea on Ubuntu 26.04:
The installation will start:

After that, we need to enter an administrator username and password to register the first account in the system:

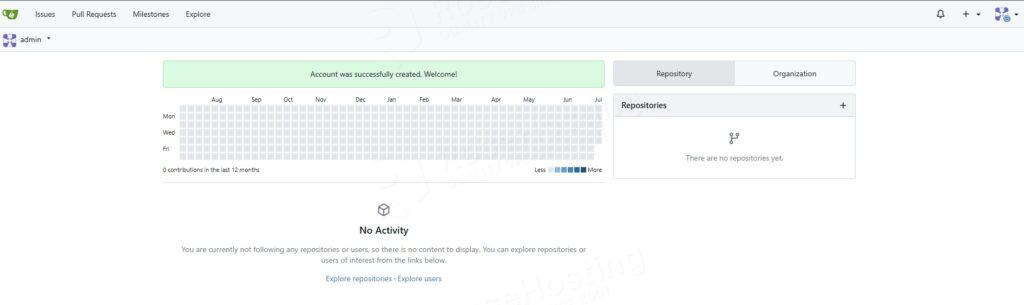
After clicking on “Register Account,” you will be redirected to the Gitea admin dashboard:
You’ve Managed to install Gitea on Ubuntu 26.04
That’s it. You successfully installed Gitea on Ubuntu 26.04 OS.
Of course, you do not have to install it yourself if you have difficulty and are not familiar with Linux. All you have to do is sign up for one of our VPS hosting plans and submit a support ticket. Our admins are available 24/7 and will help you with any aspect of installing Gitea.
If you liked this post on how to install Gitea on Ubuntu 26.04, please share it with your friends or leave a comment below.