
In this article, we will show you how to install and configure the CSF firewall on a Debian 9 VPS, as well as go through some tips on how to use CSF.
 ConfigServer Security & Firewall (CSF) is a free and advanced firewall management tool based on iptables. CSF provides a high level of security on your server and is very straightforward, making it easy to set up and install on all supported Linux distributions. We will use Debian 9 which is among the supported Linux distributions. CSF has many great features such as port scanning, SYN floods and brute force attacks for many services that can help you protect your server. One of the very nice features on CSF is that it provides a built-in web UI for managing the firewall from a web browser. This UI integration is supported by cPanel, DirectAdmin, as well as working independently on your server.
The CSF installation also comes with another service called Login Failure Daemon (LFD). LFD actually is a process that monitors the log files and sends email notifications based on the CSF configuration rules. Let’s begin with the installation.
Table of Contents
Step 1: Connect to your server
Before we begin, you need to connect to your server via SSH as the root user. Alternatively, you can use a user account with sudo privileges if you don’t have access to the root user. To do this, use the following command:
ssh root@IP_Address -p Port_Number
of course, you will need to replace IP_Address and Port_Number with your actual server IP address and SSH port number.
Once logged in, make sure that your server is up-to-date by running the following commands:
apt update
apt upgrade
Step 2: Install CSF/LFD
After you have successfully updated your server, you can run the following commands to change the current directory to /opt, download the latest CSF source code, and unpack it to the same directory.
cd /opt/
wget http://download.configserver.com/csf.tgz
tar xzf csf.tgz
Before proceeding with the installation, make sure that you are not using another firewall such as UFW. The following two commands will change the directory to /opt/csf/ and execute the installation script.
cd /opt/csf
sh install.sh
The installation of the firewall is complete, but it is best to check if the iptables modules are available which are required for proper functioning on CSF. You can do that with the command:
perl /usr/local/csf/bin/csftest.pl
Output:
Testing ip_tables/iptable_filter...OK
Testing ipt_LOG...OK
Testing ipt_multiport/xt_multiport...OK
Testing ipt_REJECT...OK
Testing ipt_state/xt_state...OK
Testing ipt_limit/xt_limit...OK
Testing ipt_recent...OK
Testing xt_connlimit...OK
Testing ipt_owner/xt_owner...OK
Testing iptable_nat/ipt_REDIRECT...OK
Testing iptable_nat/ipt_DNAT...OK

RESULT: csf should function on this server
If no fatal errors have been reported from your testing, the CSF firewall will work properly.
Step 3: Basic Configuration
If you want to configure the CSF firewall, you need to edit the configuration file ‘csf.conf’. In this tutorial, we will use nano as our editor, but you can freely use your favorite editor to edit the configuration file.
nano /etc/csf/csf.conf
The first thing we need to check in the configuration files are the open ports on your server. Typically, by default, the most commonly used ports are already open, but sometimes we need to open a specific port on the server. The following list is of the default opened ports by CSF:
# Allow incoming TCP ports
TCP_IN = "20,21,22,25,53,80,110,143,443,465,587,993,995"

# Allow outgoing TCP ports
TCP_OUT = "20,21,22,25,53,80,110,113,443,587,993,995"

# Allow incoming UDP ports
UDP_IN = "20,21,53"

# Allow outgoing UDP ports
# To allow outgoing traceroute add 33434:33523 to this list
UDP_OUT = "20,21,53,113,123"
If some of the default listed services are not being used on your server, the best practice is to close them. The less access there is to ports on your server, the better the security of your server becomes.
CSF offers many different options in the configuration files. But we will only cover some of the most commonly used settings.
ICMP_IN – This option is to control the availability of your server from PING. By default, this setting is set to 1 so that it can allow all incoming PING requests. If you choose to disable this option, you will not be able to use an external monitoring system.
IGNORE_ALLOW – If you enable this option, LFD will ignore all IP addresses that are listed in the csf.allow file. This option can be useful if you use a static IP address at home or in your office and you can be sure that this IP address will never be blocked from the server’s firewall.
SYNFLOOD, SUNFLOOD_RATE and SYNFLOOD_BURST – This option should be used only if your server is under a SYN flood attack. Please note that it is not recommended to enable this option because it will significantly slow down your server, and some visitors may have a connection problem.
LF_ALERT_TO and LF_ALERT_FROM – This is where you define the email addresses that you want to use for alerts.
TESTING – By default, TESTING is set to 1. This means that CSF enables a CRON job that clears your iptables configuration in case of configuration problems when you start CSF. This is a precautionary measure that should help you avoid getting locked out of your server. Once you are completely sure that all the settings are OK, you can set the value to zero which will enable the LFD service.
Once you define all the settings you prefer, you can save the configuration file and restart and enable the CSF and LFD services, which causes them to start automatically upon boot.
systemctl restart csf
systemctl enable csf
systemctl restart lfd
systemctl enable lfd
Step 4: CSF/LFD notifications
One of the many options of the CSF LFD are the various notifications that can help you monitor the events on your server. In this section of the article, we’ll show you how to activate or disable some of these notifications.
We will start with the system integrity alerts that check for changes in certain system files. These notifications help to detect compromised files, but you will also receive emails when changes are made with legitimate system updates.
You can leave these types of notifications if you want to track changes made to your system. If you have decided not to receive these notifications, you can disable them by finding the LF_INTEGRITY parameter in the csf.conf file and set its value to 0, or you can simply run the following command:
sed -i 's/LF_INTEGRITY = "3600"/LF_INTEGRITY = "0"/g' /etc/csf/csf.conf
The second type of notification that we would like to talk about is the excessive resource usage alert. These types of notifications are probably the most common. LFD has a feature that can monitor processes running on your server and send you emails if they use too many resources. The purpose of these notifications is to track the most intensive processes which can cause loading issues on the server. If you have decided not to receive these notifications, you can disable them by finding the PT_USERMEM and PT_USERTIME parameter in the csf.conf file and set its value to 0 or you can simply run the following commands:
sed -i 's/PT_USERTIME = "1800"/PT_USERTIME = "0"/g' /etc/csf/csf.conf
sed -i 's/PT_USERMEM = "512"/PT_USERMEM = "0"/g' /etc/csf/csf.conf
The Process Tracking option examines suspicious executable files or opened network ports on your server. These notifications help to detect potentially exploitative processes, even if these processes appear as system services. If you have decided to not receive these notifications, you can disable them by finding the PT_LIMIT parameter in the csf.conf file and set its value to 0 or you can simply run the following SSH command:
sed -i 's/PT_LIMIT = "60"/PT_LIMIT = "0"/g' /etc/csf/csf.conf
The last type of notifications that we will cover in this article are the alerts about the IP block.
CSF/LFD has the power to block IP addresses for certain reasons. Each time the system blocks an IP address, you will be notified by email containing the IP address that was blocked and the reason why it was blocked. If you want to manage these types of notification you can open your csf.conf file and find the following options:
LF_EMAIL_ALERT – Send an email alert if an IP address is blocked by one of the [*] triggers
LF_PERMBLOCK_ALERT – If an IP address was blocked more than a few times (to configure, use LF_PERMBLOCK_COUNT) then this option will send an email notification when the IP address is permanently blocked.
LF_NETBLOCK_ALERT – If an IP network class was blocked, you will receive an email notification.
LF_DISTFTP_ALERT – If LF_DISTFTP is triggered, you will receive an email notification with IP addresses that have been blocked with a reason for being involved in an FTP distributed attack.
LF_DISTSMTP_ALERT – If LF_DISTSMTP is triggered, you will receive an email notification with IP addresses that have been blocked with a reason for being involved in an SMTP distributed attack.
LT_EMAIL_ALERT – If an account exceeds the number of daily logins per IP address, then you will receive an email alert.
CT_EMAIL_ALERT – If an IP address is blocked due to connectivity tracking, then you will receive an email alert. These types of email alerts are triggered by the CT_LIMIT feature. The CT_LIMIT option is meant to protect your server from DOS attacks.
If you choose not to receive these notifications, you can turn them off by finding them in the csf.conf file and setting their values to 0, or you can simply run the following commands:
sed -i 's/LF_EMAIL_ALERT = "1"/LF_EMAIL_ALERT = "0"/g' /etc/csf/csf.conf
sed -i 's/LF_PERMBLOCK_ALERT = "1"/LF_PERMBLOCK_ALERT = "0"/g' /etc/csf/csf.conf
sed -i 's/LF_NETBLOCK_ALERT = "1"/LF_NETBLOCK_ALERT = "0"/g' /etc/csf/csf.conf
sed -i 's/LF_DISTFTP_ALERT = "1"/LF_DISTFTP_ALERT = "0"/g' /etc/csf/csf.conf
sed -i 's/LF_DISTSMTP_ALERT = "1"/LF_DISTSMTP_ALERT = "0"/g' /etc/csf/csf.conf
sed -i 's/LT_EMAIL_ALERT = "1"/LT_EMAIL_ALERT = "0"/g' /etc/csf/csf.conf
sed -i 's/CT_EMAIL_ALERT = "1"/CT_EMAIL_ALERT = "0"/g' /etc/csf/csf.conf
Once the changes have been made, you need to restart CSF and LFD using the following systemctl commands:
systemctl restart csf
systemctl restart lfd
Step 5: Manage CSF from the Command Line
You can manage CSF from the command line or through the built-in Web User Interface. In this part of the tutorial, we will make a short list of useful commands that can help you manage CSF from your command line.
Start, Stop and Restart/Reload CSF:
csf -s : Start csf
csf -f : Stop csf
csf -r : Reload/Restart csf
Allow an IP and add it to csf.allow (Whitelist an IP):
csf -a 123.45.67.89
Output:
Adding 123.45.67.89 to csf.allow and iptables ACCEPT...
ACCEPT all opt -- in !lo out * 123.45.67.89 -> 0.0.0.0/0
ACCEPT all opt -- in * out !lo 0.0.0.0/0 -> 123.45.67.89
Remove and delete an IP from csf.allow:
csf -ar 123.45.67.89
Output:
Removing rule...
ACCEPT all opt -- in !lo out * 123.45.67.89 -> 0.0.0.0/0
ACCEPT all opt -- in * out !lo 0.0.0.0/0 -> 123.45.67.89
Deny an IP and add to csf.deny (Blacklist an IP):
csf -d 123.45.67.89
Output:
Adding 123.45.67.89 to csf.deny and iptables DROP...
DROP all opt -- in !lo out * 123.45.67.89 -> 0.0.0.0/0
LOGDROPOUT all opt -- in * out !lo 0.0.0.0/0 -> 123.45.67.89
Remove and delete an IP from csf.deny (Unblock IP address):
csf -dr 123.45.67.89
Output:
Removing rule...
DROP all opt -- in !lo out * 123.45.67.89 -> 0.0.0.0/0
LOGDROPOUT all opt -- in * out !lo 0.0.0.0/0 -> 123.45.67.89
Remove and Unblock all IP addresses from csf.deny:
csf -df
Output:
DROP all opt -- in !lo out * 123.45.67.88 -> 0.0.0.0/0
LOGDROPOUT all opt -- in * out !lo 0.0.0.0/0 -> 123.45.67.88
DROP all opt -- in !lo out * 123.45.67.89 -> 0.0.0.0/0
LOGDROPOUT all opt -- in * out !lo 0.0.0.0/0 -> 123.45.67.89
csf: all entries removed from csf.deny
Search for a pattern match in iptables e.g: IP, CIDR, Port Number:
csf -g 123.45.67.89
Output:
Table Chain num pkts bytes target prot opt in out source destination
filter DENYIN 1 0 0 DROP all -- !lo * 123.45.67.89 0.0.0.0/0
filter DENYOUT 1 0 0 LOGDROPOUT all -- * !lo 0.0.0.0/0 123.45.67.89
Displays the current list of temporary allow and deny IP entries with their TTL and comment:
csf -t
Check for updates to csf and upgrade if available:
csf -u
Disable CSF and LFD completely:
csf -x
Enable CSF and LFD if previously disabled:
csf -e
Show the CSF version:
csf -v
Output:
csf: v13.04 (generic)
For more options you can check the following command:
csf -h
Step 6: Enable CSF Firewall Web UI
In this step, we will show you how to enable the CSF Web User Interface. This step is optional and it should be used only if you don’t use a control panel that supports the CSF UI (e.g. WHM/cPanel, DirectAdmin, Webmin, etc.)
The CSF UI requires several Perl modules to be installed on your server. You can meet these requirements by installing the Perl modules with the following command:
apt install libio-socket-ssl-perl libcrypt-ssleay-perl libnet-libidn-perl libio-socket-inet6-perl libsocket6-perl
Next is to enable the CSF Web User Interface. You can enable the CSF web interface by editing the csf.conf file:
nano /etc/csf/csf.conf
and update the following values:
# 1 to enable, 0 to disable web ui
UI = "1"

# Set port for web UI. The default port is 6666, but
# I change this to 7171 for easy access. The default port creates some issue
# with the chrome and firefox browsers (in my case)

UI_PORT = "7171"

# Leave blank to bind to all IP addresses on the server
UI_IP = ""

# Set username for authetnication
UI_USER = "admin"

# Set a strong password for authentication
UI_PASS = "Str0n9_PasSw0rD"
Feel free to change the values of our example with appropriate values. Once you make and save the changes, you can whitelist your public IP address by editing the ui.allow configuration file.
Replace the ‘Your_Public_IP_Address‘ with your actual IP address and execute the command:
sudo echo "Your_Public_IP_Address" >> /etc/csf/ui/ui.allow
To apply the changes you have made, you need to restart the LFD service. Restart the LFD daemon on your server by using the following command:
sudo service lfd restart
You should now be able to access the CSF UI on your browser with your server IP address and the specific port you used in the csf.conf file. In our example, we used the port 7171.
https://Your_Public_IP_Address:7171
After the successful login, you should be able to view the CSF user interface.
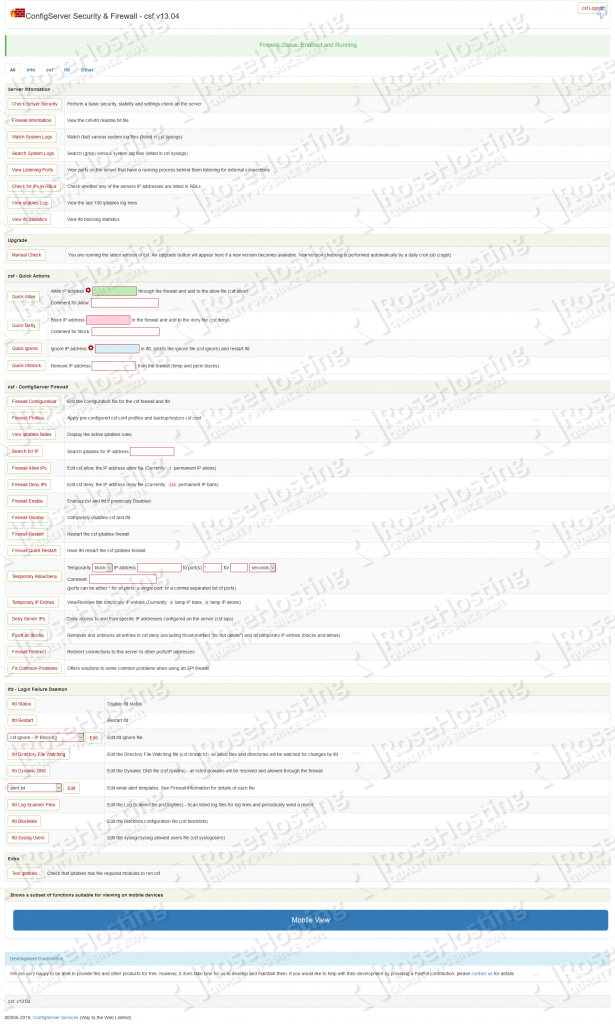
Quick Allow, Quick Deny or Quick Unblock can be very useful options from the CSF UI.
In this article, we showed you how to install and configure a Firewall with CSF on Debian 9, as well as shortly going over using CSF. Now you can use the knowledge of this guide and start to create your own CSF firewall rules which will help you to protect your server.
 Of course, if you are one of our Debian Hosting customers, you don’t have to configure your firewall with CSF on your server – simply ask our admins, sit back, and relax. Our admins will configure the firewall rules on your server for you immediately.
PS. If you liked this post about how to configure a Firewall with CSF on Debian 9, please share it with your friends on the social networks using the share buttons below, or simply leave a comment in the comments section. Thanks.
The only problem I have with CSF is their license is not GPL, MIT etc
Its some funny thing called the “The way of the web”.