
WireGuard is a free and open-source VPN (Virtual Private Network) protocol that aims to be the fastest and easiest VPN solution in the industry. WireGuard isn’t just another VPN protocol—it’s a radical overhaul designed to be faster, simpler, and more secure than legacy VPN technologies like OpenVPN and IPsec. WireGuard’s primary function is the same as a traditional VPN: creating a secure, encrypted “tunnel” between your device (the client) and the VPN server (the exit point). However, WireGuard significantly improves it. If you want to improve the security and speed of your connection, it’s time to switch to WireGuard. In this article, we will show you how to configure WireGuard VPN on Debian 13 for secure remote access.
Table of Contents
Prerequisites
- A Debian 13 VPS
- SSH root access or a regular system user with sudo privileges
Conventions
# – given commands should be executed with root privileges either directly as a root user or by use of sudo command
$ – given commands should be executed as a regular user
Step 1. Update the System
Let’s log in to your Debian 13 VPS through SSH as a root user or as a regular user with sudo privileges.
ssh root@IP_Address -p Port_numberIf you cannot log in as root, remember to substitute “root” with a user that has sudo privileges. Additionally, change “IP_Address” and “Port_Number” to make sure they match your server’s respective IP address and SSH port.
You can check whether you have the correct Debian version installed on your server with the following command:
# lsb_release -aYou should get this output:
No LSB modules are available.
Distributor ID: Debian
Description:  Debian GNU/Linux 13 (trixie)
Release:  13
Codename: trixie
Step 2. Install WireGuard
In this step, we will install WireGuard from the default Debian repository. Let’s run the command below to install it.
# apt install wireguardThat’s it! WireGuard has been successfully installed, but it’s not running now. Let’s proceed to the next step.
Step 3. Create a Private Key
You can use the ‘wg genkey’ command to generate your private key. Store your private key in a safe place. For example, in /etc/wireguard/wg_private.key with file permissions set to 600.
# wg genkey | tee /etc/wireguard/wg_private.keyOnce executed, the private key will be printed, similar to this:
cEZd21N+oTCvbDhel6tt9C91fJ7iwbq56ivqnj6YG2U=The same key will also be saved at /etc/wireguard/wg_private.key
Now, change the file permissions
# chmod 600 /etc/wireguard/wg_private.keyWe’ll need this private key to generate the public key for our WireGuard server.
Step 4. Create a Public Key
Now, create a public key from the private key we created earlier.
# cat /etc/wireguard/wg_private.key | wg pubkey | tee /etc/wireguard/wg_public.keyWe’ll need this public key to configure our WireGuard client (peer) connections. An example of a WireGuard public key used in this article:
IBVd5e4TS72l1MaUXRFTnyj/kMjcKe+iYwdHe8rhZ0k=
Step 5. Configure the WireGuard Server
Before configuring your WireGuard server, we need to select/define a private network IP range for the WireGuard connection you will use. We must use valid private network IP ranges. For example:
Between 10.0.0.0 - 10.255.255.255 (10.0.0.0/8)
Between 172.16.0.0 - 172.31.255.255 (172.16.0.0/12)
Avoid using IP ranges we already use or IP ranges frequently used by applications. For example, the default Docker installation uses the network 172.17.0.0/16. If you’re using Docker, you’ll need to use a different IP range for your WireGuard network to avoid conflicts.
In this article, I’ll use 10.10.10.0/24 for my WireGuard network.
You’ll also need to specify which port (UDP) WireGuard will use. Many network devices (such as Netgate, QNAP, and others) use UDP port 51280 for their default WireGuard configuration. For this article, I’ll be using UDP port 51822.
Now, we have all the basic information we need to run the WireGuard server:
Server Public IP: 192.168.93.140
Server Private Key: cEZd21N+oTCvbDhel6tt9C91fJ7iwbq56ivqnj6YG2U=
Server Public Key: IBVd5e4TS72l1MaUXRFTnyj/kMjcKe+iYwdHe8rhZ0k=
Server Listen Port: UDP port 51822
WireGuard Network: 10.10.10.0/24
Create a file named wg0.conf for your WireGuard configuration in the /etc/wireguard folder and fill it with the following example configuration:
/etc/wireguard/wg0.conf
The file should look like this:
[Interface]
PrivateKey = <YOUR_SERVER_PRIVATE_KEY>
Address = <YOUR_SERVER_WG_IP_ADDRESS>
ListenPort = <SERVER_UDP_LISTEN_PORT>
SaveConfig = true
Note: In the configuration above, we chose 10.10.10.1 as our server’s IP address on the WireGuard network.
Change <YOUR_SERVER_PRIVATE_KEY>, <YOUR_SERVER_IP_ADDRESS>, <SERVER_UDP_LISTEN_PORT> with the configuration you want.In this article, we will use this information as the configuration file.
[Interface]
PrivateKey = cEZd21N+oTCvbDhel6tt9C91fJ7iwbq56ivqnj6YG2U=
Address = 10.10.10.1/24
ListenPort = 51822
SaveConfig = true
Step 6. Allow IP Forwarding
In this article, we want to allow peers (clients/devices connected to our WireGuard network) to use the WireGuard server as their default gateway. This way, all outgoing network traffic (except to your local LAN/WLAN) will use this WireGuard server. If you’re using WireGuard for peer-to-peer purposes only, you don’t need this step.
Edit /etc/sysctl.conf and add net.ipv4.ip_forward=1 at the end of the file.
# nano /etc/sysctl.confAppend this line to the file above
net.ipv4.ip_forward=1Then, run sudo sysctl -p to reload the new configuration in /etc/sysctl.conf that we just modified.
# sysctl -pAfter that, you need to reset the firewall configuration so that peers (clients) can connect to the WireGuard server and client network traffic is routed correctly.
Step 7. Configure the Firewall
This should be done on your server. You need to add the WireGuard port so it is accessible from anywhere. In this article, we also consider using UFW as the firewall.
# ufw allow OpenSSH
# ufw allow proto udp to any port 51822
If the WireGuard port you configured is not 51822, change it accordingly.
Note that I also added OpenSSH to the allow list to prevent SSH connections from being dropped to the server if you haven’t previously configured/enabled a firewall.
Once completed, we can enable/restart UFW with the following command:
# ufw enableOr, to restart it, run:
# ufw reloadNext, you need to know which interface your server uses as its default route. To find out, you can use the ip route list default command.
# ip route list defaultThe command will print an output similar to this:
default via 192.168.93.140 dev ens33 proto staticNote the part after dev; that’s the default network interface. In the example above, our server’s default network interface is ens33.
Now, add the following configuration to /etc/wireguard/wg0.conf under the [Interface] section:
PostUp = ufw route allow in on wg0 out on ens33
PostUp = iptables -t nat -I POSTROUTING -o ens33 -j MASQUERADE
PreDown = ufw route delete allow in on wg0 out on ens33
PreDown = iptables -t nat -D POSTROUTING -o ens33 -j MASQUERADE
Change ens33 from the configuration above to match your server’s default network interface.
Your /etc/wireguard/wg0.conf configuration should look something like this:
[Interface]
PrivateKey = cEZd21N+oTCvbDhel6tt9C91fJ7iwbq56ivqnj6YG2U=
Address = 10.10.10.1/24
ListenPort = 51822
SaveConfig = true

PostUp = ufw route allow in on wg0 out on ens33
PostUp = iptables -t nat -I POSTROUTING -o ens33 -j MASQUERADE
PreDown = ufw route delete allow in on wg0 out on ens33
PreDown = iptables -t nat -D POSTROUTING -o ens33 -j MASQUERADE
The IP address 10.10.10.1/24 is the WireGuard VPN server IP. In the last step, we will use 10.10.10.5/24 as a client’s address for a client configuration sample.
Step 8. Start WireGuard
Now that our WireGuard server is ready, try running the WireGuard service using wg-quick (via systemd):
# systemctl start wg-quick@wg0.serviceNote that wg0 above is taken from the configuration file name in the /etc/wireguard folder (but without the .conf file extension). If the WireGuard configuration name is server.conf, you can run it using the systemctl start wg-quick@server.service command.
You can check the status now.
# systemctl status wg-quick@wg0.serviceThe command will print this output:
● wg-quick@wg0.service - WireGuard via wg-quick(8) for wg0
     Loaded: loaded (/usr/lib/systemd/system/wg-quick@.service; disabled; preset: enabled)
     Active: active (exited) since Mon 2026-05-11 05:06:29 EDT; 50s ago
 Invocation: 88f54d3dfebb49b68b4d1dc2a56664c0
       Docs: man:wg-quick(8)
             man:wg(8)
             https://www.wireguard.com/
             https://www.wireguard.com/quickstart/
             https://git.zx2c4.com/wireguard-tools/about/src/man/wg-quick.8
             https://git.zx2c4.com/wireguard-tools/about/src/man/wg.8
    Process: 2383 ExecStart=/usr/bin/wg-quick up wg0 (code=exited, status=0/SUCCESS)
   Main PID: 2383 (code=exited, status=0/SUCCESS)
   Mem peak: 10.1M
        CPU: 184ms

May 11 05:06:28 debian13 systemd[1]: Starting wg-quick@wg0.service - WireGuard via wg-quick(8) for wg0...
May 11 05:06:28 debian13 wg-quick[2383]: [#] ip link add wg0 type wireguard
May 11 05:06:28 debian13 wg-quick[2383]: [#] wg setconf wg0 /dev/fd/63
May 11 05:06:28 debian13 wg-quick[2383]: [#] ip -4 address add 10.10.10.1/24 dev wg0
May 11 05:06:28 debian13 wg-quick[2383]: [#] ip link set mtu 1420 up dev wg0
May 11 05:06:28 debian13 wg-quick[2383]: [#] ufw route allow in on wg0 out on ens33
May 11 05:06:29 debian13 wg-quick[2415]: Rules updated
May 11 05:06:29 debian13 wg-quick[2415]: Rules updated (v6)
May 11 05:06:29 debian13 wg-quick[2383]: [#] iptables -t nat -I POSTROUTING -o ens33 -j MASQUERADE
May 11 05:06:29 debian13 systemd[1]: Finished wg-quick@wg0.service - WireGuard via wg-quick(8) for wg0.
Step 9. Configure WireGuard Client
First, create the directory to store all your client configuration files:
# mkdir /etc/wireguard/clientsThe WireGuard client will load any file that ends in .conf, so you can give them descriptive names. In this article, we can create a wireguard-vpn-client.conf
But first, we need to generate a key pair:
# wg genkeyThe command prints an output like this. You will get a different output:
yLHRt9BuimOp6k9v+gT41gvfL41q1FqsiXdbPdKZh0E=The private key above will be needed in our vpn client file.
Now, run this command:
# echo 'yLHRt9BuimOp6k9v+gT41gvfL41q1FqsiXdbPdKZh0E=' | wg pubkeyMake sure to replace the key with your own key; you got it in the previous command. This command prints the public key; we do not need to save it.
Next, let’s run the wg genkey command again. This time, the key will be used as the PRESHARED key.
# wg genkeyThe command printed an output similar to this:
CLirEWiBO1c8Ozy22hANQkL/REmzoB90ZHNHB7GyTkU=Next, run this command to generate the public key again:
# echo 'CLirEWiBO1c8Ozy22hANQkL/REmzoB90ZHNHB7GyTkU=' | wg pubkeyReplace CLirEWiBO1c8Ozy22hANQkL/REmzoB90ZHNHB7GyTkU= with your own key.
Now, with the keys above, we can create the configuration file.
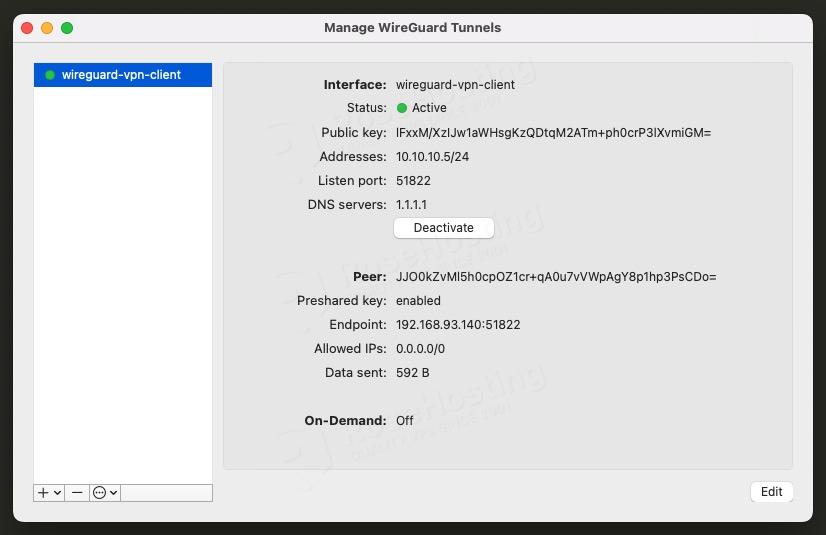
# nano /etc/wireguard/clients/wireguard-vpn-client.conf Insert these into the file.
[Interface]
Address = 10.10.10.5/24
ListenPort = 51822
PrivateKey = yLHRt9BuimOp6k9v+gT41gvfL41q1FqsiXdbPdKZh0E=
DNS = 1.1.1.1

[Peer]
PublicKey = JJO0kZvMl5h0cpOZ1cr+qA0u7vVWpAgY8p1hp3PsCDo=
PresharedKey = CLirEWiBO1c8Ozy22hANQkL/REmzoB90ZHNHB7GyTkU=
AllowedIPs = 0.0.0.0/0
Endpoint = 192.168.93.140:51822
Replace 192.168.93.140 with your WireGuard VPN server’s IP address.
Save the file, then exit. You can use this file to connect to your WireGuard VPN server using a WireGuard VPN client.
Congratulations! You have learned how to configure WireGuard VPN on Debian 13 for secure remote access.
Of course, you don’t have to spend your time following this article to configure WireGuard VPN on Debian 13 for secure remote access if you have an active Debian 13 VPS Hosting service with us, in which case you can simply ask our expert Linux admins to install Mattermost for you. Simply log in to the client area, then submit a ticket. Our expert administrators are available 24×7 and will respond to your request immediately.
If you liked this post on how to configure WireGuard VPN on Debian 13 for secure remote access, please share it with your friends or leave a comment below.