NFS (Network File System) is a file-sharing protocol designed to function over a network. NFS storage allows us to share anything through a network using any Linux distros. This system was initially developed by Sun Microsystems that allow Linux users to store, share, view, and update files on a remote system as if it was in their local machine. In this article, we will show you how to install and connect to NFS networked storage on Linux.
Table of Contents
Prerequisites
- Two VPS, one for NFS server and the other for NFS client
- root access or a system user with user privileges
Step 1. Update Your System
First of all, we need to log in to our VPS through SSH:
ssh master@IP_Address -p Port_number
Replace “master” with a user that has sudo privileges or root if necessary. Additionally, replace “IP_Address” and “Port_Number” with your server’s respective IP address and SSH port number.
Next, we are going to update our server that will act as the NFS server. Let’s execute the command below to update it. Make sure you run the command that suits your operating system.
Ubuntu/Debian
$ sudo apt update
CentOS/AlmaLinux/RockyLinux
$ sudo dnf update
That’s it, the package index on your Linux machine has been updated. We can proceed to the next step now.
Step 2. Install NFS Server
The NFS package is available on all of the most common Linux distributions. We just need to install it from the existing repository, simply run the command below.
Ubuntu/Debian
$ sudo apt install nfs-kernel-server
CentOS/AlmaLinux/RockyLinux
$ sudo dnf install nfs-utils
At this point, the NFS server has been installed. On Ubuntu/Debian, the service was already set to active, but that is not the case on CentOS/AlmaLinux/RockyLinux. So, if you are using CentOS/AlmaLinux/RockyLinux as your NFS server, we can run this command:
$ sudo systemctl enable nfs-server
Step 3. Configure NFS Server
In this step, we are going to create a directory to share with other users in the same local network. Then, we need to edit the exports file to be able to run the NFS server.
In this case, we’re sharing the folder /mnt/shared – you can change this to any folder you want.
Ubuntu/Debian
$ sudo mkdir /mnt/shared
$ sudo chown nobody:nogroup /mnt/shared
$ sudo chmod 777 /mnt/shared
CentOS/AlmaLinux/RockyLinux
$ sudo mkdir /mnt/shared
$ sudo chown nobody:nobody /mnt/shared
$ sudo chmod 777 /mnt/shared
After creating the directory to share and correcting its permissions, we can edit the /etc/exports file.
$ sudo nano /etc/exports
Insert this line into the file to share the folder /mnt/shared to the network 192.168.53.0 with a subnet mask of /24 or 255.255.255.0:
/mnt/shared 192.168.53.0/255.255.255.0(rw,sync,no_subtree_check)
Make sure to replace 192.168.53.0/255.255.255.0 with your subnet IP and subnet mask.
Save the file then exit from the editor. Please note that with the line above, you are allowing all computers on the same network to access /mnt/shared. If you want to share the NFS server only with a single IP address, you can use this line instead and replace 192.168.53.111 with your NFS client’s IP address:
/mnt/shared 192.168.53.111(rw,sync,no_subtree_check)
Every time you make changes to /etc/exports file, you need to run this command below to apply the changes:
$ sudo exportfs -a
Now that we installed everything, we can connect to the NFS server.
Step 4. Install NFS Client
Now, let’s log in to the second server that is going to be used as the NFS client. Once logged in, we can invoke this command below to install the NFS client package.
Ubuntu/Debian
$ sudo apt install nfs-common
CentOS/AlmaLinux/RockyLinux
$ sudo dnf install nfs-utils
That’s all – the NFS client installation should be completed now.
Step 5. Connect to NFS Server
On your second server where the NFS client is installed, we need to create a directory in which we’ll mount the networked storage. In this case we’ll use /opt/remote_storage, but you can create and use any directory you want.
$ sudo mkdir /opt/remote_storage
With the directory created, we can now mount the NFS networked storage to /opt/remote_storage
Of course, remember to change 192.168.53.131 with the IP address of your NFS server.
$ sudo mount -t nfs 192.168.53.131:/mnt/shared /opt/remote_storage
You can test the NFS networked storage by creating an empty file using the NFS client:
$ touch /opt/remote_storage/test_file
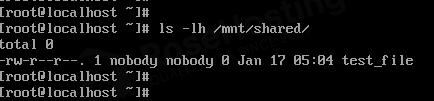
Now, log in to the other server where the NFS server was installed, then check the directory:
$ ls -lh /mnt/shared
There you will see the file called test_file which you created earlier.
That’s it! You have successfully installed NFS server and were able connect to it from your other server as an NFS client.
Connect to NFS Server on Reboot
Now, if you want your NFS client to always connect to the NFS server (like when restarting for example), we need to modify the fstab (filesystem table) file. No matter which Linux distribution your NFS client is running, you can edit the fstab file in the same location.
$ sudo nano /etc/fstab
Then, insert the following into the file:
192.168.53.131:/mnt/shared /opt/remote_storage nfs defaults 0 0
Again, do not forget to replace the directories that you used, as well as replacing 192.168.53.131 with your NFS server IP address. Save the file then exit. Now, every time the server is rebooted, it will automatically mount the remote NFS storage, and you should be able to access the NFS storage at /opt/remote_storage/ directory.
Congratulations! You have successfully installed and connected to NFS networked storage on your Linux machine.
Of course, if you are one of our Managed Linux Hosting customers, you don’t have to install and connect to NFS networked storage on Linux yourself – simply ask our admins, sit back, and relax. One of our experienced admins will install and connect to NFS networked storage on Linux for you immediately without any additional fee, along with many useful optimizations that we can do for you.
If you liked this post about how to install and connect to NFS networked storage on Linux, please share it with your friends on the social networks using the share buttons below, or simply leave a comment in the comments section. Thanks.