In this blog post, we will show you how to install and use Portainer for Docker Container Management on Ubuntu 26.04 OS. Portainer is a lightweight container management platform that provides a web-based graphical interface for managing container environments. It simplifies tasks such as deploying applications, monitoring containers, managing images, networks, volumes, and user access without relying solely on command-line tools. Portainer works with Docker by connecting to the Docker Engine API, allowing users to create, start, stop, and manage Docker containers through an intuitive dashboard. It is especially useful for beginners, teams, and administrators who want to streamline container management while improving visibility and operational efficiency.
To install and use Portainer on Ubuntu 26.04, you must install Docker Engine first, create a persistent data volume, and then deploy the Portainer Community Edition (CE) container. Let’s get started!
Table of Contents
Prerequisites
- A server running Ubuntu 26.04 OS
- User privileges: root or non-root user with sudo privileges
Step 1. Update your system
Before installing Docker and Portainer, we will update the system packages to the latest available versions. Run the following command in your Ubuntu 26.04 terminal:

apt update -y && apt upgrade -y
Step 2. Install Docker
To install Docker, first we need to install some dependencies:
apt install software-properties-common apt-transport-https ca-certificates -y
Next, add the Docker GPG key:
curl -fsSL https://download.docker.com/linux/ubuntu/gpg | gpg --dearmor -o /usr/share/keyrings/docker-archive-keyring.gpg
Next, we add the repository:
echo "deb [arch=amd64 signed-by=/usr/share/keyrings/docker-archive-keyring.gpg] https://download.docker.com/linux/ubuntu $(lsb_release -cs) stable" | sudo tee /etc/apt/sources.list.d/docker.list > /dev/null
Once the repo is added, update the system and install Docker:
apt update -y

apt install docker-ce docker-ce-cli containerd.io docker-buildx-plugin docker-compose-plugin -y
Once the installation is complete, start and enable the Docker service:
systemctl start docker && systemctl enable docker
To check the status of the Docker service, execute the command below:
systemctl status docker
You should get the following output:
root@host:~# systemctl status docker
● docker.service - Docker Application Container Engine
     Loaded: loaded (/usr/lib/systemd/system/docker.service; enabled; preset: enabled)
     Active: active (running) since Sat 2026-07-18 17:09:53 CDT; 17s ago
 Invocation: 9e014c9878804a6dbf80ca98c2cef018
TriggeredBy: ● docker.socket
       Docs: https://docs.docker.com
   Main PID: 2495 (dockerd)
      Tasks: 10
     Memory: 26.5M (peak: 26.7M)
        CPU: 2.417s
     CGroup: /system.slice/docker.service
             └─2495 /usr/bin/dockerd -H fd:// --containerd=/run/containerd/containerd.sock
Step 3. Install Portainer
Portainer runs as a lightweight container itself, directly communicating with the Docker daemon via local sockets.
First, we need to create a persistent Docker volume to store Portainer’s configurations and database:
docker volume create portainer_data
Once the volume is created, the next step is to download and deploy the Portainer CE container:
docker run -d \
  -p 8000:8000 \
  -p 9443:9443 \
  --name portainer \
  --restart=always \
  -v /var/run/docker.sock:/var/run/docker.sock \
  -v portainer_data:/data \
  portainer/portainer-ce:latest
The output should look like this:
latest: Pulling from portainer/portainer-ce
4f4fb700ef54: Pull complete
a6015988a0f3: Pull complete
c0543fe2c6ef: Pull complete
6b472224a244: Pull complete
a70dc7213cc7: Pull complete
ff9f211b5321: Pull complete
16bafc33c96f: Pull complete
2d434d89d617: Download complete
c79debbfc99f: Download complete
Digest: sha256:f6bc23d1695530a609563fd65c180aaafec0fc02e019d5fc63d16b6fbe83addd
Status: Downloaded newer image for portainer/portainer-ce:latest
931336722f6e3ed8000fba9ca8670d4594b515f804b7a52b483731e1bd274fb7
Once the container is up and running, it is important to open port 9443 to allow traffic.
ufw allow 9443/tcp

ufw reload
If the UFW service is not active, you can skip those commands.
Step 4. Access and Configure the Portainer Web UI
Before accessing the Portainer UI, you will need the setup token. To find the setup token, we need to know the container ID first. To check the container ID, execute the following command:
docker ps --format "{{.ID}}\t{{.Names}}"
In the output, only the ID and the Name will be displayed:
931336722f6e portainer
As you can see, the container ID is 931336722f6e. So, to check the setup token, we need to execute the following command:
docker logs 931336722f6e 2>&1 | grep "setup_token"
The output should look like this:
2026/07/18 10:11PM INF github.com/portainer/portainer/api/cmd/portainer/main.go:256 > no administrator account configured; admin initialization and backup restore require this setup token in the X-Setup-Token header. Start with --no-setup-token to disable. | setup_token=676137f6cb71146c64092609a8d8993236501d61558646dff3f99b280742001b
As you can see, the setup_token is 676137f6cb71146c64092609a8d8993236501d61558646dff3f99b280742001b.
Copy this token and paste it into the first window when accessing https://YourServerIPAddress:9443
IMPORTANT: You must do this within 5 minutes of launching the container. If you miss this window, restart Portainer using docker restart portainer to reset the timer)
docker restart portainer
To access the Portainer User Interface, visit the following URL:
https://YourServerIPAddress:9443
The browser will display a self-signed certificate warning. This is safe to bypass in a local environment; click “Advanced” and proceed)
In the input fields, set the admin password to at least 12 characters long and paste the setup token:
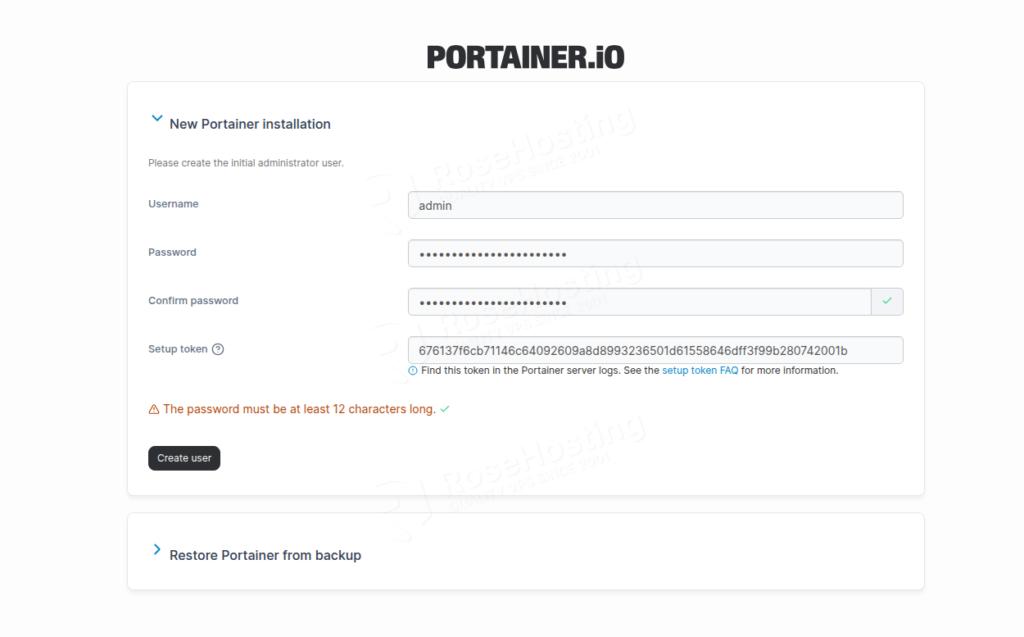
Click on Create User, and you will be redirected to the Portainer Admin Dashboard:
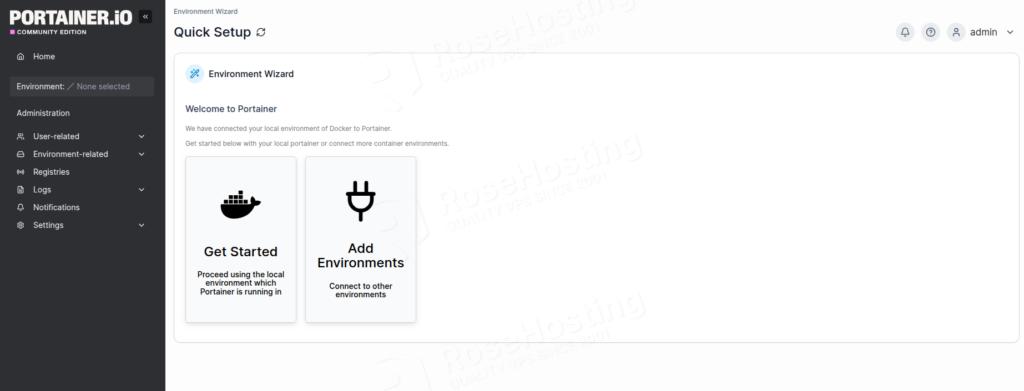
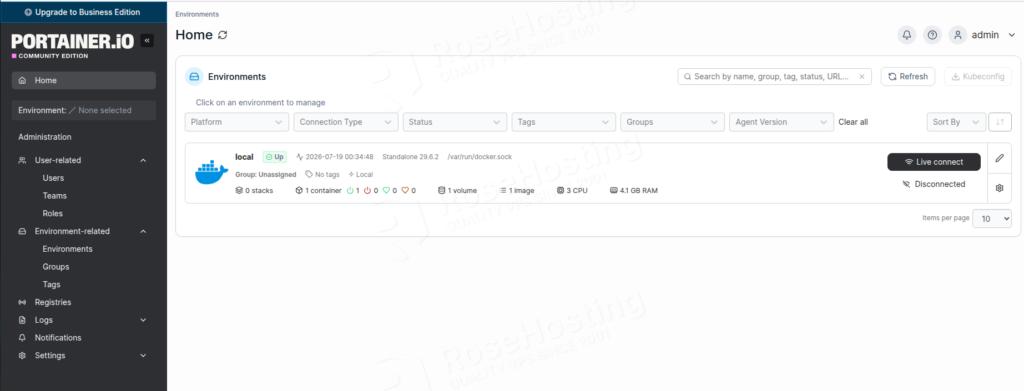
On the environment selection screen, choose Get Started to connect to the local Docker engine running Portainer.
Wrap Up
That’s it. You successfully installed Portainer for Docker Container Management on Ubuntu 26.04 OS.
Of course, you don’t have to install it by yourself if you have difficulties and are not familiar with Linux. You can always contact our technical support. You only need to sign up for one of our monthly management plans and submit a support ticket. We are available 24/7 and will address your request immediately.
If you liked this post about installing and using Portainer for Docker Container Management on Ubuntu 26.04, please share it with your friends or leave a comment below.