Rick Ellis created the CodeIgniter framework in 2006. As an open-source platform, CodeIgniter’s continuous integration serves web and application development. This framework was developed for developers who want to use the PHP programming language to create websites or applications. The goal of CI’s continuous integration is to simplify and accelerate developers’ projects. CodeIgniter developers argue that when developers have to write their own code from scratch, performance can sometimes take longer. In this article, we will show you how to install CodeIgniter on Debian 13.
Table of Contents
Prerequisites
- A Debian 13 VPS is necessary for installing CodeIgniter on this version.
- SSH root access or a regular system user with sudo privileges
Conventions
# – given commands should be executed with root privileges either directly as a root user or by use of sudo command
$ – given commands should be executed as a regular user
Step 1. Update the System
Let’s log in to your Debian 13 VPS through SSH as a root user or as a regular user with sudo privileges.
ssh root@IP_Address -p Port_numberIf you cannot log in as root, remember to substitute “root” with a user that has sudo privileges. Additionally, change “IP_Address” and “Port_Number” to make sure they match your server’s respective IP address and SSH port.
You can check whether you have the correct Debian version installed on your server with the following command:
# lsb_release -aYou should get this output:
No LSB modules are available.
Distributor ID: Debian
Description:  Debian GNU/Linux 13 (trixie)
Release:  13
Codename: trixie
Step 2. Install PHP
According to their documentation page at https://codeigniter.com/user_guide/intro/requirements.html, the latest version of CodeIgniter does not support PHP lower than version 8.4. Since Debian 13 ships with PHP 8.4, we can simply install it from the default repository, facilitating the installation of CodeIgniter on Debian 13.
# apt install php-{bcmath,common,curl,fpm,gd,intl,mbstring,mysql,soap,xml,zip,cli}Step 3. Install Composer
In this step, we are going to install Composer, which is essential for CodeIgniter installation on Debian 13. The installation is fairly easy and straightforward.
# curl -sS https://getcomposer.org/installer -o composer-setup.php
# php composer-setup.php --install-dir=/usr/local/bin --filename=composer
That’s it. To check the version of the installed Composer, you can run this command:
# composer -VStep 4. Install MySQL
CodeIgniter supports multiple database engines, like MySQL/MariaDB, PostgreSQL, SQLite3, Microsoft SQL Server, or Oracle Database. In this step, we are going to install MariaDB from the default Debian 13 repository, which will help in setting up CodeIgniter on Debian 13. To install the MariaDB server, execute the command below:
# apt install mariadb-server MariaDB should be up and running now.
Step 5. Create a Database
On Debian 13, MariaDB will start automatically upon installation. Since the database server is up and running now, we can log in to MySQL shell and create a database for our CodeIgniter website, enabling its installation on Debian 13.
# mysql Once logged in to the MySQL shell, we can run the following commands.
mysql> CREATE DATABASE codeigniter;
mysql> GRANT ALL on codeigniter.* to codeigniter@localhost identified by 'm0d1fyth15';
mysql> FLUSH PRIVILEGES;
mysql> \q
Remember to replace m0d1fyth15 with a stronger password.
Step 6. Install CodeIgniter
We can install CodeIgniter by directly downloading the installation file or by using Composer to install CodeIgniter on Debian 13. To install CI 4 with Composer, type the following command:
# cd /var/www/html
# composer create-project codeigniter4/appstarter rosehosting -vvv
Wait for the process to complete.
There are several arguments we passed to this command:
create-project is the command to create a new project with Composer;
codeigniter4/appstarter is the CodeIgniter file to be downloaded;
rosehosting is the name of the project we will create;
-vvv allows you to view the installation process in more detail.
Once the process is complete, you will have a new folder called rosehosting in the directory where you execute the command from.
Step 7. Configure CodeIgniter
To start making a configuration file, we can copy the sample env file to .env
# cp -a env .envNow, we can edit the .env file.
# nano .env#--------------------------------------------------------------------
# ENVIRONMENT
#--------------------------------------------------------------------
CI_ENVIRONMENT = developmentNow add the database details.
#--------------------------------------------------------------------
# DATABASE
#--------------------------------------------------------------------

database.default.hostname = localhost
database.default.database = codeigniter
database.default.username = codeigniter
database.default.password = m0d1fyth15
database.default.DBDriver = MySQLi
Also, configure the URL to access the CodeIgniter4 web UI.
app.baseURL = 'http://ci.yourdomain.com'Replace ci.yourdomain.com with your actual domain name pointing to your server. Save the file, then exit from the editor.
Now, we can give the CodeIgniter files the correct permissions.
# chown -R www-data: /var/www/html/rosehosting/
Step 8. Install and Configure Nginx
In this tutorial, we will install and use Nginx, not Apache. This is crucial when dealing with CodeIgniter installation on Debian 13. Let’s execute the following command to install it.
# apt -y install nginxUpon installation, Nginx will automatically run. It is also configured to start automatically upon reboot.
Now, let’s create an Nginx server block for the domain name you will use for accessing CodeIgniter. For example, we will use ci.yourdomain.com
# nano /etc/nginx/conf.d/codeigniter.conf Insert the following into the file.
upstream codeigniter {
server unix:/run/php/php8.4-fpm.sock;
}
server {
listen 80
root /var/www/html/rosehosting/public;
index index.php;
server_name _;
location / {
try_files $uri $uri/ /index.php;
}
location ~ \.php$ {
include snippets/fastcgi-php.conf;
fastcgi_pass codeigniter;
fastcgi_param SCRIPT_FILENAME $document_root$fastcgi_script_name;
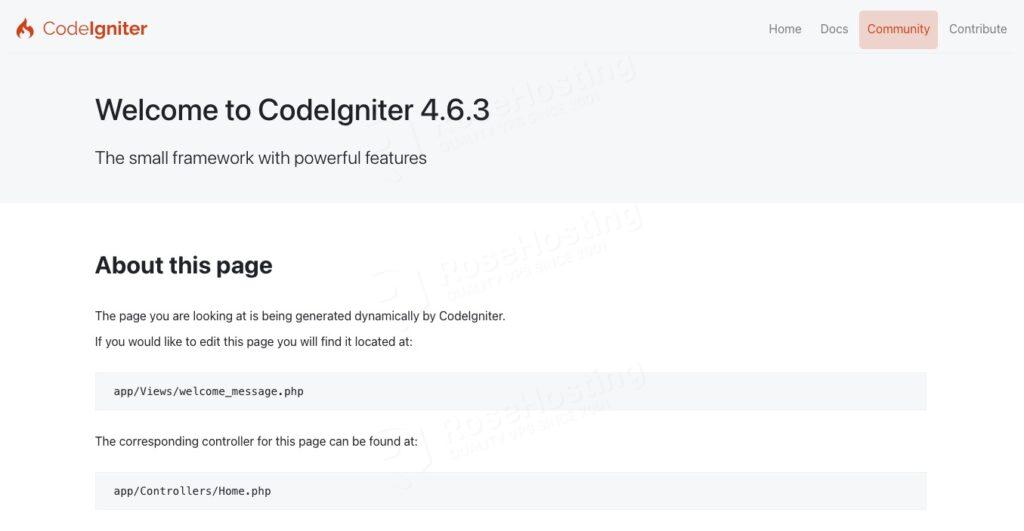
}That’s it! You can now go to http://ci.yourdomain.com and start building your CodeIgniter website.
Follow the CodIgniter documentation to learn more.
Of course, you don’t have to install CodeIgniter on Debian 13 if you use one of our Debian VPS Hosting services, in which case you can ask our expert Linux administrators to install CodeIgniter on Debian 13 for you for free. They are available 24×7 and will take care of your request immediately. Managing CodeIgniter websites is not just about the installation; we can help you optimize your CodeIgniter installation if you have an active service with us.
If you liked this post about how to install CodeIgniter on Debian 13, please share it with your friends, or simply leave a comment below. Thanks.