
Django is a free and open-sourced web framework written in Python that follows the MVT (Model-View-Template) architectural pattern.
In this blog post, we will explain in step-by-step detail how to install the Django framework on AlmaLinux 9 OS.
This framework is used worldwide by many developers and companies, and its usage is rapidly increasing on a daily basis. With Django web framework can be built from the simplest to the most complex web applications.
Installing Django Web Framework on AlmaLinux is a very simple process that may take up to 15 minutes. Let’s get started!
Table of Contents
Prerequisites
- A server with AlmaLinux 9 as OS
- Valid domain pointed to the servers IP address
- User privileges: root or non-root user with sudo privileges
Step 1. Update the System
Every fresh installation of the operating system needs the packages to be updated to the latest version available.
sudo dnf update -y && sudo dnf upgrade -y
Step 2. Install Python3
To install Python3, first, we will use some Python3 dependencies with the following command:
yum install wget yum-utils make gcc openssl-devel bzip2-devel libffi-devel zlib-devel sqlite-devel -y
Once the Python3 dependencies are installed, update the system and download Python3
yum update

wget https://www.python.org/ftp/python/3.10.5/Python-3.10.5.tgz
Extract the Python3 file by using the below command:
tar xzf Python-3.10.5.tgz

cd Python-3.10.5
Install Python3 with the following command:
./configure

make altinstall
Once installed, check the python version:
python3 --version
You should receive the following output:
[root@host Python-3.10.5]# python3.10 --version
Python 3.10.5
Step 3. Create Python Virtual Environment
To create the Python virtual environment and activate it execute the following commands:
cd /home/

python3 -m venv django-venv

source django-venv/bin/activate
Step 4. Install Django Web Framework
Now, when the Django virtual environment is created and activated, we can proceed with installing the Django Web Framework:
pip3 install django
After successful installation, you should see the following output:
(django-venv) [root@host home]# pip3 install django
Collecting django
  Downloading Django-4.1.7-py3-none-any.whl (8.1 MB)
     ━━━━━━━━━━━━━━━━━━━━━━━━━━━━━━━━━━━━━━━━ 8.1/8.1 MB 5.1 MB/s eta 0:00:00
Collecting asgiref<4,>=3.5.2
  Downloading asgiref-3.6.0-py3-none-any.whl (23 kB)
Collecting sqlparse>=0.2.2
  Downloading sqlparse-0.4.3-py3-none-any.whl (42 kB)
     ━━━━━━━━━━━━━━━━━━━━━━━━━━━━━━━━━━━━━━━━ 42.8/42.8 KB 5.7 MB/s eta 0:00:00
Installing collected packages: sqlparse, asgiref, django
Successfully installed asgiref-3.6.0 django-4.1.7 sqlparse-0.4.
Step 5. Create Django Project
To install the Django project, you need to execute the following command in the virtual environment:
django-admin startproject djangoproject .
Check the Django project directory:
(django-venv) [root@host home]# ls -al
total 20
drwxr-xr-x.  4 root root 4096 Apr  2 16:48 .
dr-xr-xr-x. 19 root root 4096 Mar 31 12:55 ..
drwxr-xr-x   2 root root 4096 Apr  2 16:48 djangoproject
drwxr-xr-x   5 root root 4096 Apr  2 16:40 django-venv
-rwxr-xr-x   1 root root  669 Apr  2 16:48 manage.py
After project creation, we need to migrate the database:
python3 manage.py migrate
After successful migration, you will receive the following output:
(django-venv) [root@host home]# python3 manage.py migrate
Operations to perform:
  Apply all migrations: admin, auth, contenttypes, sessions
Running migrations:
  Applying contenttypes.0001_initial... OK
  Applying auth.0001_initial... OK
  Applying admin.0001_initial... OK
  Applying admin.0002_logentry_remove_auto_add... OK
  Applying admin.0003_logentry_add_action_flag_choices... OK
  Applying contenttypes.0002_remove_content_type_name... OK
  Applying auth.0002_alter_permission_name_max_length... OK
  Applying auth.0003_alter_user_email_max_length... OK
  Applying auth.0004_alter_user_username_opts... OK
  Applying auth.0005_alter_user_last_login_null... OK
  Applying auth.0006_require_contenttypes_0002... OK
  Applying auth.0007_alter_validators_add_error_messages... OK
  Applying auth.0008_alter_user_username_max_length... OK
  Applying auth.0009_alter_user_last_name_max_length... OK
  Applying auth.0010_alter_group_name_max_length... OK
  Applying auth.0011_update_proxy_permissions... OK
  Applying auth.0012_alter_user_first_name_max_length... OK
  Applying sessions.0001_initial... OK
Step 6. Create Django Superuser
To create a Django superuser for managing the Django Admin Dashboard execute the command below:
python3 manage.py createsuperuser
While creating the superuser, the prompt will ask you for an admin username, email, and password:
(django-venv) [root@host home]# python3 manage.py createsuperuser
Username (leave blank to use 'root'): admin
Email address: admin@yourdomain.com
Password:
Password (again):
Superuser created successfully.
Step 7. Start Django Project
Before starting the Django project, we need to add the IP address in the settings.py file:
nano djangoproject/settings.py
Paste the IP address in the Allowed Hosts array, save the file and close it.
ALLOWED_HOSTS = ['YourServerIPAddress']
To start the Django project on a port, for example 8000, execute the following command:
python3 manage.py runserver YOUR_SERVER_IP_ADDRESS:8000
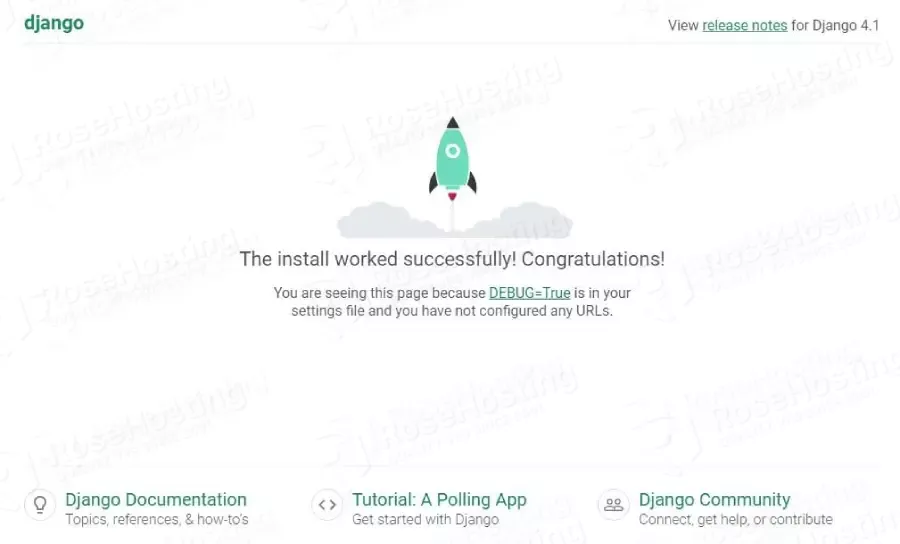
Once the Django project is up and running, you can access it at YOUR_SERVER_IP_ADDRESS:8000
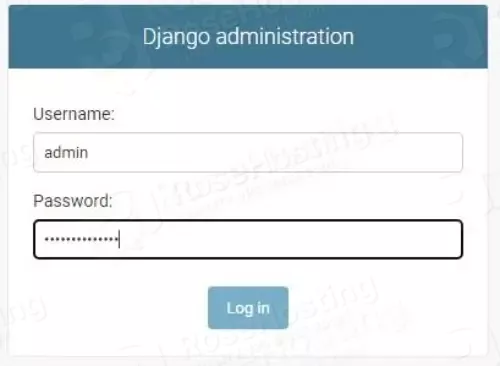
To access the Admin dashboard, you can use the following URL: YOUR_SERVER_IP_ADDRESS:8000/admin/
Congratulations, you successfully installed and started Django Web Framework on AlmaLinux 9 OS
If you find any difficulties with installing Django Web Framework, you can contact our technical support, and they will help you with any aspect of installing and configuring. Our technical support is available 24/7 via live chat and support tickets.
If you liked this post on installing Django Web Framework on AlmaLinux 9 OS, please share it with your friends on social networks or simply leave a reply below.