
In this article, we will show you how to install Etherpad on a managed Debian 9 server.
 Etherpad is a real-time editor that is web-based and comes as an open-source package. This application allows users to simultaneously edit documents in real time and to see the differences through the use of colored text. Etherpad also has a chat box that allows users to easily communicate between one another, further improving productivity. This won’t take very long to install, so let’s get startedz
Table of Contents
Step 1: Connect to Your Server
Before we begin, you need to connect to your server via SSH as the root user or as an admin account. To do this, use the following command:

ssh root@IP_ADDRESS -p PORT_NUMBER
Of course, you will need to replace IP_ADDRESS and PORT_NUMBER with your respective server IP address and SSH port number. If necessary, replace ‘root’ with the username of your admin account.
Once logged in, make sure that your server is up-to-date by running the following commands:
apt update
apt upgrade
Step 2: Install Dependencies
After successfuly logging in, you’ll need to run the following command so that you can install all dependencies for the Node.js installation.
apt install gzip git curl python libssl-dev pkg-config gcc g++ make build-essential -y
Step 3: Install Node.js
Etherpad requires Node.js version 8.9.0 or higher, so in this tutorial, we will install the latest version of Node.js (at the time of writing this tutorial).
Enable the NodeSource repository with the following curl command:
curl -sL https://deb.nodesource.com/setup_11.x | sudo bash -
Now, you can install Node.js with the following command:
apt install -y nodejs
You can verify the nodejs and npm versions by using the commands below.
nodejs --version
npm --version
Step 4: Install and Configure MySQL
A database server is one of the requirements to run Etherpad. You can install MySQL, which is a great open-source database server. Type the following command to install MySQL on your server:
apt install mysql-server mysql-client
Once MySQL is installed on your server, you can use the commands below in order to stop, start, and enable the MySQL service.
systemctl start mysql
systemctl stop mysql
systemctl enable mysql
The next command is optional, but recommended by us. You can run the command if you want to secure the MySQL server by disallowing remote root access, removing the test database, and setting a root password for MySQL.
mysql_secure_installation
When prompted, answer the questions below by following the guide.
Enter current password for root (enter for none): Just press the [Enter] key, as no password is set by default.
Set root password? [Y/n]: Y
New password: Enter your password
Re-enter new password: Repeat your password
Remove anonymous users? [Y/n]: Y
Disallow root login remotely? [Y/n]: Y
Remove test database and access to it? [Y/n]: Y
Reload privilege tables now? [Y/n]: Y
Restart the MySQL server so the changes will take effect.
systemctl restart mysql
Now you should be able to log in to the MySQL shell with the command:
mysql -u root -p
Then type the password you created above to sign on. Once you are in the MySQL shell, you can use the following command and create a database called etherpad_db for the Etherpad application.
CREATE DATABASE etherpad_db;
To grant the user etherpad_user with full access to the etherpad_db run the command:
GRANT ALL PRIVILEGES ON etherpad_db.* TO etherpad_user@localhost IDENTIFIED BY 'Str0n9Pas$worD';
NOTE: Don’t forget to replace ‘Str0n9Pas$worD‘ with a unique, strong password. Now you can use the flush privileges operation to reload the grant tables, after which you can exit from the MySQL shell.
FLUSH PRIVILEGES;
EXIT;
Step 5: Download and Install Etherpad
With the following commands, you will create a new user called etherpad and switch to that user.
useradd -m -s /bin/bash etherpad
su - etherpad
Run the git command below and clone the etherpad repository.
git clone git://github.com/ether/etherpad-lite.git
After you successfully clone the etherpad repository, you can enter the etherpad-lite directory and run the bin/run.sh script to start Etherpad.
cd etherpad-lite/
bin/run.sh
Etherpad has now been temporarily started. To see the Etherpad home page you can open your preferred web browser and type your server’s public IP address with port 9001.
http://server_IP_address:9001/You should be able to see the Etherpad home page.
To stop the application, you can press ‘Ctrl+c’ in your terminal. The problem with this is that the service only runs temporarily – only while it’s open in your terminal session. In order to have the server persistently run, you need to create a service for it. This is explained in Step 7.
Step 6: Configure Etherpad
Following this step from the article, you will perform some basic configuration of the Etherpad editor.
Login to the etherpad user and enter the etherpad-lite directory.
su - etherpad
cd etherpad-lite/
Open the settings.json configuration file with your preferred text editor. In our example, we will use nano as the text editor of choice.
nano settings.json
Change the IP address in the configuration file to ‘server_IP_address‘, and optionally you can change the listening port to non-default. In our example, we will use the default port.
"ip": "server_IP_address",
"port" : 9001,
Disable the ‘dirty’ database which is the default in the configuration file by using the comment tags /* and */ as shown in the example below.
/*
"dbType" : "dirty",
"dbSettings" : {
"filename" : "var/dirty.db"
},
*/
Now uncomment the MySQL database configuration and enter the MySQL information you created in the fourth step of this article.
"dbType" : "mysql",
"dbSettings" : {
"user" : "etherpad_user",
"host" : "localhost",
"port" : 3306,
"password": "Str0n9Pas$worD",
"database": "etherpad_db",
"charset" : "utf8mb4"
},
You can enable the admin user by removing the comment from those lines and replace Str0n9Pas$worD with a password of your choice.
"users": {
"admin": {
// "password" can be replaced with "hash" if you install ep_hash_auth
"password": "Str0n9Pas$worD",
"is_admin": true
},
"user": {
// "password" can be replaced with "hash" if you install ep_hash_auth
"password": "Str0n9Pas$worD",
"is_admin": false
}
},
Once you have finished all the modifications, you can save the configuration file and exit.
Step 7: Setup Etherpad as a Service
Method 1: Systemd
In this step, you will configure Etherpad to run as a systemd service on your Debian 9 system.
Run the following command so you can create a new service file named ‘etherpad.service’.
cd /etc/systemd/system/ && nano etherpad.service
Then paste the following configuration.
[Unit]
Description=etherpad-lite (real-time collaborative document editing)
After=syslog.target network.target

[Service]
Type=simple
User=etherpad
Group=etherpad
WorkingDirectory=/home/etherpad/etherpad-lite
Environment=NODE_ENV=development
ExecStart=/usr/bin/nodejs /home/etherpad/etherpad-lite/node_modules/ep_etherpad-lite/node/server.js
Restart=always # use mysql plus a complete settings.json to avoid Service hold-off time over, scheduling restart.

[Install]
WantedBy=multi-user.target
You can then save the configuration file and exit. Use the command below to reload the systemd service list on your server.
systemctl daemon-reload
Now you can use the systemctl command so that you can start and enable the Etherpad application easily and persistently. When the service is enabled, it will start automatically every time the system is booted.
systemctl start etherpad
systemctl enable etherpad
Method 2: Init.d
If you prefer to use init, then you can create a new initial script with the following command.
nano /etc/init.d/etherpad
Paste the following script.
#!/bin/sh

### BEGIN INIT INFO
# Provides:          etherpad-lite
# Required-Start:    $local_fs $remote_fs $network $syslog
# Required-Stop:     $local_fs $remote_fs $network $syslog
# Default-Start:     2 3 4 5
# Default-Stop:      0 1 6
# Short-Description: starts etherpad lite
# Description:       starts etherpad lite using start-stop-daemon
### END INIT INFO

PATH="/usr/local/sbin:/usr/local/bin:/sbin:/bin:/usr/sbin:/usr/bin:/opt/node/bin"
LOGFILE="/var/www/etherpad-lite/etherpad-lite.log"
EPLITE_DIR="/var/www/etherpad-lite"
EPLITE_BIN="bin/safeRun.sh"
USER="etherpad"
GROUP="etherpad"
DESC="Etherpad Lite"
NAME="etherpad-lite"

set -e

. /lib/lsb/init-functions

start() {
  echo "Starting $DESC... "

    start-stop-daemon --start --chuid "$USER:$GROUP" --background --make-pidfile --pidfile /var/run/$NAME.pid --exec $EPLITE_DIR/$EPLITE_BIN -- $LOGFILE || true
  echo "done"
}

#We need this function to ensure the whole process tree will be killed
killtree() {
    local _pid=$1
    local _sig=${2-TERM}
    for _child in $(ps -o pid --no-headers --ppid ${_pid}); do
        killtree ${_child} ${_sig}
    done
    kill -${_sig} ${_pid}
}

stop() {
  echo "Stopping $DESC... "
   while test -d /proc/$(cat /var/run/$NAME.pid); do
    killtree $(cat /var/run/$NAME.pid) 15
    sleep 0.5
  done
  rm /var/run/$NAME.pid
  echo "done"
}

status() {
  status_of_proc -p /var/run/$NAME.pid "" "etherpad-lite" && exit 0 || exit $?
}

case "$1" in
  start)
      start
      ;;
  stop)
    stop
      ;;
  restart)
      stop
      start
      ;;
  status)
      status
      ;;
  *)
      echo "Usage: $NAME {start|stop|restart|status}" >&2
      exit 1
      ;;
esac

exit 0
Save and close the file. Make the script executable by changing the file’s permissions, and enable it to start on boot.
chmod +x /etc/init.d/etherpad
update-rc.d etherpad defaults
/etc/init.d/etherpad start
You can verify that the application is up and running on port 9001 with the following commands.
systemctl status etherpad
and
netstat -tunlp | grep 9001
Step 8: Setting up a Reverse Proxy
Because Apache and Nginx are one of the most popular web servers on the internet, in this step we will show you how to create a reverse proxy for them so that you can open the website containing Etherpad with a domain name. This additionally has the benefit of not requiring a port number to be specified in order to access Etherpad.
We assume that you have already installed Apache or Nginx on your server. You can check the web server status with the commands below.
For Apache2:
systemctl status apache2
For Nginx:
systemctl status nginx
If you have Apache2 installed on your server you can create a new virtual host configuration file so that you can access Etherpad application with a domain name.
nano /etc/apache2/sites-available/domain_name.conf
add the following content to the file:
<VirtualHost *:80>
    ServerName domain_name.com ServerAlias www.domain_name.com ServerSignature Off <IfModule mod_proxy.c> ProxyVia On ProxyRequests Off ProxyPass / http://server_IP_address:9001/ ProxyPassReverse / http://server_IP_address:9001/ ProxyPreserveHost on <Proxy *> Options FollowSymLinks MultiViews AllowOverride All Order allow,deny allow from all </Proxy> </IfModule> </VirtualHost>
Of course, you will need to replace domain_name.com with your actual registered domain name, as well as replacing server_IP_address with your server’s public IP address. Once you are finished with editing the configuration file, save the file and exit.
The following Apache modules must be installed:
a2enmod proxy
a2enmod proxy_http
a2enmod headers
In order to enable the virtual host you have just created, run the a2ensite command:
a2ensite domain_name
For the changes you made to take effect, you need to restart Apache:
apache2ctl restart
If you have Nginx installed on your server, you can create a new server block so that you can access the Etherpad application with a domain name and no port number.
Create the new etherpad server block with the command:
nano /etc/nginx/sites-available/etherpad.conf
add the following content to the file:
server {
 listen 80;
 server_name domain_name.com;
   location / {
   proxy_pass http://server_IP_address:9001/
   proxy_set_header Host $host;
   proxy_buffering off;
              }
        }
You will need to replace domain_name.com with your actual registered domain name, as well as replacing server_IP_address with your server’s public IP address. When you finish with editing the configuration file, save the file and exit.
To activate the etherpad virtual host you can create a symlink with the command:
ln -s /etc/nginx/sites-available/etherpad /etc/nginx/sites-enabled/
Once that’s done, test the Nginx configuration.
nginx -t
Before you start and enable the Nginx service, you need to make sure that there are no errors during the Nginx configuration test. If it all checks out, you can run the following commands:
systemctl restart nginx
systemctl enable nginx
Step 9: Accessing Etherpad
Now open your favorite web browser and enter your domain name.
http://domain_name.com/
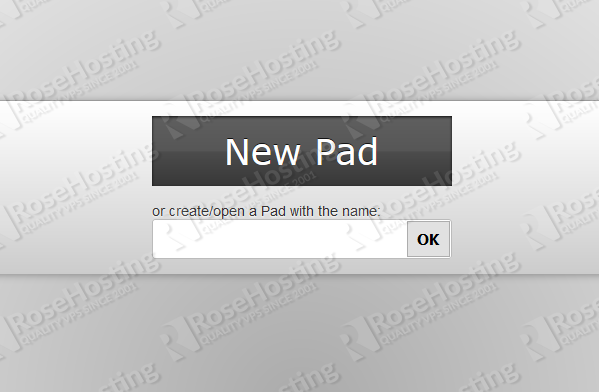
You should be able to see the Etherpad editor in your browser.
Enter the name of your new Pad and click on the OK button.
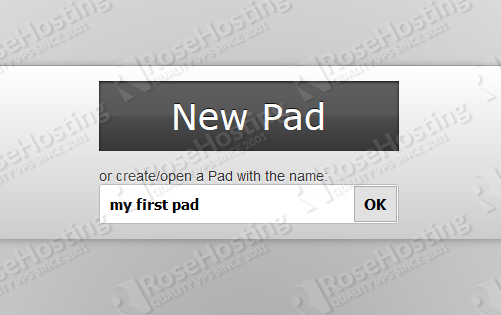
You should now be able to see the Etherpad editor as shown in the image below.

To access the admin URL, add /admin/ to the end of your domain name.
http://domain_name.com/admin/
You will be prompted for an administrator username and password. Enter your admin username and password and then click the Sign In button.
Congratulations. You have successfully installed and configured the Etherpad editor.
In this article, we showed you how to install Etherpad on Debian 9. You can now continue to use and explore this incredible open-source application.
 Of course, if you are one of our Debian Hosting customers, you don’t have to install Etherpad on your Debian 9 VPS – simply ask our admins, sit back, and relax. Our admins will install and configure Etherpad on Debian 9 for you immediately.
PS. If you liked this post about how to install Etherpad on a Debian 9 VPS, please share it with your friends on the social networks using the share buttons below, or simply leave a comment in the comments section. Thank you.
You will be prompted for an administrator username and password. Enter your admin username and password and then click the Sign In button.
wich user? from debian, from maria db?
thx
The user admin set in settings.json.