Flectra is a free and open-source CRM and ERP software that provides a lot of flexibility and customization that lets you meet the unique needs of your business.
 Flectra is built using the Python programming language and PostgreSQL as its database backend. This software aims to help almost everyone, whether it’s a small startup or a large corporation. Flectra has a simple and user-friendly interface and a modular design that enables you to add or remove tools to make it work the way you need it to.
Flectra is a fork of Odoo Community and its main goal was to implement many features from Odoo Enterprise while still keeping it open for everyone to use.
In this tutorial, we will explain how to install Flectra on an Ubuntu 20.04 VPS using Nginx as a reverse proxy. The reverse proxy will allow you to access your Flectra instance from a domain name while also using the default port number. Let’s get started.
Table of Contents
Requirements
- A freshly installed Ubuntu 20.04 VPS with root access enabled or a user with sudo privileges. We include root access on all of our VPSes.
- Minimum 2 GB of RAM. For this we’ll be using our SSD 2 VPS plan.
Step 1 – Log in via SSH and Update your System
First, you will need to log in to your Ubuntu 20.04 VPS via SSH as the root user:
ssh root@IP_ADDRESS -p PORT_NUMBER
Replace the values in red with the IP address and SSH port number for your VPS or server. The default SSH port number is almost always 22.
Next, run the following commands to upgrade all installed packages on your VPS:
apt-get update -y
apt-get upgrade -y
Once all the packages are updated, restart your system to ensure that all packages are using the latest version.
Step 2 – Install Required Dependencies
To begin, you will need to install the Python package and a few other Flectra dependencies in your system. You can install all of them using the following command:
apt-get install gcc python3-venv build-essential python3-pillow python3-wheel python3-lxml python3-dev python3-pip python3-setuptools npm nodejs git gdebi libldap2-dev libsasl2-dev libxml2-dev libxslt1-dev libjpeg-dev libpq-dev -y
Once all the dependencies are installed, you will need to install wkhtmltopdf tool in your system.
You can download and install it with the following command:
wget https://github.com/wkhtmltopdf/wkhtmltopdf/releases/download/0.12.5/wkhtmltox_0.12.5-1.bionic_amd64.deb
apt install ./wkhtmltox_0.12.5-1.bionic_amd64.deb
Once installed, you can proceed to the next step.
Step 3 – Install PostgreSQL
Flectra requires PostgreSQL in order to store its data in a database. You can install it with the following command:
apt-get install postgresql -y
Once the installation is completed, use the PostgreSQL utility and create a user for Flectra with the following command. We named our user flectra, but you can use any name you like:
su - postgres -c "createuser -s flectra"
Step 4 – Install Flectra
First, create a separate user for Flectra with the following command. The name of this user should be the same as your PostgreSQL user:
useradd -m -U -r -d /opt/flectra -s /bin/bash flectra
Once the user is made, log in with your Flectra user and download the Flectra source from the official Git repository:
su - flectra
git clone --depth=1 --branch=1.0 https://gitlab.com/flectra-hq/flectra.git flectra
After that, create a Flectra virtual environment with the following command:
python3 -m venv flectra-venv
Next, activate the virtual environment with the following command:
source flectra-venv/bin/activate
By default, Ubuntu 20.04 comes with Python version 3.8.2. So you will need to update the requirements.txt file to prevent the psucopg2 error when installing Flectra 1.7.
You can prevent this error by modifying default requirements.txt file:
nano flectra/requirements.txt
Find the following lines:
psycopg2==2.7.3.1; sys_platform != 'win32'
psycopg2==2.8.3; sys_platform == 'win32'
And, update them with the following lines:
psycopg2==2.8.5; sys_platform != 'win32'
psycopg2==2.8.5; sys_platform == 'win32'
Save and close the file then install the wheel module with the following command:
pip3 install wheel
Next, install all required Python modules with the following command:
pip3 install -r flectra/requirements.txt
Once all the modules are installed, deactivate from the virtual environment with the following command:
deactivate
Next, exit from the Flectra user using the following command:
exit
Step 5 – Configure Flectra
Next, you will need to create a directory structure for Flectra to store addons, configuration files and logs.
You can create it with the following command:
mkdir /opt/flectra/flectra-custom-addons
mkdir /var/log/flectra
touch /var/log/flectra/flectra.log
mkdir /etc/flectra
Next, change the ownership of the above directories to Flectra as shown below:
chown -R flectra:flectra /opt/flectra/flectra-custom-addons
chown -R flectra:flectra /var/log/flectra/
chown -R flectra:flectra /etc/flectra
Next, create a Flectra configuration file with the following command:
nano /etc/flectra/flectra.conf
Add the following lines:
[options]
admin_passwd = your-password
db_host = False
db_port = False
db_user = flectra
db_password = False
logfile = /var/log/flectra/flectra.log
logrotate = True
proxy_mode = True
addons_path = /opt/flectra/flectra/addons, /opt/flectra/flectra-custom-addons
Make sure you set your-password to a good and strong password. Save and close the file when you are finished.
Step 6 – Create a Systemd Service File for Flectra
Flectra is more or less set up, however we have no way to manage it as a service currently. To fix this, we will create a systemd service file to manage the Flectra service. Create a new service file using this command:
nano /etc/systemd/system/flectra.service
Then add the following lines:
[Unit]
Description=flectra
#Requires=postgresql-10.6.service
#After=network.target postgresql-10.6.service

[Service]
Type=simple
SyslogIdentifier=flectra
PermissionsStartOnly=true
User=flectra
Group=flectra
ExecStart=/opt/flectra/flectra-venv/bin/python3 /opt/flectra/flectra/flectra-bin -c /etc/flectra/flectra.conf
StandardOutput=journal+console

[Install]
WantedBy=multi-user.target
Save and close the file. Then, reload the systemd daemon list with the following command:
systemctl daemon-reload
Next, start the Flectra service and enable it to start at boot using the following command:
systemctl start flectra
systemctl enable flectra
Now you can verify the port that Flectra is listening on using the following command:
netstat -plntu | grep 7073
You should get the following output:
tcp 0 0 0.0.0.0:7073 0.0.0.0:* LISTEN 110833/python3
Flectra is now set up and running.
Step 7 – Configure Nginx as a Reverse Proxy for Flectra
Flectra is now running, however it is only accessible at our IP address using the port 7073. This may be okay for some, but it would be ideal if Flectra could be directly accessible using a domain name with the default port (80). To do this, we’ll set up Nginx as a reverse proxy. Install the Nginx web server using the following command:
apt-get install nginx -y
Once installed, create a new Nginx virtual host configuration file:
nano /etc/nginx/sites-available/example.conf
Add the following lines. Make sure to replace example.com with your own registered domain name:
#flectra server
upstream flectra {
 server 127.0.0.1:7073;
}

server {
   listen 80;
   server_name flectra.example.com;

proxy_read_timeout 720s;
 proxy_connect_timeout 720s;
 proxy_send_timeout 720s;

 # Add Headers for flectra proxy mode
 proxy_set_header X-Forwarded-Host $host;
 proxy_set_header X-Forwarded-For $proxy_add_x_forwarded_for;
 proxy_set_header X-Forwarded-Proto $scheme;
 proxy_set_header X-Real-IP $remote_addr;

 # log
 access_log /var/log/nginx/flectra.access.log;
 error_log /var/log/nginx/flectra.error.log;

 # Redirect requests to flectra backend server
 location / {
   proxy_redirect off;
   proxy_pass http://flectra;
 }

 # common gzip
 gzip_types text/css text/less text/plain text/xml application/xml application/json application/javascript;
 gzip on;
}
Save and close the file, then activate the Nginx virtual host file using the following command:
ln -s /etc/nginx/sites-available/example.conf /etc/nginx/sites-enabled/
Finally, restart the Nginx service to apply the changes:
systemctl restart nginx
Step 8 – Access the Flectra Web UI
Now, open your web browser and type the URL http://flectra.example.com. You will be redirected to the following page:
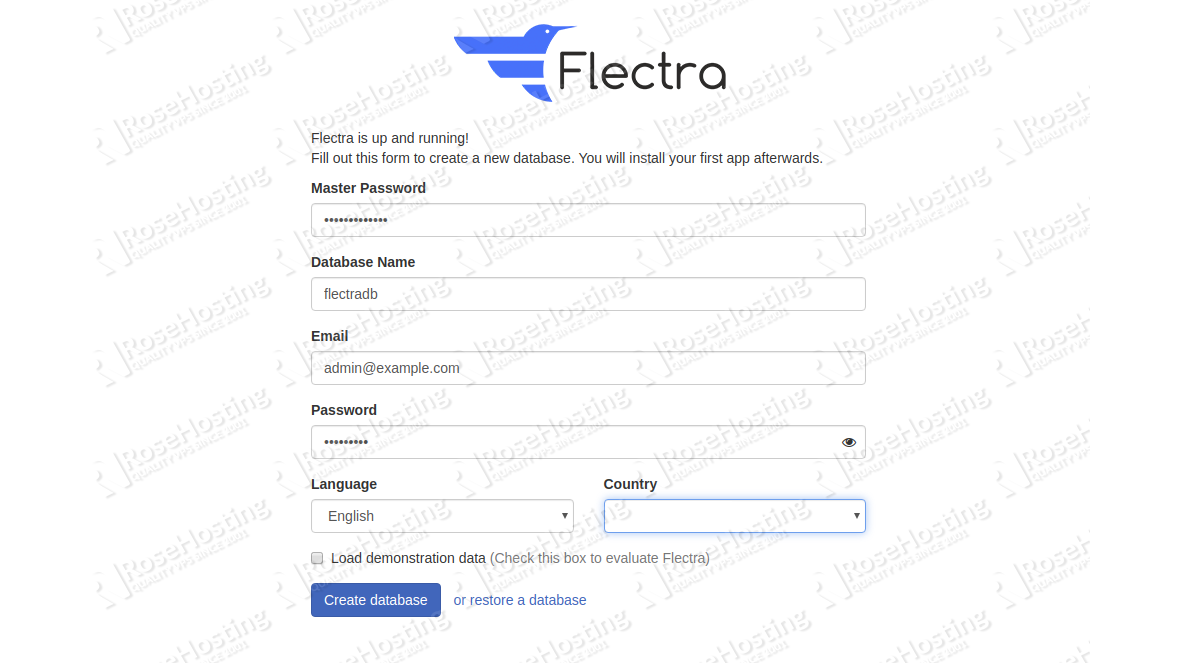
Provide your Master password, database details, email, and password and click on the Create database button. You will be redirected to the Flectra dashboard, as shown below:

That is all! You now have a functioning Flectra installation on your Ubuntu 20.04 VPS. Now you can start using it and improve your business’ productivity.
 Installing Flectra isn’t very difficult or time consuming, however it’s easy to miss a step or to mess something up. This is why using one of our Managed Flectra VPS Hosting services is a great idea – our admins will quickly set up and install Flectra on your Ubuntu 20.04 VPS with ease, and all you have to do is ask. Plus, our fully-managed support team can also help you maintain and optimize your server whenever you need it, all at no extra cost.
If this tutorial has helped you install Flectra on your Ubuntu 20.04 server or VPS, we would really appreciate you sharing this article with your friends on social media using the share shortcuts, or by describing your installation experience in our comments section. Thank you.