Flectra is an open-source, powerful and customizable business management tool that helps you grow your business through its powerful modular design covering all essential aspects of most businesses.
 Flectra integrates the capabilities of CRM and ERP systems into a single package. Flectra helps you modify and adapt your system to meet the unique needs of your business. This makes it the ultimate business app suite that gives you a scalable business management platform which provides you with all the freedom to make the software work for you and your business setup.
Flectra offers several features that cover almost every use case, including e-Commerce, Accounting, Sales Management, Websites, Marketing, Inventory Management, MRP, Reporting, Timesheets, and lots more.
In this tutorial, we will show you how to install Flectra on a CentOS 8 VPS using Nginx as a reverse proxy.
Table of Contents
Requirements
- A CentOS 8 VPS with root access enabled, or a user with sudo privileges.
- A minimum of 2 GB of RAM. For this, we’ll be using our SSD 2 VPS plan.
Step 1: Getting Started
First, you will need to log in to your CentOS 8 VPS via SSH as the root user:
ssh root@IP_ADDRESS -p PORT_NUMBER
Change the values in red to the correct values for your VPS.
Next, run the following command to upgrade all installed packages on your VPS:
dnf update -y
Once all the packages are updated, it is necessary to disable SELinux on your system. You can disable it by editing the config file found at /etc/selinux/config :
nano /etc/selinux/config
Change the following line:
SELINUX=disabled
Save and close the file, then restart your server to apply the changes.
Step 2: Install Required Dependencies
Next, you will need to install Python and other Flectra dependencies onto your system. You can install all of them in one go by running the following command:
dnf install python36 python36-devel git gcc wget nodejs libxslt-devel bzip2-devel openldap-devel libjpeg-devel freetype-devel -y
Once all of the packages are installed, run the following command to install the Node.js module:
npm install -g less
Next, you will also need to install the wkhtmltopdf package in your system (it renders html documents as PDFs) You can download it with the following command:
wget https://downloads.wkhtmltopdf.org/0.12/0.12.5/wkhtmltox-0.12.5-1.centos7.x86_64.rpm
Next, install the downloaded file with the following command:
dnf localinstall wkhtmltox-0.12.5-1.centos7.x86_64.rpm
Once you are done, you can proceed to the next step.
Step 3: Install PostgreSQL
Next, you will need to install PostgreSQL to serve as the database back-end. You can install it with the following command:
dnf install -y postgresql-server
Once installed, initialize the database with the following command:
postgresql-setup --initdb --unit postgresql
You should get the following output:
 * Initializing database in '/var/lib/pgsql/data'
 * Initialized, logs are in /var/lib/pgsql/initdb_postgresql.log
Next, start the PostgreSQL service and enable it to start at boot with the following commands:
systemctl start postgresql
systemctl enable postgresql
Next, login to the PostgreSQL shell and create a new PostgreSQL user with the following command. We’re using the name flectra, but you can use any name you like:
su - postgres -c "createuser -s flectra"
Step 4: Install Flectra
Finally, after setting up all of the required software, we can now install Flectra on our system. Create a separate user for Flectra using the following command. We’re using the name flectra because the names between this and PostgreSQL have to match. Make sure that the username you choose is the same as the PostgreSQL user that you created earlier:
useradd -m -U -r -d /opt/flectra -s /bin/bash flectra
Then login with the Flectra user and download Flectra from the Git repository:
su - flectra
git clone --depth=1 --branch=1.0 https://gitlab.com/flectra-hq/flectra.git flectra
After that, create a virtual environment for Flectra, we’re naming it flectra-venv, but you can use any name you like:
python3 -m venv flectra-venv
Now, activate the virtual environment with the following command:
source flectra-venv/bin/activate
Afterwards, install all Python modules with the following command. Python will read from the file and install everything that Flectra needs:
pip3 install -r flectra/requirements.txt
Once all modules are installed, deactivate the virtual environment with the following command:
deactivate
Finally, exit from the Flectra user using the following command:
exit
Step 5: Configure Flectra
Flectra is now installed, but we still need to configure it. First, you will need to create several directories for Flectra addons, configuration files, and logs. You can create them with the following command. We chose these common locations, but you can create these folders and files anywhere you like:
mkdir /opt/flectra/flectra-custom-addons
mkdir /var/log/flectra
mkdir /etc/flectra
touch /var/log/flectra/flectra.log
Next, change the ownership of the above directories to flectra:
chown -R flectra:flectra /opt/flectra/flectra-custom-addons
chown -R flectra:flectra /var/log/flectra/
chown -R flectra:flectra /etc/flectra
Once that’s done, create a Flectra configuration file with the following command:
nano /etc/flectra/flectra.conf
Add the following lines – change the admin_passwd field to contain the password you wish to use for the admin account. Additionally, change the paths for the files/folders if you chose different locations from the ones in this tutorial:
[options]
admin_passwd = your-password
db_host = False
db_port = False
db_user = flectra
db_password = False
logfile = /var/log/flectra/flectra.log
logrotate = True
proxy_mode = True
addons_path = /opt/flectra/flectra/addons, /opt/flectra/flectra-custom-addons
Save and close the file when you are finished.
Step 6: Create a Systemd File for Flectra
Next, create a systemd service file for Flectra to manage the Flectra service.
nano /etc/systemd/system/flectra.service
Add the following lines:
[Unit]
Description=flectra
#Requires=postgresql-10.6.service
#After=network.target postgresql-10.6.service

[Service]
Type=simple
SyslogIdentifier=flectra
PermissionsStartOnly=true
User=flectra
Group=flectra
ExecStart=/opt/flectra/flectra-venv/bin/python3 /opt/flectra/flectra/flectra-bin -c /etc/flectra/flectra.conf
StandardOutput=journal+console

[Install]
WantedBy=multi-user.target
Save and close the file once you are finished. Then, reload the systemd daemon with the following command. This is needed so that systemd can recognize and acknowledge the newly added service:
systemctl daemon-reload
Next, start the Flectra service and enable it to start at system reboot with the following command:
systemctl start flectra
systemctl enable flectra
You can also verify the status of your Flectra service with the following command:
systemctl status flectra
You should get the following output:
● flectra.service - flectra
   Loaded: loaded (/etc/systemd/system/flectra.service; disabled; vendor preset: disabled)
   Active: active (running) since Sun 2020-06-28 03:23:58 EDT; 7s ago
 Main PID: 25512 (python3)
    Tasks: 4 (limit: 12537)
   Memory: 90.8M
   CGroup: /system.slice/flectra.service
           └─25512 /opt/flectra/flectra-venv/bin/python3 /opt/flectra/flectra/flectra-bin -c /etc/flectra/flectra.conf

Jun 28 03:23:58 centos8 systemd[1]: Started flectra.
Jun 28 03:24:00 centos8 flectra[25512]: 2020-06-28 07:24:00,365 25512 INFO ? flectra: Flectra version 1.7
Jun 28 03:24:00 centos8 flectra[25512]: 2020-06-28 07:24:00,368 25512 INFO ? flectra: Using configuration file at /etc/flectra/flectra.conf
Jun 28 03:24:00 centos8 flectra[25512]: 2020-06-28 07:24:00,368 25512 INFO ? flectra: addons paths: ['/opt/flectra/.local/share/Flectra/addons>
Jun 28 03:24:00 centos8 flectra[25512]: 2020-06-28 07:24:00,369 25512 INFO ? flectra: database: flectra@default:default
Jun 28 03:24:00 centos8 flectra[25512]: 2020-06-28 07:24:00,495 25512 INFO ? flectra.service.server: HTTP service (werkzeug) running on centos>
Jun 28 03:24:00 centos8 flectra[25512]: 2020-06-28 07:24:00,719 25512 INFO ? flectra.addons.base.ir.ir_actions_report: Will use the Wkhtmltopd>
Now Flectra is running and listening on port 7073. You can verify it with the following command:
netstat -plntu | grep 7073
You should see the following output:
tcp 0 0 0.0.0.0:7073 0.0.0.0:* LISTEN 25967/python3
Step 6: Configure Nginx as a Reverse Proxy for Flectra
Your Flectra install is now complete and configured, but you currently have to use the ip address of your VPS followed by the port 7073 to access it. While that works, the usual use case is wanting to have it accessible through a domain name with no port number needed. Because of that, it is a good idea to configure Nginx as a reverse proxy to serve Flectra through port 80.
First, install the Nginx web server using the following command:
dnf install nginx -y
Once installed, start the Nginx service and enable it to start at system reboot:
systemctl start nginx
systemctl enable nginx
Next, create a new Nginx virtual host configuration file for Flectra:
nano /etc/nginx/conf.d/flectra.conf
Add the following lines:
#flectra server
upstream flectra {
 server 127.0.0.1:7073;
}

server {
   listen 80;
   server_name flectra.example.com;

proxy_read_timeout 720s;
 proxy_connect_timeout 720s;
 proxy_send_timeout 720s;

 # Add Headers for flectra proxy mode
 proxy_set_header X-Forwarded-Host $host;
 proxy_set_header X-Forwarded-For $proxy_add_x_forwarded_for;
 proxy_set_header X-Forwarded-Proto $scheme;
 proxy_set_header X-Real-IP $remote_addr;

 # log
 access_log /var/log/nginx/flectra.access.log;
 error_log /var/log/nginx/flectra.error.log;

 # Redirect requests to flectra backend server
 location / {
   proxy_redirect off;
   proxy_pass http://flectra;
 }

 # common gzip
 gzip_types text/css text/less text/plain text/xml application/xml application/json application/javascript;
 gzip on;
}
Make sure to replace flectra.example.com with the name of your registered domain name. Save and close the file when you are finished. Then, restart the Nginx service to apply the changes:
systemctl restart nginx
Step 7: Access the Flectra Web Interface
At this point, Flectra is installed and configured, and now has Nginx serving it through a reverse proxy. Now, open your web browser and type the URL http://flectra.example.com (of course, your domain will be different from this). You will be redirected to the following setup page:
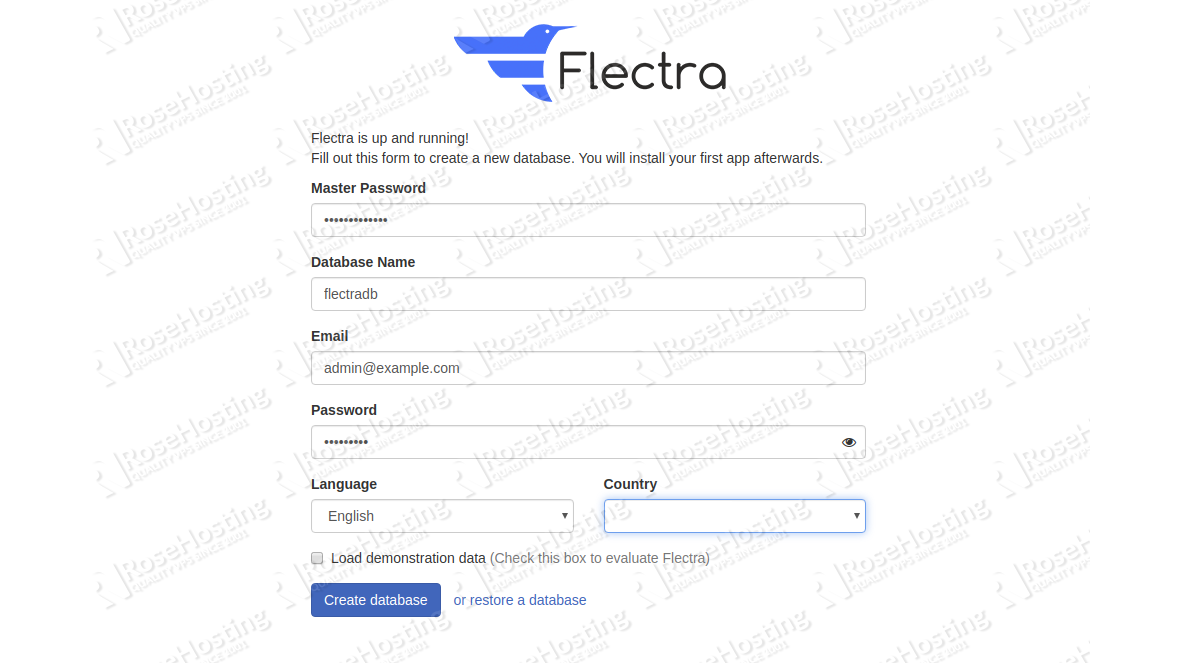
Provide your Master password, database details, email, & password and click on the Create database button. You will then be redirected to the Flectra dashboard, as shown below:

That’s all there is to it! Now you can install the modules that are best suited for your business and get to being productive using Flectra.
 While this article lets you install Flectra on your own, you don’t have to install Flectra on CentOS 8 if you use one of our Flectra VPS Hosting services, in which case you can simply ask our team of expert Linux admins to install and configure Flectra for you. Our fully-managed support team is available 24×7 and will take care of your request immediately, along with anything else that you might need.
PS. If you liked this post on how to install Flectra on CentOS 8, please share it with your friends through the social networks using the share shortcuts below, or simply leave a reply in the comments section. Thanks.