
In this tutorial, we will explain how to install Forgejo on Ubuntu 26.04. Forgejo is a lightweight, open-source Git hosting solution designed for managing source code and software development projects. It offers an intuitive platform where developers can host repositories, track code changes, review contributions, and collaborate with other team members. Forgejo comes with a wide range of built-in features, including pull requests, issue tracking, project management, wikis, and flexible user permission controls. Built on Git version control, it delivers excellent performance while consuming minimal system resources, making it an ideal choice for individuals, small teams, and organizations. Since Forgejo is self-hosted and supports multiple operating systems, it gives users complete ownership of their repositories, data, and development workflow.
Setting up Forgejo on Ubuntu 26.04 is a simple process that can be completed in about 15 minutes. Let’s begin!
Table of Contents
Prerequisites
- A server with Ubuntu 26.04 installed
- A domain name that resolves to your server’s IP address
- User privileges: root or non-root user with sudo privileges
Step 1. Update the System
Before proceeding with the installation, it is recommended to update the system so that all installed packages are upgraded to their latest available versions. Run the command below to update the package index and install any available updates:

apt update -y && apt upgrade -y
Step 2. Install Apache Web Server
Apache plays an important role in a Forgejo deployment because it can be configured as a reverse proxy. This allows it to process incoming client requests, provide HTTPS support, and route traffic securely to the Forgejo application running on the server.
Install the Apache web server by running the following command:
apt install apache2 -y
After the installation is complete, start the Apache service and configure it to launch automatically at system boot:
systemctl start apache2 && systemctl enable apache2
Verify that the service is running:
systemctl status apache2
If everything is working correctly, you should see output similar to the following:
root@host:~# systemctl status apache2
● apache2.service - The Apache HTTP Server
     Loaded: loaded (/usr/lib/systemd/system/apache2.service; enabled; preset: enabled)
     Active: active (running) since Thu 2026-07-09 19:23:26 CDT; 8s ago
 Invocation: d5d603b21375446fb88b82f8418c700a
       Docs: https://httpd.apache.org/docs/2.4/
   Main PID: 34531 (apache2)
     Status: "Processing requests..."
      Tasks: 55 (limit: 3770)
     Memory: 5.6M (peak: 6.1M)
        CPU: 184ms
     CGroup: /system.slice/apache2.service
Step 3. Install MariaDB Database Server
Forgejo stores its data in a database, including user accounts, repositories, issues, pull requests, and other project-related information. In this guide, we’ll use MariaDB as the database backend because it is fast, reliable, and widely used in production environments.
Install the MariaDB database server by running the following command:
apt install mariadb-server -y
After the installation is complete, start the MariaDB service and configure it to start automatically whenever the server boots:
systemctl start mariadb && systemctl enable mariadb
To verify that MariaDB is running correctly, check its current status:
systemctl status mariadb
If everything is working as expected, you should see output similar to the following:
root@host:~# systemctl status mariadb
● mariadb.service - MariaDB 11.8.6 database server
     Loaded: loaded (/usr/lib/systemd/system/mariadb.service; enabled; preset: enabled)
     Active: active (running) since Thu 2026-07-09 19:43:24 CDT; 29s ago
 Invocation: 5cf777443c6d41d79093a880eae1a61d
       Docs: man:mariadbd(8)
             https://mariadb.com/kb/en/library/systemd/
   Main PID: 23573 (mariadbd)
     Status: "Taking your SQL requests now..."
      Tasks: 13 (limit: 24887)
     Memory: 93.5M (peak: 97.9M)
        CPU: 4.237s
     CGroup: /system.slice/mariadb.service
             └─23573 /usr/sbin/mariadbd
Step 4. Create the Forgejo Database and Database User
Before installing Forgejo, you need to create a dedicated MariaDB database along with a database user that Forgejo will use to connect to it. Then, grant the user the necessary privileges by executing the SQL statements below:
CREATE USER 'forgejouser'@'localhost' IDENTIFIED BY 'YourStrongPassword';

CREATE DATABASE forgejodb;

GRANT ALL PRIVILEGES ON forgejodb.* TO 'forgejouser'@'localhost';

FLUSH PRIVILEGES;

EXIT;
Step 5. Install Forgejo
To begin, create a dedicated system user that will be responsible for running the Forgejo service:
adduser --system --shell /bin/bash --group --disabled-password --home /home/forgejo forgejo
Next, download the latest Forgejo binary, copy it to /usr/bin/forgejo, and make it executable:
wget https://codeberg.org/forgejo/forgejo/releases/download/v12.0.4/forgejo-12.0.4-linux-amd64

cp forgejo-12.0.4-linux-amd64 /usr/bin/forgejo

chmod 755 /usr/bin/forgejo

chmod +x /usr/bin/forgejo
Now create the directories required by Forgejo to store its configuration, repositories, logs, and application data. After that, assign the appropriate ownership and permissions so the forgejo user can access them.
mkdir -p /etc/forgejo /var/lib/forgejo/{custom,data,indexers,public,log}

chown forgejo:forgejo /etc/forgejo /var/lib/forgejo/{custom,data,indexers,public,log}

chmod 750 /var/lib/forgejo/{data,indexers,log}

chmod 770 /etc/forgejo
With the required directories in place, the next step is to configure Forgejo as a systemd service so it can be managed like any other system service.
Create a new file named forgejo.service inside the /etc/systemd/system directory using your preferred text editor. In this example, we will use nano.
nano /etc/systemd/system/forgejo.service
Add the following configuration to the file:
[Unit]
Description=Forgejo
[Service]
RestartSec=3s
Type=simple
User=forgejo
Group=forgejo
WorkingDirectory=/var/lib/forgejo/

ExecStart=/usr/bin/forgejo web --config /etc/forgejo/app.ini
Restart=always
Environment=USER=forgejo HOME=/home/forgejo FORGEJO_WORK_DIR=/var/lib/forgejo

[Install]
WantedBy=multi-user.target
Save the file, exit the editor, then start the Forgejo service and configure it to start automatically after each system reboot:
systemctl start forgejo && systemctl enable forgejo
To confirm that the service is running correctly, execute:
systemctl status forgejo
If everything has been configured correctly, you should see output similar to the following:
root@host:~# systemctl status forgejo
● forgejo.service - Forgejo
     Loaded: loaded (/etc/systemd/system/forgejo.service; enabled; preset: enabled)
     Active: active (running) since Thu 2026-07-09 19:41:18 CDT; 5s ago
 Invocation: d1f8db7221974f74a5c4eb3c940d5fd9
   Main PID: 41232 (forgejo)
      Tasks: 8 (limit: 3770)
     Memory: 92.6M (peak: 92.6M)
        CPU: 1.691s
     CGroup: /system.slice/forgejo.service
             └─41232 /usr/bin/forgejo web --config /etc/forgejo/app.ini
Step 6. Configure an Apache Virtual Host
Now it’s time to configure Apache to serve your Forgejo instance. Start by creating a new virtual host configuration file:
touch /etc/apache2/sites-available/forgejo.conf
Open the newly created file with your preferred text editor:
nano /etc/apache2/sites-available/forgejo.conf
Then add the following configuration:
<VirtualHost *:80>
ServerName yourdomain.com

ErrorLog ${APACHE_LOG_DIR}/yourdomain-error.log
CustomLog ${APACHE_LOG_DIR}/access.log combined

ProxyPreserveHost On
ProxyRequests Off
AllowEncodedSlashes NoDecode
ProxyPass / http://localhost:3000/ nocanon
RequestHeader set "X-Forwarded-Proto" expr=%{REQUEST_SCHEME}

</VirtualHost>
Save the file and exit the editor.
Next, enable the required Apache modules along with the virtual host configuration you just created:
a2enmod rewrite

a2enmod proxy

a2enmod headers

a2enmod proxy_http

a2enmod proxy_http2

a2ensite forgejo.conf
Before applying the changes, it’s a good idea to verify that the Apache configuration doesn’t contain any syntax errors:
apachectl -t
If everything is configured correctly, you should see output similar to this:
root@host:~# apachectl -t
Syntax OK
Finally, restart the Apache service to apply the new configuration:
systemctl restart apache2
Your Apache reverse proxy is now configured for Forgejo. You can open your browser and navigate to https://yourdomain.com to continue with the web-based installation.
Step 7. Complete the Forgejo Installation
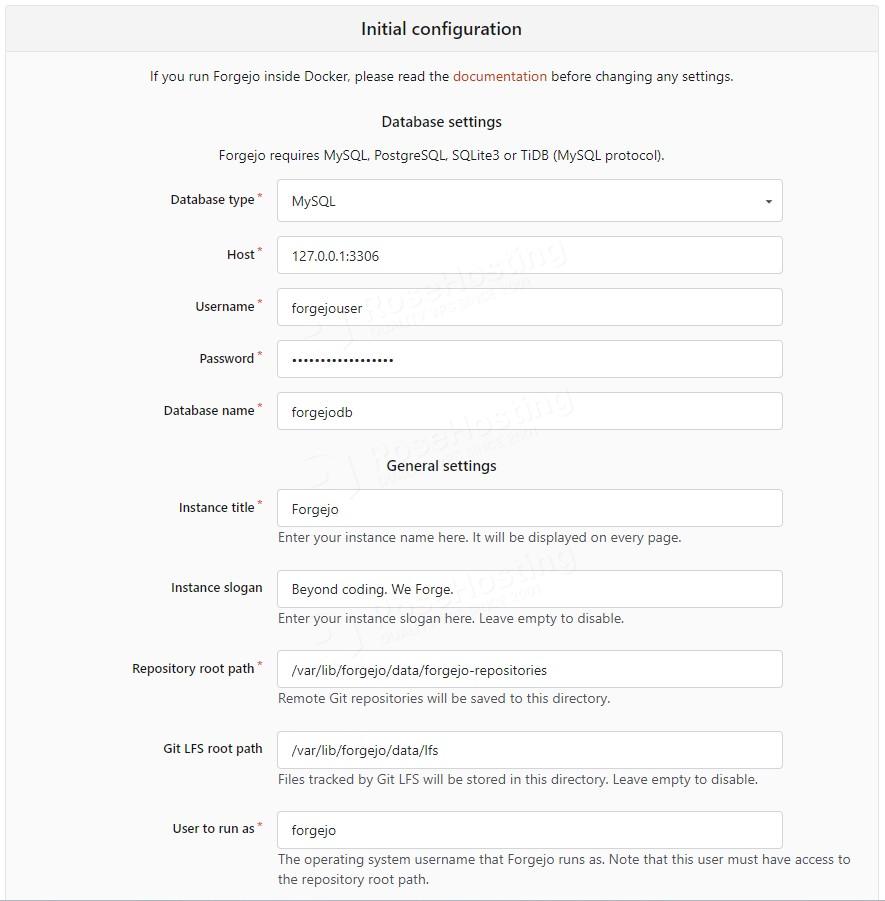
Open your browser and navigate to your Forgejo instance. The initial setup page will appear, where you’ll need to enter the MariaDB database credentials that you created in Step 4. After verifying that the information is correct, click “Install Forgejo” to begin the installation.
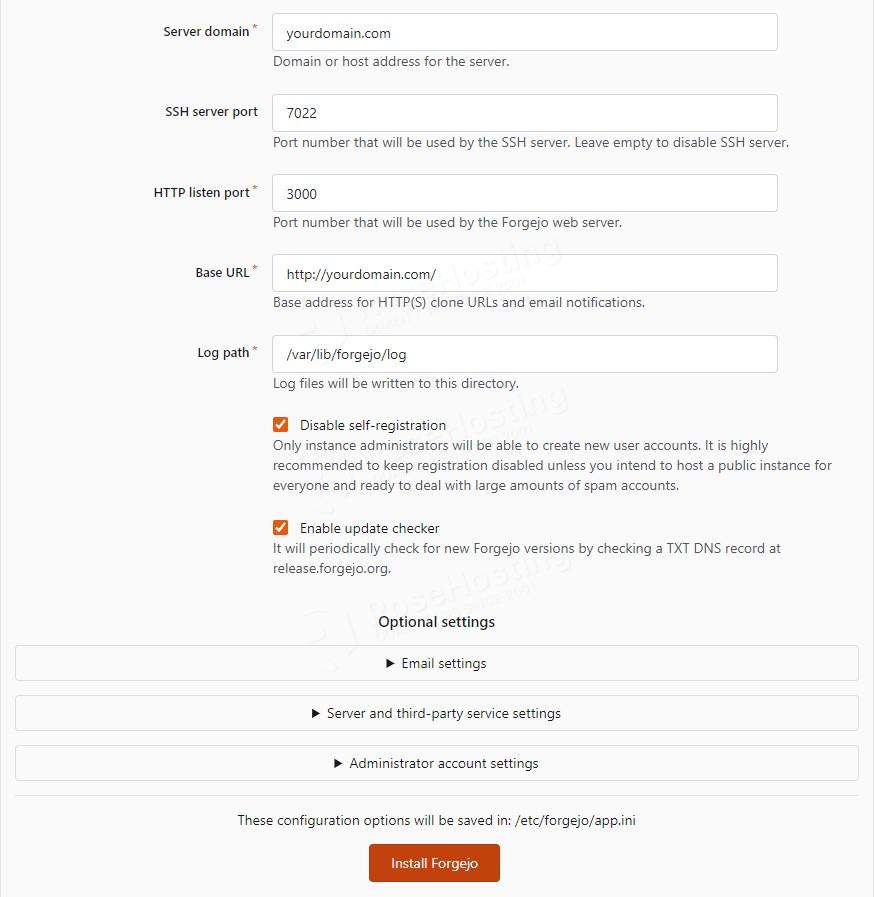
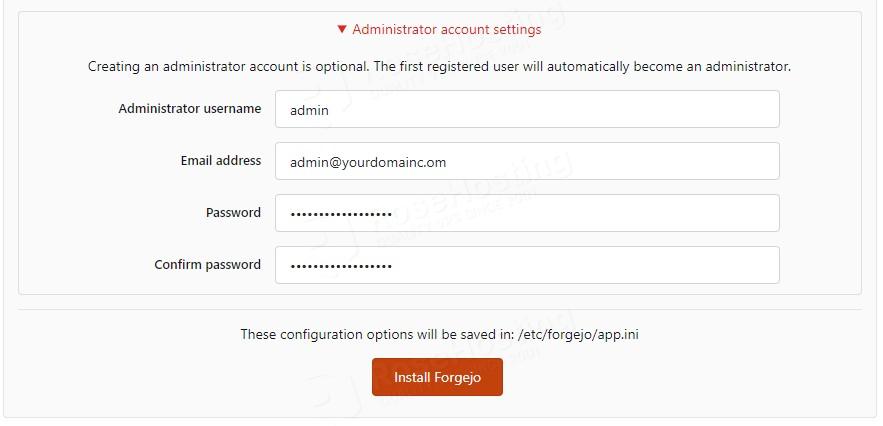
You can create the Administrator now, or wait until you register a user, who will automatically become an Administrator.
If you leave it after installation, it should look like this:
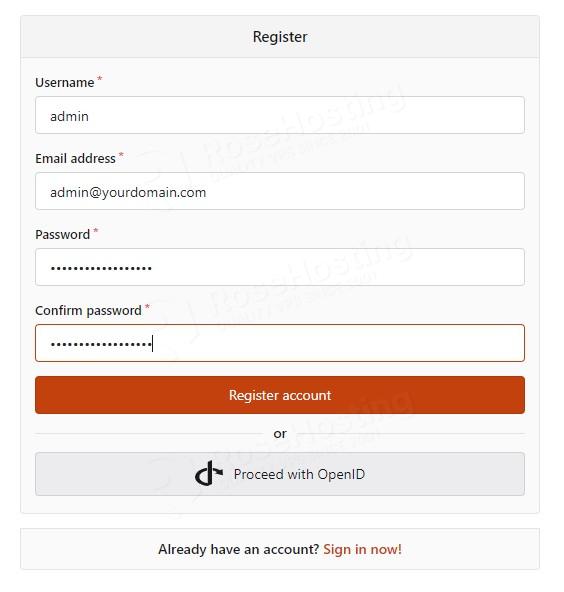
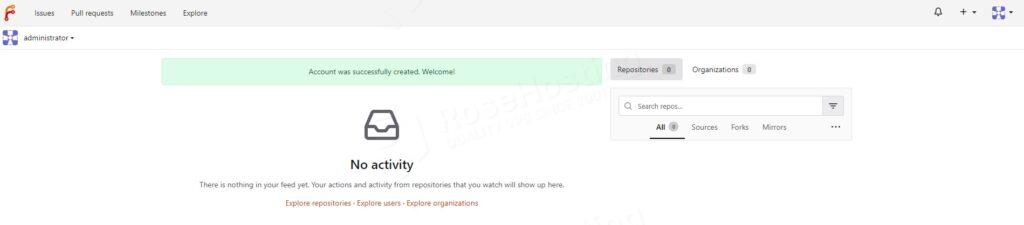
After clicking “Register Account”, you’ll be logged in automatically and redirected to the Forgejo administration dashboard, where you can start creating repositories, managing users, and configuring your instance.
In Conclusion
Congratulations! You have successfully installed Forgejo on Ubuntu 26.04.
If you run into any issues during the installation or simply prefer not to configure it yourself, we’re here to help. Just sign up for one of our VPS hosting plans and open a support ticket. Our Linux administrators are available 24/7 and happy to assist you with any aspect of your Forgejo installation and configuration.
If you found this guide on how to install Forgejo on Ubuntu 26.04 helpful, feel free to share it with others on social media or leave a comment below.