 The following article will guide you through the steps on how to install Gallery3 on Ubuntu 14.04 LTS VPS.
What is Gallery3?
It is an open source photo sharing web application, based on PHP and MySQL.
Gallery3 has intuitive photo management administration and you can use it into your own website no matter whether you’re running a small personal site or a large community portal.
In order to install and run Gallery3 on your linux virtual server, the following minimum system requirements have to be met:
- Apache 2.2+
- PHP 5.2.3+
- PHP safe_mode must be disabled
- PHP-Iconv
- PHP-Simplexml
- PHP-Filter
- PHP-Json
- PHP-Mbstring
- PHP short_open_tag must be enabled
- MySQL database server
Ok, before proceeding any further, make sure you are in a screen session and your Ubuntu 14.04 LTS Linux VPS is up-to-date by running:
## screen -U -s gallery3-screen
## apt-get update
## apt-get upgrade
Since Gallery3 requires a webserver, a database server and a PHP server/support, we will have to install and set-up LAMP (Linux Apache MySQL and PHP) on the system.
Install Apache2 on your Ubuntu 14.04 VPS using:
## apt-get install apache2
Next, proceed with installing the MySQL database server in your system using
## apt-get install mysql-server
once installed, run the post-installation script mysql_secure_installation and configure it like this
## mysql_secure_installation

- Set root password? [Y/n] y
- Remove anonymous users? [Y/n] y
- Disallow root login remotely? [Y/n] y
- Remove test database and access to it? [Y/n] y
- Reload privilege tables now? [Y/n] y
install PHP support on the system using the following command:
## apt-get install php5 php5-mysql php5-gd
check it out using
## php -v
edit your PHP configuration file and set the following:
## vim /etc/php5/apache2/php.ini

short_open_tag = On
restart apache for the changes to take effect:
## service apache2 restart
create a new MySQL database for Gallery3 using MySQL command line or any other tool like phpMyAdmin. Using command line, this can be achieved by running the following SQL statements:
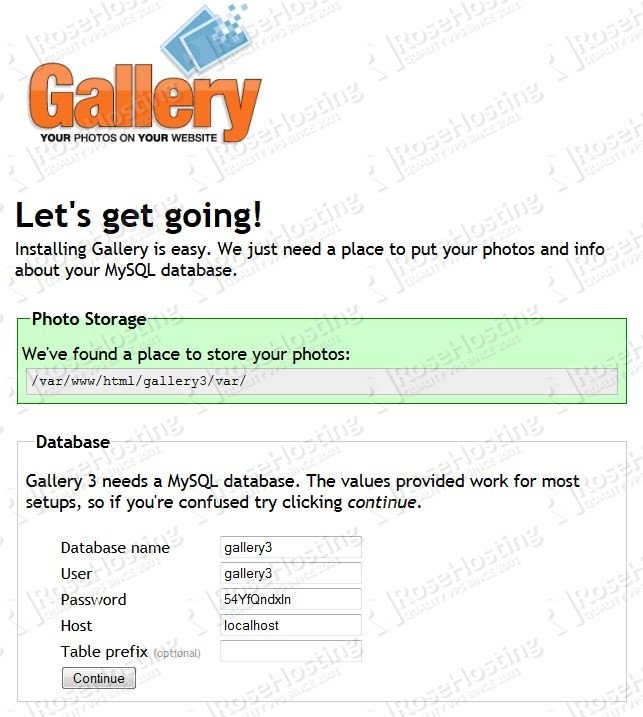
## mysql -u root -p

mysql> CREATE DATABASE gallery3;
mysql> GRANT ALL ON gallery3.* TO gallery3@localhost IDENTIFIED BY '54YfQndxln';
mysql> \q
Download the latest version of Gallery3. At the time of writing this article, the version is 3.0.9. Once you have the URL to the zip archive, pass it to the wget command and run the following:
## wget -O /tmp/gallery3.zip http://downloads.sourceforge.net/project/gallery/gallery3/3.0.9/gallery-3.0.9.zip
## unzip -d /var/www/html /tmp/gallery3.zip
## cd /var/www/html/gallery3
## chown www-data: -R ../gallery3/
with all that in place, navigate to http://yourdomain.tld/gallery3 and install Gallery3 using the web-installer as shown on the screenshot below:
Of course you don’t have to do any of this if you use one of our Linux VPS Hosting services, in which case you can simply ask our expert Linux admins to install Gallery3 for you. They are available 24×7 and will take care of your request immediately.
PS. If you liked this post please share it with your friends on the social networks using the buttons on the left or simply leave a reply below. Thanks.
Thanks, this fixed a few things I was struggling with.
Working great.