
In this tutorial, we will show you how to set up and install ISPConfig 3 on a VPS running Ubuntu 18.04.
ISPConfig is a well-known open-source web hosting control panel that allow us to manage services through a web browser. We can easily add Apache virtual host or Nginx server blocks, create/edit/delete databases, configure cron jobs, create email accounts, and much more. It is a free  alternative to paid control panels – you don’t have to spend any money to use this control panel.
Table of Contents
Prerequisites:
- An Ubuntu 18.04 VPS
- SSH access with root privileges
Step 1: Log in via SSH and Update the System
Log in to your Ubuntu 18.04 VPS with SSH as a root user, or a user with sudo privileges:
ssh root@IP_Address -p Port_number
Replace IP_Address and Port_number with their respective values for your server.
You can check whether you have the proper Ubuntu version installed on your server with the following command:
lsb_release -a
You should get this output:
Distributor ID: Ubuntu
Description: Ubuntu 18.04.2 LTS
Release: 18.04
Codename: bionic
Then, run the following command to make sure that all installed packages on the server are updated to the latest available version:
apt update && apt upgrade
In this tutorial, we will use ubuntu.mydomain.com as the server hostname – a hostname should be an FQDN (a Fully Qualified Domain Name). It is important to use a subdomain as the hostname, and not the main domain. If you do not use a subdomain for the server hostname, you will for example have an issue with amavis and other emailing related programs. Learn more on how to change your hostname.
Step 2: Reconfigure Bash and Stop the ‘apparmor’ Program
We need to use bash as the default system shell, not dash, to proceed with the ISPConfig installation.
dpkg-reconfigure dash
Use dash as the default system shell (/bin/sh)? No
systemctl stop apparmor
systemctl disable apparmor
Check if you have services running on your server already:
netstat -pltn
Step 3: Install MariaDB, Postfix, and Dovecot
Run the folowing commands to install MariaDB, Postfix, and Dovecot.
apt install mariadb-server postfix postfix-mysql openssl dovecot-mysql dovecot-pop3d dovecot-sieve dovecot-lmtpd binutils dovecot-imapd
In the installation process, you will be asked two questions for postfix – make sure you use your hostname as the system mail name.
General type of mail configuration: Internet Site
System mail name: ubuntu.mydomain.com
Next, edit /etc/postfix/master.cf using your preferred text editor.
Basically, we will need to uncomment a few lines in the configuration file and append -o smtpd_client_restrictions=permit_sasl_authenticated,reject under the submission and smtpd sections. The file should look like the following:
submission inet n - y - - smtpd
-o syslog_name=postfix/submission
-o smtpd_tls_security_level=encrypt
-o smtpd_sasl_auth_enable=yes
-o smtpd_client_restrictions=permit_sasl_authenticated,reject
# -o smtpd_reject_unlisted_recipient=no
# -o smtpd_client_restrictions=$mua_client_restrictions
# -o smtpd_helo_restrictions=$mua_helo_restrictions
# -o smtpd_sender_restrictions=$mua_sender_restrictions
# -o smtpd_recipient_restrictions=
# -o smtpd_relay_restrictions=permit_sasl_authenticated,reject
# -o milter_macro_daemon_name=ORIGINATING

smtps inet n - y - - smtpd
-o syslog_name=postfix/smtps
-o smtpd_tls_wrappermode=yes
-o smtpd_sasl_auth_enable=yes
-o smtpd_client_restrictions=permit_sasl_authenticated,reject
# -o smtpd_reject_unlisted_recipient=no
# -o smtpd_client_restrictions=$mua_client_restrictions
# -o smtpd_helo_restrictions=$mua_helo_restrictions
# -o smtpd_sender_restrictions=$mua_sender_restrictions
# -o smtpd_recipient_restrictions=
# -o smtpd_relay_restrictions=permit_sasl_authenticated,reject
# -o milter_macro_daemon_name=ORIGINATING
When done, save and exit the file and restart Postfix:
systemctl restart postfix
At this point, MariaDB is running and we are now going to create a password for the root user. Run the following command to create a root password, remove the test database, remove the anonymous user then reload the privileges.
mysql_secure_installation
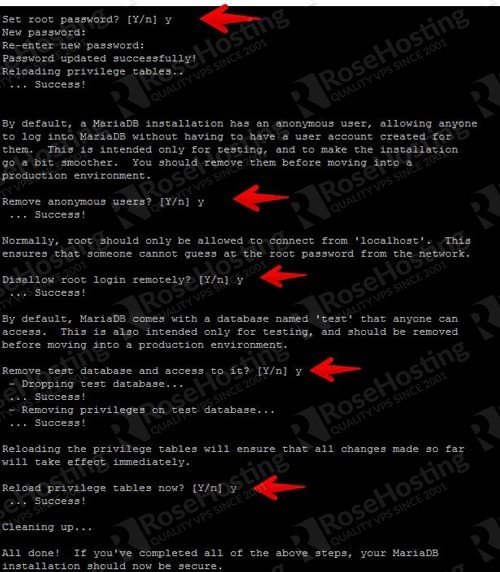
Once created, you can test the password by invoking this command. You will be asked for the root password that you set in the previous command:
# mysql -u root -p
Step 4: Install Spamassassin, Clamav and Amavisd-new
Run the next line to install Spamassassin, Clamav, and Amavisd-new, as well as some required packages for these programs to work properly.
apt install spamassassin clamav clamav-daemon amavisd-new postgrey zip unzip bzip2 arj nomarch lzop cabextract libnet-ldap-perl libauthen-sasl-perl daemon libnet-ident-perl libnet-dns-perl libio-string-perl libio-socket-ssl-perl apt-listchanges
To free some memory usage, we can stop spamassassin. ISPConfig 3 uses amavisd, which loads the Spamassassin libraries internally, so we can stop spamassassin.
systemctl stop spamassassin
systemctl disable spamassassin
freshclam
If you see the error message when running ‘freshclam’ command as shown below, you can ignore it as this means that freshclam is already running:
ERROR: /var/log/clamav/freshclam.log is locked by another process
ERROR: Problem with internal logger (UpdateLogFile = /var/log/clamav/freshclam.log).
systemctl start clamav-daemon
At the time of this article being written, the amavisd-new has a bug in Ubuntu 18.04 that needs to be patched. To fix it, run the following commands:
cd /tmp
wget https://git.ispconfig.org/ispconfig/ispconfig3/raw/stable-3.1/helper_scripts/ubuntu-amavisd-new-2.11.patch
cd /usr/sbin
cp -pf amavisd-new{,.orig}
patch < /tmp/ubuntu-amavisd-new-2.11.patch
You will see the following message. But, if you see an error message, it means that amavisd-new has already been patched.

Step 5: Install Apache and Other Packages
Run the next command to install the packages required by ISPConfig. It’s likely that at least a few of these will already be installed on your system.
apt install apache2 apache2-utils apache2-doc libapache2-mod-php php7.2 php7.2-common php7.2-cli php7.2-mysql php7.2-sqlite3 php7.2-imap php7.2-gd php7.2-cgi php7.2-zip php7.2-mbstring php7.2-opcache php7.2-curl php7.2-intl php7.2-pspell php7.2-recode php7.2-tidy php7.2-xmlrpc php7.2-xsl libapache2-mod-fcgid apache2-suexec-pristine php-pear mcrypt imagemagick libruby memcached php-memcache php-imagick libapache2-mod-python php-gettext php-apcu phpmyadmin mailman roundcube roundcube-core roundcube-mysql roundcube-plugins php-net-sieve tinymce getmail4 javascript-common libjs-jquery-mousewheel rkhunter binutils vlogger webalizer awstats geoip-database libclass-dbi-mysql-perl bind9 dnsutils haveged daemon libio-string-perl libio-socket-ssl-perl libnet-ident-perl quota quotatool libnet-dns-perl pure-ftpd-common pure-ftpd-mysql cabextract certbot
During the installation, you will need to answer some basic questions. If you are asked to select a web server, select Apache2.
Also, you will be asked to enter the MySQL application password for phpMyAdmin and the MySQL application password for Roundcube. You can enter a strong password of your choice or leave them blank to make the system create random passwords for them. Ideally, you would create the password so you can know what the password is.
Configure Apache and PHP
Once the installation of the required packages is completed, it is time to configure the software. Let’s start with Apache. Enable the following Apache and PHP modules:
a2enmod rewrite ssl cgi include actions suexec dav_fs dav auth_digest alias
phpenmod mcrypt
systemctl restart apache2
We also need to configure Roundcube webmail to prevent it from showing server name input in the webmail login form.
nano /etc/roundcube/config.inc.php
Edit the ‘default_host’ value to ‘localhost’
$config['default_host'] = 'localhost';
Save the file, then exit.
Configure pure-ftpd
Since you will have to provide the users with FTP access to your Ubuntu VPS so they can upload and download files, you need to configure a chroot environment. That way, the users will not have access to the rest of the system. Edit the /etc/default/pure-ftpd-common file and change the value for VIRTUALCHROOT from false to true.
nano /etc/default/pure-ftpd-common
VIRTUALCHROOT=true
Save the file and exit, then restart the service for the changes to take effect:
systemctl restart pure-ftpd-mysql
Create a New List for Mailman
We can create a new list for Mailman now.
newlist mailman
You will be asked to enter the email of the person that runs the list as well as a password. The script will provide you with an output of aliases that should be added to the /etc/aliases file.
nano /etc/aliases
The file should be like the following:
# Required aliases
postmaster: root
MAILER-DAEMON: postmaster

# Common aliases
abuse: postmaster
spam: postmaster

# Other aliases
clamav: root

mailman: "|/var/lib/mailman/mail/mailman post mailman"
mailman-admin: "|/var/lib/mailman/mail/mailman admin mailman"
mailman-bounces: "|/var/lib/mailman/mail/mailman bounces mailman"
mailman-confirm: "|/var/lib/mailman/mail/mailman confirm mailman"
mailman-join: "|/var/lib/mailman/mail/mailman join mailman"
mailman-leave: "|/var/lib/mailman/mail/mailman leave mailman"
mailman-owner: "|/var/lib/mailman/mail/mailman owner mailman"
mailman-request: "|/var/lib/mailman/mail/mailman request mailman"
mailman-subscribe: "|/var/lib/mailman/mail/mailman subscribe mailman"
mailman-unsubscribe: "|/var/lib/mailman/mail/mailman unsubscribe mailman"
Save and close the file. Initialize the alias database and restart the services.
newaliases
systemctl restart mailman
Disable awstats cron
nano /etc/cron.d/awstats
We need to comment out all lines in that file by appending “#” in front of the lines, it should be like this:
#MAILTO=root

#*/10 * * * * www-data [ -x /usr/share/awstats/tools/update.sh ] && /usr/share/awstats/tools/update.sh

# Generate static reports:
#10 03 * * * www-data [ -x /usr/share/awstats/tools/buildstatic.sh ] && /usr/share/awstats/tools/buildstatic.sh
Step 6: Install Fail2Ban
You can skip this step, but for security purpose it is recommended to have Fail2Ban running on your server. This temporarily bans the IP addresses of computers that attempt to log in through SSH too many times. Run this command to install it:
apt install fail2ban -y
Once installed, use your preferred text editor to edit the configuration file for Fail2Ban.
nano /etc/fail2ban/jail.local
[pure-ftpd]
enabled = true
port = ftp
filter = pure-ftpd
logpath = /var/log/syslog
maxretry = 3

[dovecot]
enabled = true
filter = dovecot
action = iptables-multiport[name=dovecot-pop3imap, port="pop3,pop3s,imap,imaps", protocol=tcp]
logpath = /var/log/mail.log
maxretry = 5

[postfix]
enabled = true
port = smtp
filter = postfix
logpath = /var/log/mail.log
maxretry = 3
Step 7: Install Jailkit
If you want to chroot your SSH users, you need to install Jailkit prior to installing ISPConfig.
apt-get -y install build-essential autoconf automake1.11 libtool flex bison debhelper
cd /tmp
wget http://olivier.sessink.nl/jailkit/jailkit-2.20.tar.gz
tar xvfz jailkit-2.20.tar.gz
cd jailkit*
echo 5 > debian/compat

./debian/rules binary
Now we can install Jailkit with the following command:
cd ..
dpkg -i jailkit_2.20-1_*.deb
Step 8: Install ISPConfig 3
Finally, let’s install ISPConfig. Download the latest release and install it by using the following command.s:
cd /tmp
wget -O ispconfig.tar.gz https://git.ispconfig.org/ispconfig/ispconfig3/repository/archive.tar.gz?ref=stable-3.1
tar xfz ispconfig.tar.gz
cd ispconfig3*/install/
php -q install.php
Answer the questions to complete the installation and then access the ISPConfig hosting control panel at: http://yourIPAddress:8080
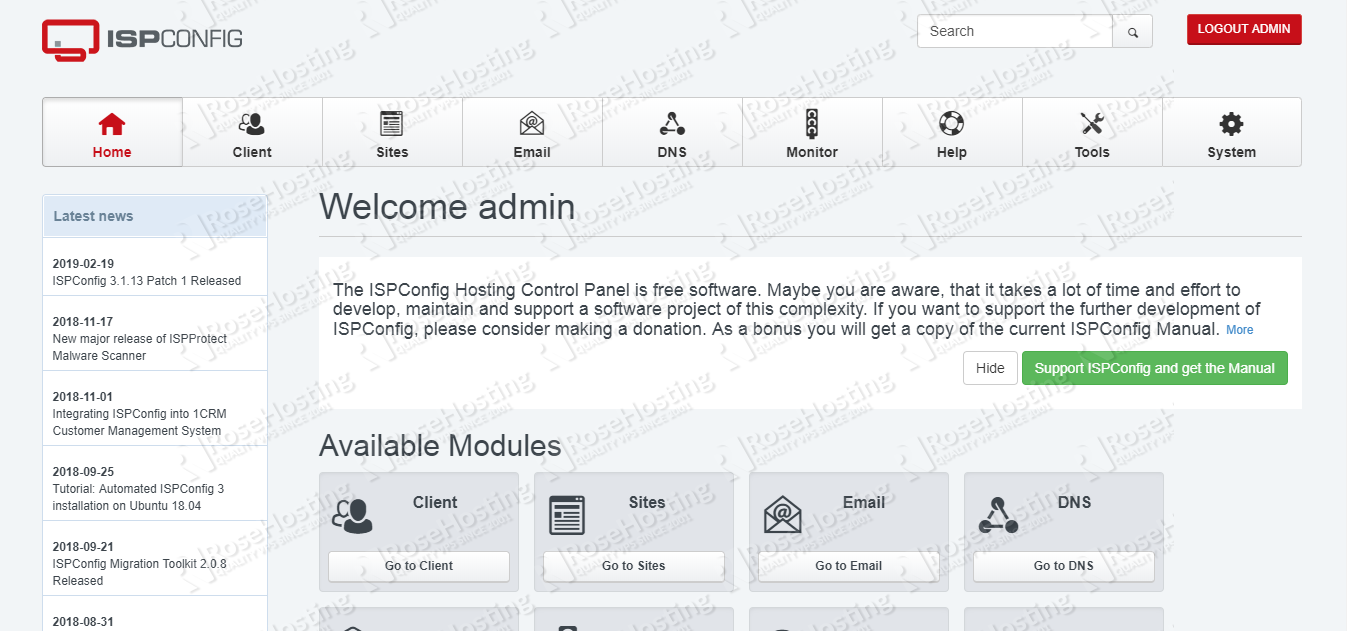
Congratulations! At this point, you should be able to access ISPConfig at http://yourIPAddress:8080 . For more information about ISPConfig, its features and configuration, please check their official documentation.
Feel free to check out our tutorial on how to install ISPConfig 3 on CentOS 3.
 Of course, you don’t have to know how to install ISPConfig on Ubuntu 18.04 if you use our Ubuntu 18.04 VPS Hosting services. You can simply ask our support team to install ISPConfig on Ubuntu 18.04 for you. They are available 24/7, and will be able to help you with the installation of ISPConfig on Ubuntu 18.04.
PS. If you enjoy reading this blog post on installing ISPConfig on Ubuntu 18.04, feel free to share it on social networks, or simply leave a comment down in the comments section. Thank you.
In Step 8
the correct link today for ispconfig
wget https://git.ispconfig.org/ispconfig/ispconfig3/raw/develop/helper_scripts/ubuntu-amavisd-new-2.11.patch
Thanks!
Hi there. Thanks for posting that!
As of today, i’m actually trying to follow your steps but some error came up along the way. Im doing my best to google those errors and figure out why they occur. It would be nice to be able to chat with you. Tommy
Hello,
So I installed ISP config and after I went to the website and i got hmmmm…can’t reach this page. I setup the IP and the domain properly and everything else. I added all the ports to. Please help!
Thank you
You can verify the issue by looking at the log files.