
Java is a free, open-source, high-level, object-oriented programming language that is designed to have as few implementation dependencies and it can run on all major operating systems that support Java without the need for recompilation.
Java 17 LTS is the latest long-term support release that includes security and performance updates, and of-course bug fixes.
Installing Java on Ubuntu 20.04 server is easy, however, it’s important to know which ‘type’ of Java you need:
- OpenJDK is a free and open-source implementation of the Java SE Platform Edition.
- Oracle JDK is the closed-source in-house version of Java developed entirely by Oracle.
Oracle Java is more oriented towards the enterprise market, with longer version support lifespans than OpenJDK.
Prerequisites
- An Ubuntu 20.04 VPS (we’ll be using our NVMe 2 VPS plan)
- Access to the root user account (or access to an admin account with root privileges)
Table of Contents
Log in to the Server & Update the Server OS Packages
First, log in to your Ubuntu 20.04 server via SSH as the root user:
ssh root@IP_Address -p Port_number
You will need to replace ‘IP_Address‘ and ‘Port_number‘ with your server’s respective IP address and SSH port number. Additionally, replace ‘root’ with the username of the admin account if necessary.
Before starting, you have to make sure that all Ubuntu OS packages installed on the server are up to date. You can do this by running the following commands:
apt-get update
apt-get upgrade
Install OpenJDK 17 from Ubuntu 20.04 Repository
Ubuntu 20.04’s default repository included Java 17. This is the easiest way to install the JDK using the apt package manager:
apt install openjdk-17-jdk openjdk-17-jre
Once installed, verify the Java version using the following command:
java -version
You should get the following output:
openjdk 17.0.2 2022-01-18
OpenJDK Runtime Environment (build 17.0.2+8-Ubuntu-120.04)
OpenJDK 64-Bit Server VM (build 17.0.2+8-Ubuntu-120.04, mixed mode, sharing
Install Oracle JDK 17 on Ubuntu 20.04 – APT PPA Method
By default, Oracle Java is not available in the Ubuntu 20.04 default repository. You will need to add the third-party repository in your system in order to install Oracle Java.
First, install the required dependencies with the following command:
apt-get install gnupg2 software-properties-common
Once all the dependencies are installed, add the Java repository with the following command:
add-apt-repository ppa:linuxuprising/java
When the repository is added, you can install it with the following command:
apt-get install oracle-java17-installer oracle-java17-set-default
You will see this installer window where you are supposed to agree to the License Terms.
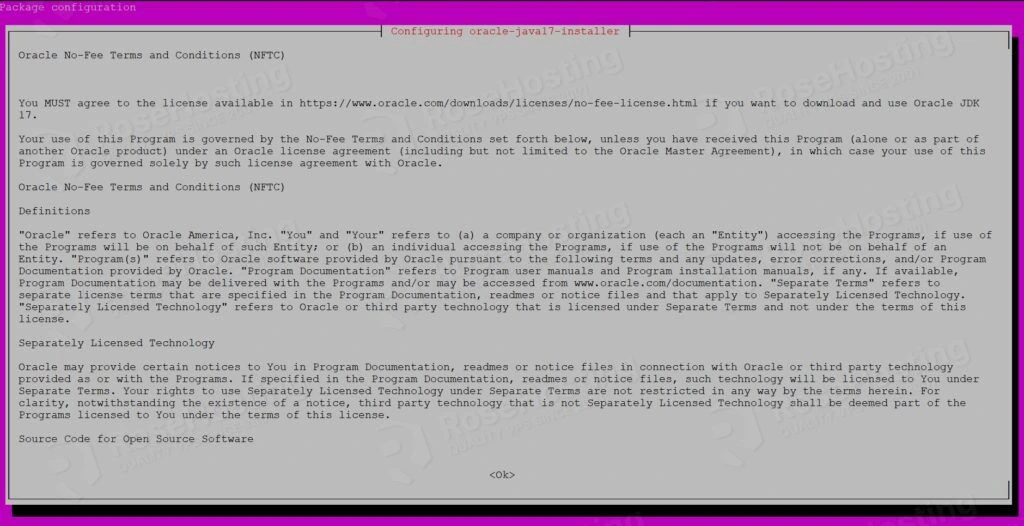
Agree to the License Terms by clicking Yes:

Once the installation has been finished, verify the installed version of Java by checking the version:
java -version
You should get the following output:
java version "17.0.1" 2021-10-19 LTS
Java(TM) SE Runtime Environment (build 17.0.1+12-LTS-39)
Java HotSpot(TM) 64-Bit Server VM (build 17.0.1+12-LTS-39, mixed mode, sharing)
Install Oracle JDK 17 on Ubuntu 20.04 – DPKG Method
First, install the required dependencies using the following command:
apt install libc6-i386 libc6-x32 libxi6 libxtst6
After installing all the required dependencies, you can download the .deb package using a wget command:
wget https://download.oracle.com/java/17/latest/jdk-17_linux-x64_bin.deb
Once you have downloaded the .deb package, run the following command to install Java:
dpkg -i jdk-17_linux-x64_bin.deb
Set environment variables using these commands below:
export JAVA_HOME=/usr/lib/jvm/jdk-17/
export PATH=$PATH:$JAVA_HOME/bin
Next, set your Java environment path in the /etc/environment file:
nano /etc/environment
Add the following line:
JAVA_HOME="/usr/lib/jvm/jdk-17"
Next, activate the Java environment variable with the following command:
source /etc/environment
You can now verify the JAVA_HOME environment variable with the following command:
echo $JAVA_HOME
You should get the following output:
/usr/lib/jvm/jdk-17
You can now verify the version of Java using the following command:
java -version
Output:
java version "17.0.2" 2022-01-18 LTS
Java(TM) SE Runtime Environment (build 17.0.2+8-LTS-86)
Java HotSpot(TM) 64-Bit Server VM (build 17.0.2+8-LTS-86, mixed mode, sharing)
Install Oracle JDK 17 on Ubuntu 20.04 – Manual Method
You can download it using the following command:
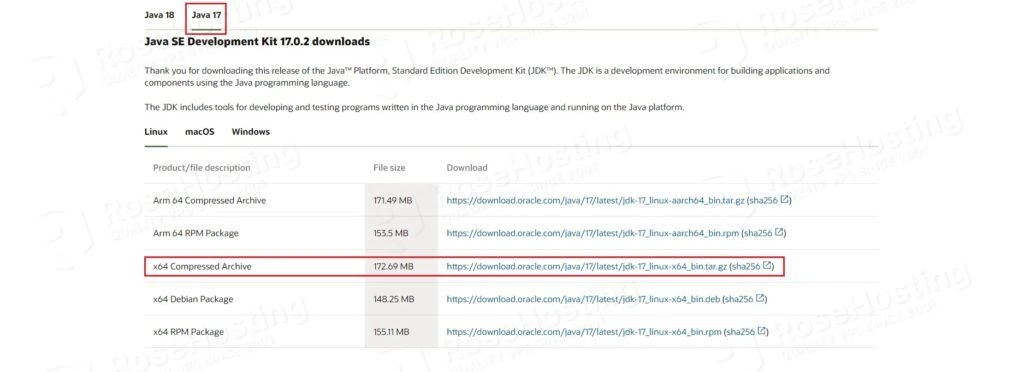
wget https://download.oracle.com/java/17/latest/jdk-17_linux-x64_bin.tar.gz
Once the tarball is downloaded, verify the tarball checksum with the following command:
sha256sum jdk-17_linux-x64_bin.tar.gz
You should see an output that looks similar to the one below:
342e76bb9ded80aa1edd566efbae42f8f1c2366e19b9189e5941b45893b9861f jdk-17_linux-x64_bin.tar.gz
Compare the hash value from the above output to the checksum value on the Oracle download page. If they match, that means the file’s integrity is validated.
You have successfully downloaded the Java JDK 17 file and now you will extract it to the /opt directory using the tar command:
tar xvzf jdk-17_linux-x64_bin.tar.gz -C /opt
Now you need to set the environment variables as below:
export JAVA_HOME=/opt/jdk-17.0.2
export PATH=$PATH:$JAVA_HOME/bin
Verify the JAVA_HOME environment variable with the following command:
echo $JAVA_HOME
You should get the following output:
/opt/jdk-17.0.2
Java 17 is now installed. To confirm, use the following commands:
java -version
If installed correctly, you should see the following output:
java 17.0.2 2022-01-18 LTS
Java(TM) SE Runtime Environment (build 17.0.2+8-LTS-86)
Java HotSpot(TM) 64-Bit Server VM (build 17.0.2+8-LTS-86, mixed mode, sharing)
As you can see, you can see the version is the latest Java 17 JDK build.
In this tutorial, you learned how to install Java JDK 17 on Ubuntu 20.04 server.
Of course, you don’t have to do any of this if you use one of our Linux VPS Hosting services, in which case you can ask our expert Linux admins to set it up for you. They are available 24/7 and will take care of your request immediately.
PS. If you liked this post please share it with your friends on social networks or simply leave a reply below. Thanks.
There’s no need to install openjdk-17-jre when installing openjdk-17-jdk, because it’s already included:
Attemping to install the jdk shows:
“`
The following additional packages will be installed:
openjdk-17-jdk-headless openjdk-17-jre openjdk-17-jre-headless
“`
the ist method is working properly thaks got clear explaination
I know this is old but the proper way to install the Java packages are:
sudo apt install openjdk-17-jre openjdk-17-jdk
Because the JDK will try to create certificates based on the JRE install.